Archive
Pink Macarons
Said relative who recently opened a cafe wanted macarons on her menu. And again, i was tasked to experiment with recipes for both shell and filling…
So here you go!

I’m not exactly an expert on macarons.

But i hope these are good enough to display..

Laduree’s Macarons Framboise
Raspberry Macarons
Taken from Not So Humble Pie
Yields approximately 50-60 1″ cookies
Macaron shells
275g (2 3/4 cups + 1 tbsp) ground almonds (almond flour)
250g (2 cups + 1 tbsp) confectioners (icing) sugar
210g (6 1/2) egg whites (I used fresh egg whites)
210g (1 cup + 1 tbsp) granulated sugar
a few drops red or maroon food coloring gel
To make the macaron cookies. Preheat your oven to 300°F with an oven rack in the lower third (If your cookies tend to burst, move the rack higher. If your cookies tend to brown, move the rack lower).
Combine almond flour and confectioners sugar together in a food processer and blend thoroughly. Sift the mixture through a medium gauge sifter to remove any lumps or large pieces of almond and repeat until fine.
In a large clean dry mixing bowl, beat your egg whites until foamy and then slowly add the granulated sugar beating on medium speed. Once the sugar has disolved, increase speed to medium high and beat until a thick glossy meringue forms. Add the food coloring and beat briefly to combine.
With a large flat rubber spatula, fold one third of your sifted almond/sugar into the egg whites until combined. Repeat, until you’ve added all the almond mixture. How much mixing beyond incorporation is the tricky part to describe.
If you’re used to my most recent macaron recipe, you’ll find that this recipe needs a few strokes more mixing. The batter is thicker and packs a lot of air and if you don’t deflate it during mixing your shells may have nipples or crack.
Pipe your cookies onto parchment or silicone baking mats (I used parchment and a Ateco round #11 tip) and then allow to rest for 10-15 minutes before baking.
Bake one sheet at a time for 15 minutes. To prevent hollows, I recommend snatching one cookie from the oven and breaking it open prior to removing the cookie sheet. If the insides are still overly moist or molten, leave the cookies in the oven for 1-5minutes longer until the insides are set. This will prevent the insides from collapsing during cooling and forming hollows.
Allow the cookies to cool completely on the baking sheet.
Fill the cookies with a small dollop of jam and then arrange in an air tight container. Refrigerate the cookies for a minimum of 24 hours to mature. Then bring to room temperature and serve.
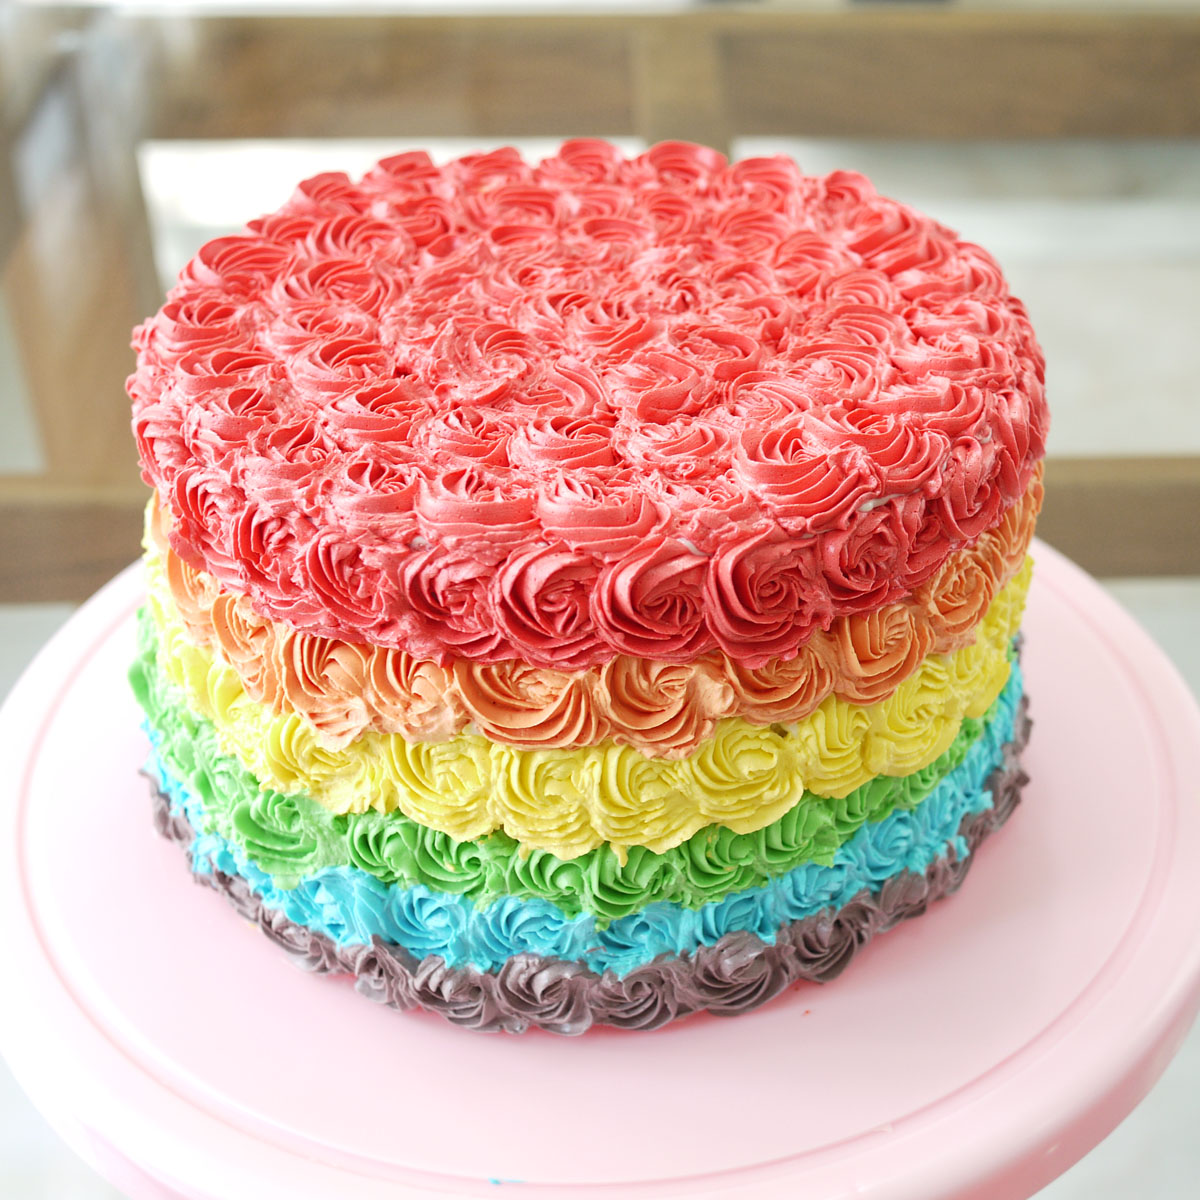
Rainbow Cake
I know, I know, rainbow cakes are ‘so yesterday’…
But truthfully, even at its rage, where every baker, every cake shops, and every blog was speckled with at least one ‘rainbow’ item. I wasn’t tempted at the very least to make one. Mostly because of the amount of work involved. And maybe because of the amount of food coloring that went into it.
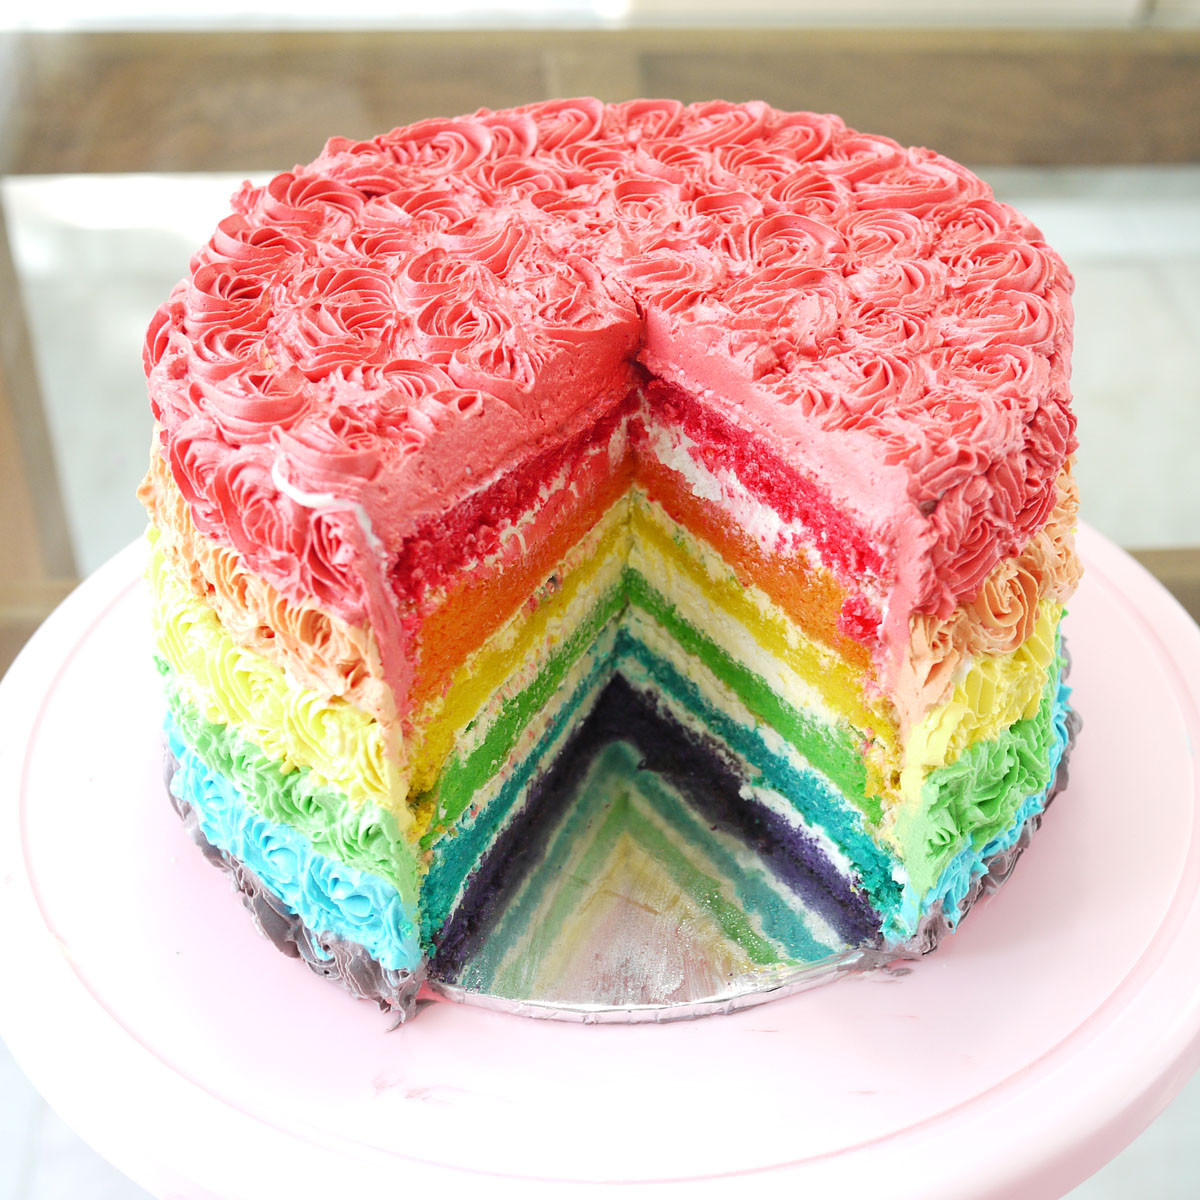
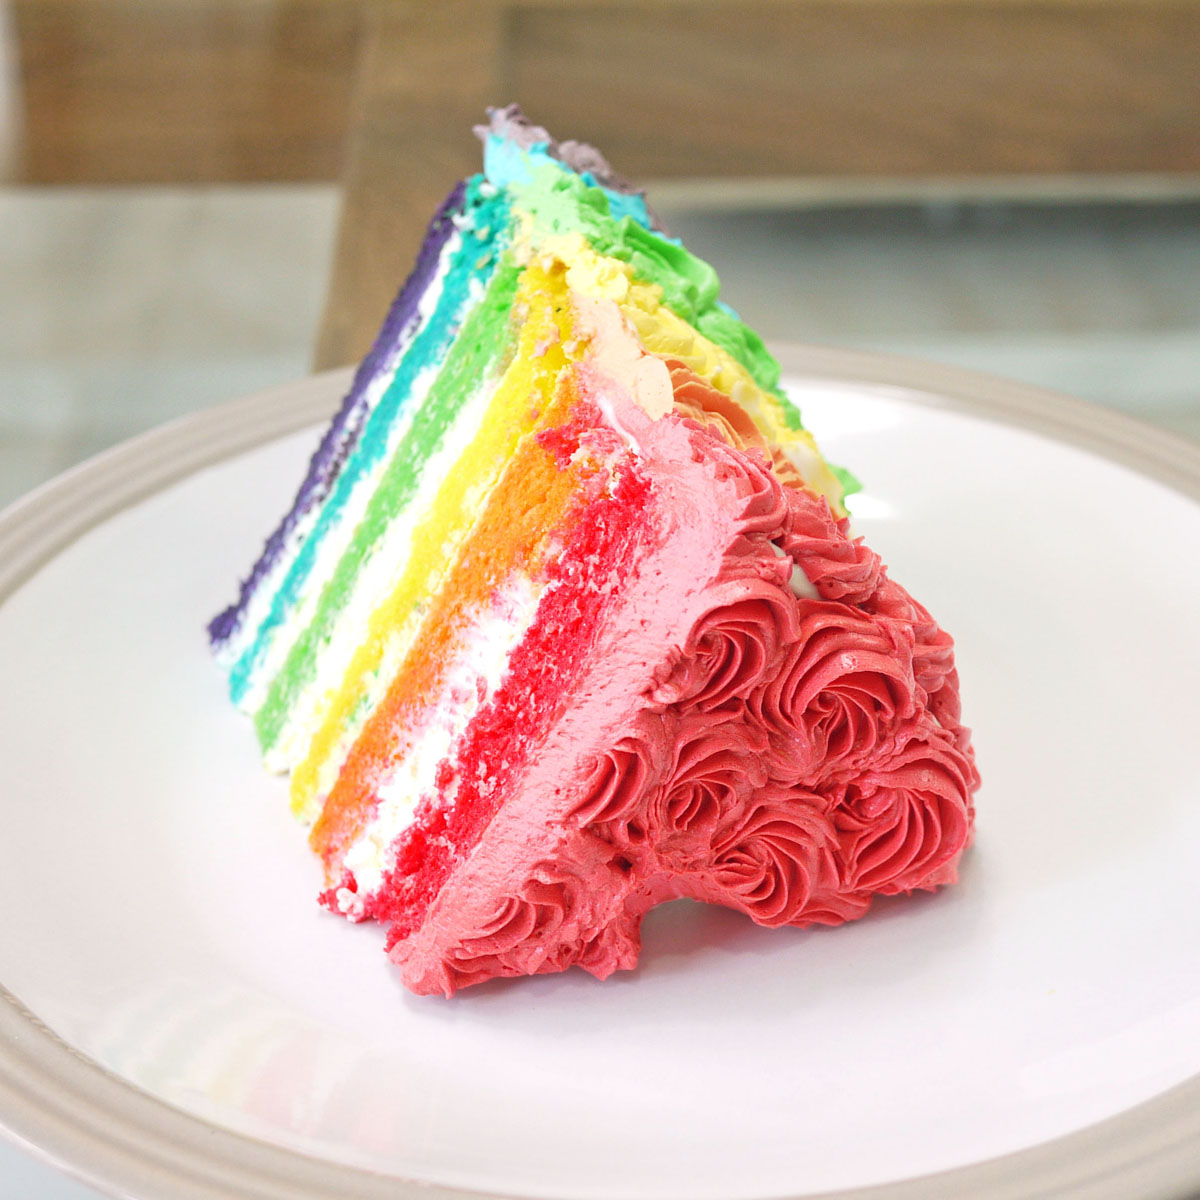
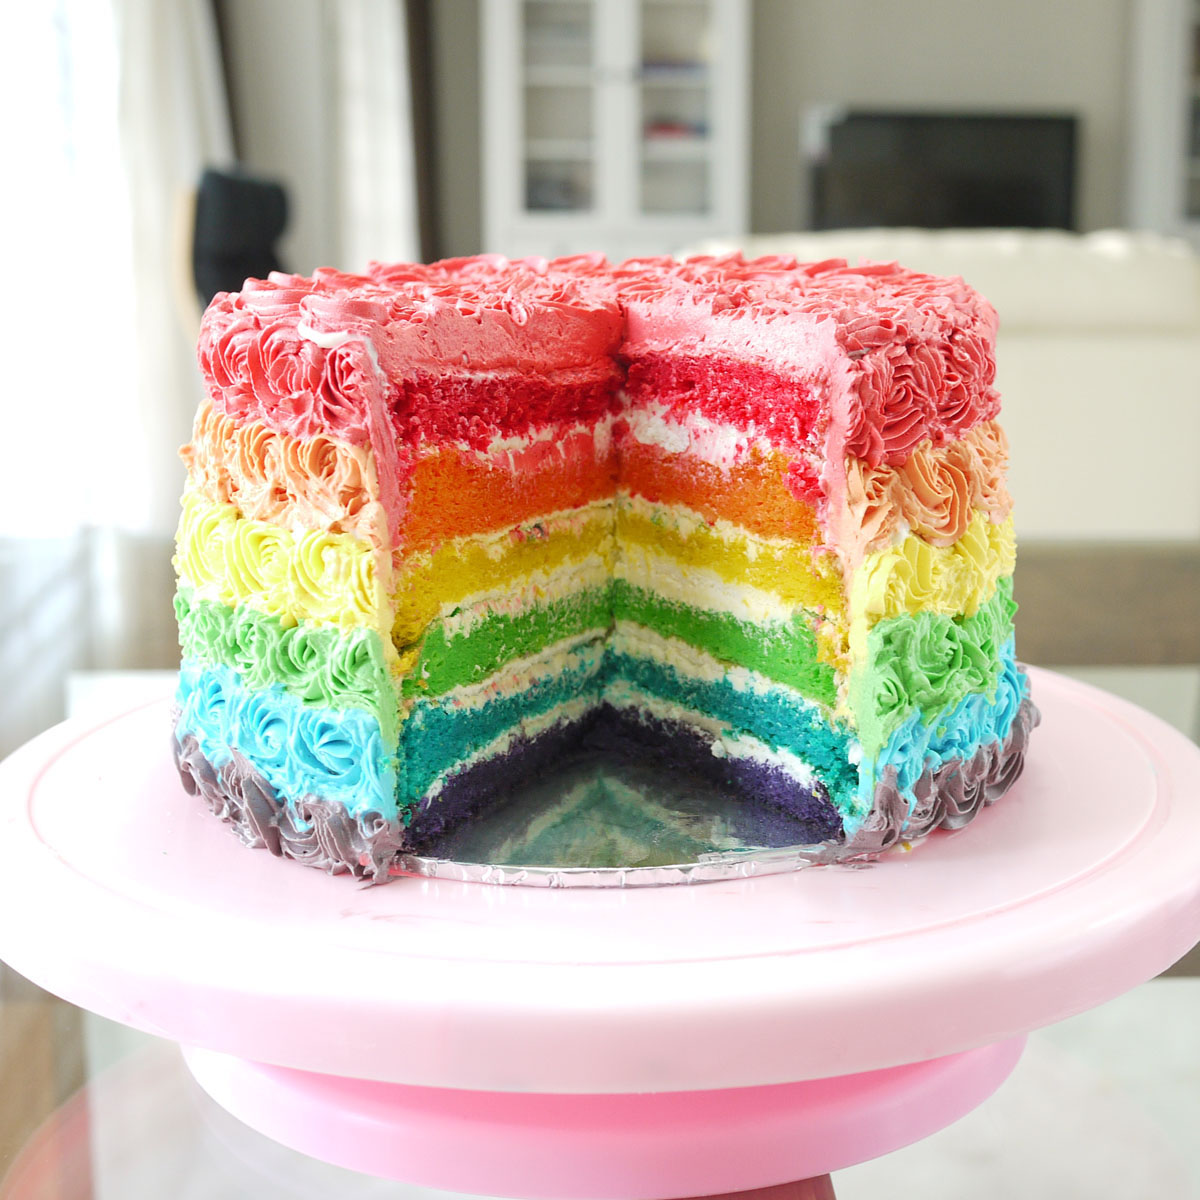
Even now, as i sit typing this, the one slice of cake that i cut for the photos remain untouched.
So why make rainbow cake you ask?
Well you see, a close relative of mine has just opened up a cafe. She wanted rainbow cake on the menu and I was to experiment with a few recipes and decorating options.

The cake had to be pretty enough to sit on her display chiller. So I decided to pipe rainbow roses around and on the cake.

It’s a lot of work, a lot of piping bags, and a lot of bowls. But i came up with a good solution on how to minimize them. First, I tinted a good amount of buttercream YELLOW. I took my first pipping bag, and piped yellow roses on where it should be. Then i divided ALL yellow buttercream into two. Onto one bowl of my yellow buttercream, and added a few drops of red to make ORANGE. In a way, you can say that i am recycling my yellow buttercream to make orange. And when i am done with my orange roses, i added even more red coloring to make my RED buttercream.
To the second batch of yellow butter, I added drops of blue to make GREEN buttercream. Leftover green buttercream were added with more blue coloring to make BLUE buttercream. And when i am done, I took leftover RED buttercream, mix with BLUE buttercream and my final color, which is PURPLE buttercream.
Which pretty much means that instead of ending up with all 6 colors of buttercream, I was left with only leftover purple buttercream.
Geez, I hope i dont confuse you.
Whatever the case, I hope my relative’s pastry chef has the patience of a Saint. Because if making this rainbow cake daily was one of the job descriptions, I would tender my resignation.
Rainbow Cake Recipe:
Taken from NCC Rainbows Week
SPONGE CAKE
by Hera
A:
16 egg yolks
8 egg whites
200 gram sugar
B:
160 gram AP flour
20 gr milk powder
20 gr cornflour
C
200 gr butter,melted
Red, Yellow, Orange, Blue, Green, Purple colorings
How To:
1) Beat eggs and sugar till ribbon stage
2) Sift ingredients B into a bowl. Slowly fold ingredients B onto the whisked eggs.
3) Fold in the melted butter.
4) Divide batter into 6, and add colorings into each one of them.
5) Pour each of the colored batter onto a tin measuring 20 cm in diameter.
7) Bake for 18-20 minute @ 175 °C or till cakes are fully cooked (You can do a skewer test here)
8) When the cake layers are cool, layer each cake with the cream cheese frosting
Frosting Cream Cheese:
Bahan:
350 ml Whipping cream
250 gr Cream Cheese
110 gr icing75 gr butter unsalted
Cara:
Whip the whipping cream, set aside in the refrigerator.
Beat Cream Cheese, butter n sugar
Add Whipped cream into the cream cheese mixture and beat till well mixed.
For the buttercream frosting, i used Martha Stewart’s Swiss meringue buttercream.
Recipe can be found here
Happy Father’s Day
Having a baby automatically adds three extra celebrations to your household. There’s the baby’s birthday, which is due next month. There is Mother’s day, which was spent unceremoniously in the mall, cause Mr. Crustabakes didn’t have a clue it was Mother’s day. And there is Father’s day.

I am thrilled to have these three additional celebrations. I baked a cake for the occasion because I didn’t want to let the opportunity to celebrate ( and bake a cake) slide.
This was truly a “play it by the ear” cake. No planning was made for the cake. I just visualized Mr Crustabakes’ face and kind of go with the flow. While the eyes, nose and pink cheeks were inspired by Mr. Pringles. The blue collared shirt, spiky hair, and the day old beard are signature of Mr. Crustabakes.
Happy Father’s day, Tong!
In case you were wondering, it’s a two tiered red velvet cake with cream cheese frosting, Both tier were full fondant, with crushed oreo for “beard”
For the red velvet cake recipe:
Taken from Oprah.Com
- 2 1/4 cups sifted cake flour (not self-rising)
- 1/4 cup Dutch-process cocoa powder
- 1/2 tsp. salt
- 8 Tbsp. (1 stick) unsalted butter , at room temperature
- 1 1/2 cups sugar
- 2 large eggs , at room temperature
- 2 Tbsp. liquid red food coloring
- 1 tsp. vanilla extract | Get the recipe!
- 1 cup buttermilk , at room temperature
- 2 tsp. distilled white vinegar
- 1 tsp. baking soda
- 2 packages (8 ounces apiece) cream cheese , at room temperature
- 8 Tbsp. (1 stick) unsalted butter , at room temperature
- 2 1/2 cups confectioners’ sugar , sifted
- 1 tsp. vanilla extract | Get the recipe!
- Pinch of salt
Sift flour, cocoa, and salt into a bowl.
In stand mixer with paddle attachment, beat butter at low speed until creamy. Add sugar; blend on medium speed, scraping bowl occasionally, until fluffy, about 3 minutes. Add eggs 1 at a time, mixing well after each. Scrape bowl; add food coloring and vanilla. On low speed, beat in flour mixture in thirds, alternating with buttermilk, beginning and ending with flour mixture. In small bowl, stir together vinegar and baking soda. Stir into batter. Divide batter between prepared pans; spread evenly. Bake until a toothpick inserted in center comes out clean, 25 to 30 minutes. Cool in pans 10 minutes. Run a knife around edges and turn layers out onto racks. Remove paper and flip cakes; cool completely. Freeze for 30 minutes.
To make frosting: In stand mixer with paddle attachment, beat cream cheese and butter at medium speed until smooth, about 1 minute. Add sugar, vanilla, and salt. Blend on low speed for 30 seconds; beat on medium-high until fluffy.
To assemble: Cut layers in half horizontally with a serrated knife. Place 1 layer, cut side up, on a serving plate; spread with 1/2 cup frosting. Repeat twice. Add last layer, top side up. Ice cake thinly with 3/4 cup frosting to crumb-coat. Refrigerate 20 minutes; finish frosting.
Gyudon – Japanese Beef Rice Bowl
I was walking in the beef section of the supermarket when i came across a display of thinly sliced beef. They were all pre-packed, and unlabelled.
I remember asking Nami, of Just one Cookbook, what was the best type of beef for Yoshinoya’s kind of beef bowl. She answered that they were just cheap scraps of beef, also known as komagire.
I took one pack of the beef in my hand, and discovered that they had strings of fats at the sides of each slice, which is just the way Yoshinoya’s beef was. At Rp.18000/100grams (about $2),these packs were also considerably cheaper than the shabu beefs, which were placed just a few metres away.
I purchased a pack, and went ahead with my Gyudon adventure.

And, so here it is,
These beef slices were slightly chewier and tougher than Yoshinoya’s. I guess it’s because they weren’t as thinly sliced.
Following Nami’s recipe, but omitting the egg, the flavour of this dish come pretty close to Yoshinoya’s.

Whoopee! Another Just One Cookbook recipe that’s becoming a staple in our household.
Prep Time: 10 minutes
Cook Time: 20 minutes
Yield: Serves 2-3
Ingredients:
- 1 onion
- 2 green onions
- 3/4 lb thinly sliced beef (Shabu Shabu beef or Komagire beef)
- 1 Tbsp. oil
- 2 tsp. sugar
- 2 Tbsp. sake
- 2 Tbsp. mirin
- 1 Tbsp. soy sauce
- 3 eggs (omitted)
- pickled ginger (Kizami Shoga) for garnish (omitted)
Instructions:
- Slice the onion and green onion thinly, and cut the meat into small pieces.
- Heat the skillet over medium high heat and add the oil. Stir-fry the onions until wilted.
- Add the beef and sprinkle sugar and cook until browned.
- Add sake, mirin, and soy sauce and mix together.
- Reduce the heat and simmer until most of the liquid is gone.
- Pour the beaten egg all over the meat and cover quickly. Cook until the eggs are almost cooked. Add the green onion right before you remove from the heat. (I omitted this step)
- Serve over steamed rice and drizzle the sauce over. Top with pickled ginger if you like.
Enjoy!
Sourdough Sandwich Bread
After all the sourdough recipes you had to put up with, I am glad to say that the sourdough adventure is almost coming to an end.
You see, my previous recipes were all recipes that didn’t require the lifting powers of the yeast thriving in the sourdough starter. Items such as brownies, muffins, pancakes, waffles all had either baking powder or baking soda in them that did the lifting. The sourdough starter was superfluous at the very best. It’s just there to add flavour, or as a means to use up all the sourdough discard that came with each sourdough feeding.
Last night however, i put my sourdough starter to its ultimate test. I baked a bread with it.

Unlike instant yeast which probably takes two hours to proof, i had to let it sit for about three hours for its first proofing, and another 5 hours for its final proofing.

Nevertheless, I am pretty happy with the result. The bread came out sufficiently soft with that sour twang that trademark sour twang that comes with sourdough bread! I can’t believe i just baked a bread with yeast that i grew in my own kitchen!
Yay Me!
Sourdough Sandwich Bread
Slightly modified from “Rahasia Membuat Roti Sehat & Lezat Ragi Alami” by Sangjin Ko
375 grams Bread Flour
180 grams sourdough starter
7 grams salt
37 grams sugar
165 grams water
30 ml milk
45 grams butter
In a bowl, mix the flour, salt, sugar and sourdough starter. Make a hole in the middle and pour the water and milk into it. Mix well. Transfer the batter onto a table top that has been dusted with flour. Add the butter, and knead till is elastic and stops being sticky.
Shape the dough into a bowl. Cover and let to proof at room temperature till it doubles in size (3 hours).
Punch the dough down to let out excess air. Divide dough into 2. Cover with plastic and let rest for another 30 minutes.
Grease you S\sandwich tin with butter. Preheat oven to 200 degree celcius.
Take one of the dough, flatten it and roll it up like a swill roll. Place the dough onto the sandwich tin.
Let the dough proof for another 2 hours (i left mine to proof for 5 hours).
Bake the dough at 180 degree clecius, for about 30 minutes till the tops get crusty and golden brown.
Chicken Katsu Curry
I am not exactly proud of my contribution to this month’s Little Thumbs Up event. Hosted by Miss B of Everyone Eats Well in Flanders , and organized by Zoe from Bake For Happy Kids and Doreen from my little favourite D.I.Y, the selected ingredient for this month is curry.

While most curry dishes require long and engaging cooking activities, mine was pretty much instant with the use of Japanese instant curry blocks.

All i had to do was just to brown some onions and cook some carrots and potatoes. At this point, you could choose to add in some meat into your pot of vegetables too. But i decided to go an extra mile by breading and frying my chicken.
I guess it’s my way of making up, since i was already using instant Japanese curry paste.
Chicken Katsu Curry
(Serves 1)
1 piece of chicken thigh (deboned)
Salt & Pepper
2 tbs flour
Egg
Panko Crumbs
1/2 potato
1./2 caroot
1.2 onion
a cup of water
1 Tbs oil
Curry Block (I used S&B brand)
For the chicken katsu
Pat dry the chicken thigh, and season with salt and pepper.
Coat the thigh in flour, dredge it in the beaten egg, den re-coat it again in the panko crumbs
Fry till cooked and golden brown
For the curry
Brown the onion in the oil. Add carrots and potatoes. Add a cup of water and let the mixture boil till carrots and potatoes are tender.
When the water has reduced to about half a cup, add the curry block in and stir till dissolved. Keep cooking until bubbles appear.
Serve curry over white rice. Add the chicken katsu.
Sourdough batter Onion Rings

Yet another sourdough recipe. This time, sourdough discard was used to make the batter to dip these onion rings. Looks like there is no end to the wonders of sourdough!
Sourdough Onion Rings
taken from Williams Sonoma
Ingredients:
- 2 cups sourdough starter
- 1/2 cup cold sparkling water
- 1/2 tsp. sea salt, plus more, to taste
- 3 large onions, peeled and cut into 1/2-inch
slices - 1 cup all-purpose white bread flour
- Peanut or canola oil for deep-frying
Directions:
Fill a large bowl with ice cubes and place a medium bowl on top of the ice. In the medium bowl, combine the sourdough starter, sparkling water and the 1/2 tsp. salt and stir to mix. Separate the onions into rings, leaving the centers intact. Place the flour in a shallow bowl and toss the onions in the flour to coat.
In a deep fryer, pour in the oil and heat to 370°F on a deep-frying thermometer. Dip the flour-coated onion rings, one at a time, into the sourdough starter mixture, then drop them into the hot oil. Fry in a single layer, turning if necessary, until they are golden brown. Using a slotted spoon, transfer the onion rings to the baking sheet and season with salt. Place the baking sheet in the oven and fry the next batch. Be sure the oil returns to 370ºF before adding the onions or they will be greasy.
Sourdough Brownies
Not bringing anything much to the table today. Just another sourdough discard recipe.
*hangs head in shame*

I wasnt expecting anything extraordinary from this recipe. To me, it was just another recipe to help me save my daily sourdough discard.

But i must say, i am pleasantly surprised at how they turned out. Dense, fudgy, and very chocolatey.

Just like how good brownies should be!
Sourdough Brownies
Taken from the Wild Yeast
Yield: 24 brownies (9 x 13-inch pan)
Time:
- Mix: 10 minutes
- Bake: 40 minutes
Final Dough Ingredients:
- 300 g 72% cocoa (bittersweet) chocolate, chopped
- 226 g unsalted butter, cut into pieces
- 200 g sugar
- 6 g (1 teaspoon) salt
- 8.4 g (2 teaspoons) vanilla extract
- 160 g (3 whole) eggs, at room temperature
- 40 g cocoa powder
- 220 g mature 100%-hydration sourdough starter
Method:
- Preheat the oven to 325F.
- Butter a 9 x 13-inch metal baking pan. Line the bottom of the pan with parchment, and butter the parchment.
- In the microwave, melt together the chocolate and the butter. Check it frequently to make sure it doesn’t burn.
- Whisk in the sugar, salt, and vanilla.
- Add the eggs one at a time, whisking to combine after each addition.
- Sift the cocoa powder over the chocolate mixture and stir to combine.
- Add the starter and stir gently until it is completely incorporated.
- Turn the batter into the prepared pan and bake for about 40 minutes, until a bamboo skewer inserted in the center come out clean.
- Cool in the pan for 20 minutes, then loosen the edges with a knife, invert onto parchment paper, and re-invert onto a cooling rack.
- When completely cool, cut into squares.
A baking addict who loves to give away all her baked products to willing (or unwilling) recipients to make room for more baking. i would love to hear from you! Email me at twilightzky@hotmail.com
Flickr Photos


Foodgawker

Paperblog

Yummy

