Archive
Happy Idul Adha
This cake is made to honor the cows to be slaughtered tomorrow.
And to wish all my Muslim Friends Happy Idul Adha.


Happy Holidays everyone!
Peach Pie
I am taking a break from all the healthy, wholesome cooking to make way for this peach pie.
This pie is a full butter, double crusted, gluten-full pie made from refined white wheat flour.
The peaches came from a can which probably leached BPA.
White refined sugar was added to the peaches.

While the overall goal here is to make healthier, whole foods to feed my family. I’m taking baby steps towards it.
That canned peach? It was something I unwittingly bought a few months ago. I am using it as I am clearing my pantry of the less healthy food items and replacing it with the healthier ones.

Having said that, I don’t think i will go to the extremeties such as completely eliminating a certain food.
I ‘ll still use wheat flour to create gluten-full bread.
I will still dump cupfuls of sugar into my cookies. ( well, maybe I will hold back just a little)

My version of “healthy” is defined in the most universal way. Health ideas that most of us can unanimously agree on. And my first focus would be to buy ingredients as fresh and as less processed as possible.
I really don’t like the idea of reading the ingredient list on say, a pack of biscuit in the supermarket and not being able to pronounce some of the items listed there, be it preservatives, additives, or even coloring, So if i were really craving for that pack of biscuit, i would load up my grocery cart with flour, butter, sugar and whatever it takes to make that biscuit.
So wish me luck everyone. *tosses empty can of peach*
Peach Pie
Makes a small pie with a diameter of about 12 cm
80 grams flour
60 grams butter, cubed and frozen
pinch of salt
pinch of sugar
1 to 1.5 tablespoon ice cold water
Filling
1 tbs beaten egg
1 cup of peaches (I used canned peach)
1 tbs flour
25 grams sugar
pinch of cinnamon
pinch of salt
1/2 tbs butter
1. In a food processor, add the flour, salt and sugar and pulse a couple of times.
2. Add the butter, and pulse a few times until the mixture resembles peas.
3. Add ice water and pulse. The dough should start to hold together.
4. Remove dough from the food processor, and place it over your working surface. Form the dough into two discs, cover in pastic wrap and refrigerate for at least one hour.
5. Preheat oven to 425 F
6. Take the dough discs and roll it out till it’s at least 18 cm in diameter.
7. Place the rolled dough and arrange it into the pie dish. Brush the pie crust with egg whites so that it doesnt get soggy.
8. In a large bowl, place the sliced peaches. In another bowl, mix the flour, sugar cinnamon,salt and the beaten egg. Pour the mixture over the sliced peaches and mix gently with a wooden spoon.
9. Roll the second disc of dough to make the top crust. Cut small round holes into the disc to let air during baking
10. Spoon peaches onto the pie dish, cover with the second dough, folding the edges under.Dip a fork in the egg wash, and start pressing the edges with the tines of the fork.
11. Bake for 10 mins in a preheated oven. the reduce the heat to 350 F and bake for an additional 30-35 mins.
12. Cool before removing from pie dish,
Coconut Flour Banana Chiffon Cake
I’ve been observing numerous foodblogs and their abstinence to grains.
A Grain-Free diet, as they call it, is a diet devoid of grains. This includes things like rice, barley, oats, etc.
To summarize, ALL the flours in my pantry, be it rice flour, wheat flour or corn flour unmitigatedly breach this grain free diet.
“So what the heck are you supposed to bake with?” screamed the baker in me.
Well, take it easy, Because baking is still possible without the above mentioned flours. Days after days of blogstalking activities revealed that almond flour (almond being a nut, not a grain), and coconut flour (coconut is a fruit), are the top favourites amongst the grain-free dieters.
And since i live in the tropics where coconuts are aplenty. I am using coconut flour on this grain free adventure

but WHY ???? you ask. Aren’t grains good for you? Aren’t they full of fiber? Don’t they reduce the risk of heart diseases.
Well, i guess there are two sides to every story.
The followers of a grain free diet believe that:
1. Grain are inflammatory food due to its high starch content.
Grains that are refined have higher inflammatory index than unrefined grains. So a white flour is more inflammatory than a whole wheat flour.
2. Grain contain phytic acid which binds minerals and prevent absorbtion.
This pretty much means that you won’t be able to fully and effeciently absorb the minerals that the grains boasts about.
3. Grains are linked to tooth decay.
High starches in grain is a breeding ground for bacterial growth in your mouth.
There are probably a more extensive list of the detrimental effects of grains. But I’ll leave it up to you guys to research into it on your own. My brain is starting to hurt just by highlighting the three points above. I guess i could never look into health advisor as an occupation.

Sugar Free Coconut Flour Chiffon Banana Cake with blueberries
Makes two ramekins
5 grams coconut flour
1 egg yolk (preferable organic)
10 grams coconut oil
10 grams coconut milk
60 grams ripe bananas, mashed
1 egg white
a handful of frozen blueberries
Preheat oven to 165 C (330 F).
Mix egg yolk, mashed banana, coconut flour, oil, and milk into a bowl. Stir till you get a smooth batter
Beat egg white till stiff peak.
Fold egg white into banana batter
Transfer batter into ramekins
Drop blueberries on the batter
Bake for +- 20 minutes or till the cake turns a golden brown
Nigella’s Caramel Croissant Pudding
What strikes me the most about Nigella Lawson is her beauty.
It’s almost a pity that she is hosting a cooking show instead of starring in a blockbuster movie. What a waste of pretty face, me thinks.
After watching numerous episodes of her show, I’ve come to conclude that Nigella’s style of cooking comes with a careless wanton. She is not very rigid on her measurements. It’s always a “drizzle of this” or a “handful of that”. That doesn’t sit well with me. My sense of estimation is tragically useless.
Thankfully, someone was able to convert her recipes into teaspoons, tablespoons and cups. Precise instructions are my bedrock. Without it, I am just a piece of wood drifting about cluelessly in the world of culinary.
So the recipe I’ve chosen for this month’s cook like a star , organised by Bake for Happy Kids, Joyce from Kitchen Flavours and Anuja from Simple Baking – is Nigella’s Caramel croissant pudding.


What made this pudding stand out is the use of croissant instead of the common stale bread. This made a very soft, melt-in-your-mouth pudding texture which you barely have to chew.
So, grab a spoon and dig in!

Recipe taken from Food Network.
Caramel Croissant Pudding
2 stale croissants
1/2 cup sugar
2 tablespoons water
1/2 cup heavy cream
2 tablespoons bourbon
1/2 cup whole milk
2 eggs, beaten
Directions
Preheat the oven to 350 degrees F.
Tear the croissants into pieces and put in a small gratin dish; I use a cast iron oval with a capacity of about 500ml/ 2 cups for this.
Put the sugar and water into a saucepan, and swirl around to help dissolve the sugar before putting the saucepan on the hob over medium to high heat. Caramelize the sugar and water mixture by letting it bubble away until it all turns a deep amber colour; this will take 3 to 5 minutes. Keep looking but don’t be too timid.
Take the pan off the heat and add the cream – ignoring all spluttering – followed by the bourbon and milk. Whisk to mix, then still whisking add the beaten eggs. Pour this quickly over the croissants and leave to steep for 10 minutes.
Place in the preheated oven for 20 minutes and prepare to swoon.
Caitlyn’s Sugar Free Cupcakes with Avocado Frosting
I know, i know, majority of you would probably feel repulsed by yet another sugar free, gluten free baby food.
But i feel the need to post this recipe, namely because it’s a recipe I’ve developed myself.
After rounds and rounds of trial error, I’ve finally came up with a cake recipe i really loved.
A cake recipe that’s subtly sweet and soft as can be.
Considering that this is an entirely sugar free (refined/unrefined, synthetic/natural), this is quite a breakthrough. No stevia, no xylitol, or any of that fancy sweeteners was used here.
The goodness came from ripe bananas.

Working with my sugar free constraints, I also wanted to come up with a frosting that’s equally healthy for these cupcakes. For days, I find myself sometimes staring into blank space. I just couldn’t think of something that’s naturally sweet and is thick enough to pipe.
Then the idea hit me. avocadoes! At first I was skeptical, I didnt know whether blended avocadoes would be too watery. I also thought that avocadoes would be too tasteless as a frosting. That’s when i decided to drop in some medjool dates in. And boy, did it work like a charm! and most importanly, baby Caitlyn loves it!
Sugar Free, Gluten Free Chiffon cake with Avocado Date Frosting
Makes 3 of the above star shaped cupcakes
15 grams rice flour
5 grams sago flour
1 organic egg yolk
8 grams olive oil
11 grams raw almond milk
60 grams banana, mashed
1 organic egg white
Preheat oven to 170 degree celcius.
In a bowl, mix the yolk, raw almond milk, bananas, and olive oil together. Sift in the flours.
Beat the egg whites till stiff peaks.
Fold the egg whites into the banana mixture.
Pour into mold and bake till golden brown (+- 20 to 25 minutes)
Avocado Frosting
1 avocado
1 medjool date
With a blender, blend the avocado and the date together.
Using a piping bag, pipe onto cupcakes.
Durian Cream Puff
Mr. Crustabakes is never one to care for diplomacy.
If i made something that didn’t appeal to his delicate taste buds, he’ll express it point blank.
He calls it “being honest”. i call it “tactless”
So when he said “I wish to eat this at least ONE more time in my life”. It was the crowning accomplishment of all my baking history.
I couldn’t believe it came from a cream puff.

DURIAN cream puff to be exact.
I wish it were something more sophisticated, more cosmopolitan. Like a macaron.
But homeboy likes it “domestic” (He grew up in Singapore)

Which is ironic because the durian in the filling came all the way from Thailand. I’ve splurged and bought the premier Monthong Durian which were guaranteed of its sweetness.

If you were wondering why i am making so many durian themed dessert,
It’s because i am entering my second post to July’s Aspiring baker: Tropical Spiky Month, hosted by Charmaine of Mimi Bakery House

Also because i have a durian crazed husband, who loves durian in everything.
Choux Paste Recipe (makes 2)
50 ml water
32 gram butter
38 grams all purpose flour
1 egg
pinch of salt
Preheat oven to 180 degree celcius
Over the stove, heat the water and butter together till it comes to a rolling boil. Add all the flour and salt, and mix till it comes together in a dough. Set aside to cool.
Add the egg, and beat into the dough. Mix till well combined.
Put dough into pipping bag, and pipe on greased baking paper
Bake for 30 mins or till the choux turn golden brown
Cool completely before filling.
Durian Filling
Whipping cream 30 grams
Durian Flesh 90 grams
whip the cream till soft peaks, Add the durian flesh, and mix till well combined.
Happy Birthday Baby Caitlyn!
On this date last year, I was making breakfast for your dad when i experienced a bout of intense stomach contractions that made me grip the kitchen counter.
“Is this it?”, I thought to myself panicking. I glanced at my unpacked “maternity” luggage a few feet away from the kitchen door. I’m not due until two weeks later.
“Let’s not panic”, I thought to myself. First time mothers usually take up to 15 hours to birth their child, i soothed myself , remembering my doctor’s words.

I finished scrambling my eggs of a breakfast, and fetched my list of “to brings” that the hospital gave me.
I scanned the list. Another wave of panic attack came over me. “Breast pump”, i whispered aloud. I cursed myself repeatedly for stalling in buying one. A vision of my sister who successfully breastfed her kids till they were two years old each came into my mind. ” You need breast pump. It is very, very,VERY important”.

I pushed that out of my mind, I wondered if I could actually purchase breastpump while IN labor. I went into the shower, and spent a good 15 minutes not doing anything. Just standing under the warm running water (Green activists can hate me for wasting water, but please bear with the panic stricken mother-to-be).
The warm water felt comforting. The contractions didn’t reappear. I composed myself. Maybe it’s just a false alarm. I got dressed and got ready for work, vowing to buy breastpumps later that evening.

On the way to work, another wave of strong contractions made me close my eyes and wince in surrender. I dialled the hospital’s number and made an appointment to see the doctor. It was the smartest thing I’ve ever done, because 14 hours later, a slimy screaming baby was pulled out of me.

“Happy Birthday Baby Caitlyn”. May you be blessed with a wealth of health and love.Mommy can’t even begin to describe how much she loves you.
PS: this is a two tiered cake. The first tier is a sugar free cake for Caitlyn, the second layer is just an average sponge cake for adults.
Sugar Free Sponge Cake with Pear Jam:
For a 10 cm cake
1 egg yolk
2 egg whites
35 ml pear concentrate (made by simmering 105 ml of pear juice till it reduced to third)
15 grams olive oil
25 grams AP flour
5 grams cornflour
Boil olive oil with pear concentrate till the mixture steams. Set aside to warm
Add in egg yolk to the olive oil mixture. Slowly stir in the AP and cornflour.
Beat egg whites till soft peaks. Fold into the flour mixture.
Bake at 170 degree till cooked (+-15 minutes )
Slice the cake halfway, spread the sugar free pear jam and sandwich it with the top layer.
Sugar Free Pear Jam
50ml of homemade pear concentrate (made by simmering 150 ml of pear juice till it reduced to a third)
1/2 tsp arrowroot starch, dissolved in a bit of water.
Stir the arrowroot starch into the pear concentrate.
Simmer till thick and bubbly
Set aside to cool
I am entering this post into the Slightly Indulgent Tuesdays, organized by Amy simplysugarandglutenfree. Slightly Indulgent Tuesdays is a very delightful weekly linky which aims at sharing gluten and sugar free recipes. While this recipe is not gluten free, it is still a very healthful sugar free recipe 😉
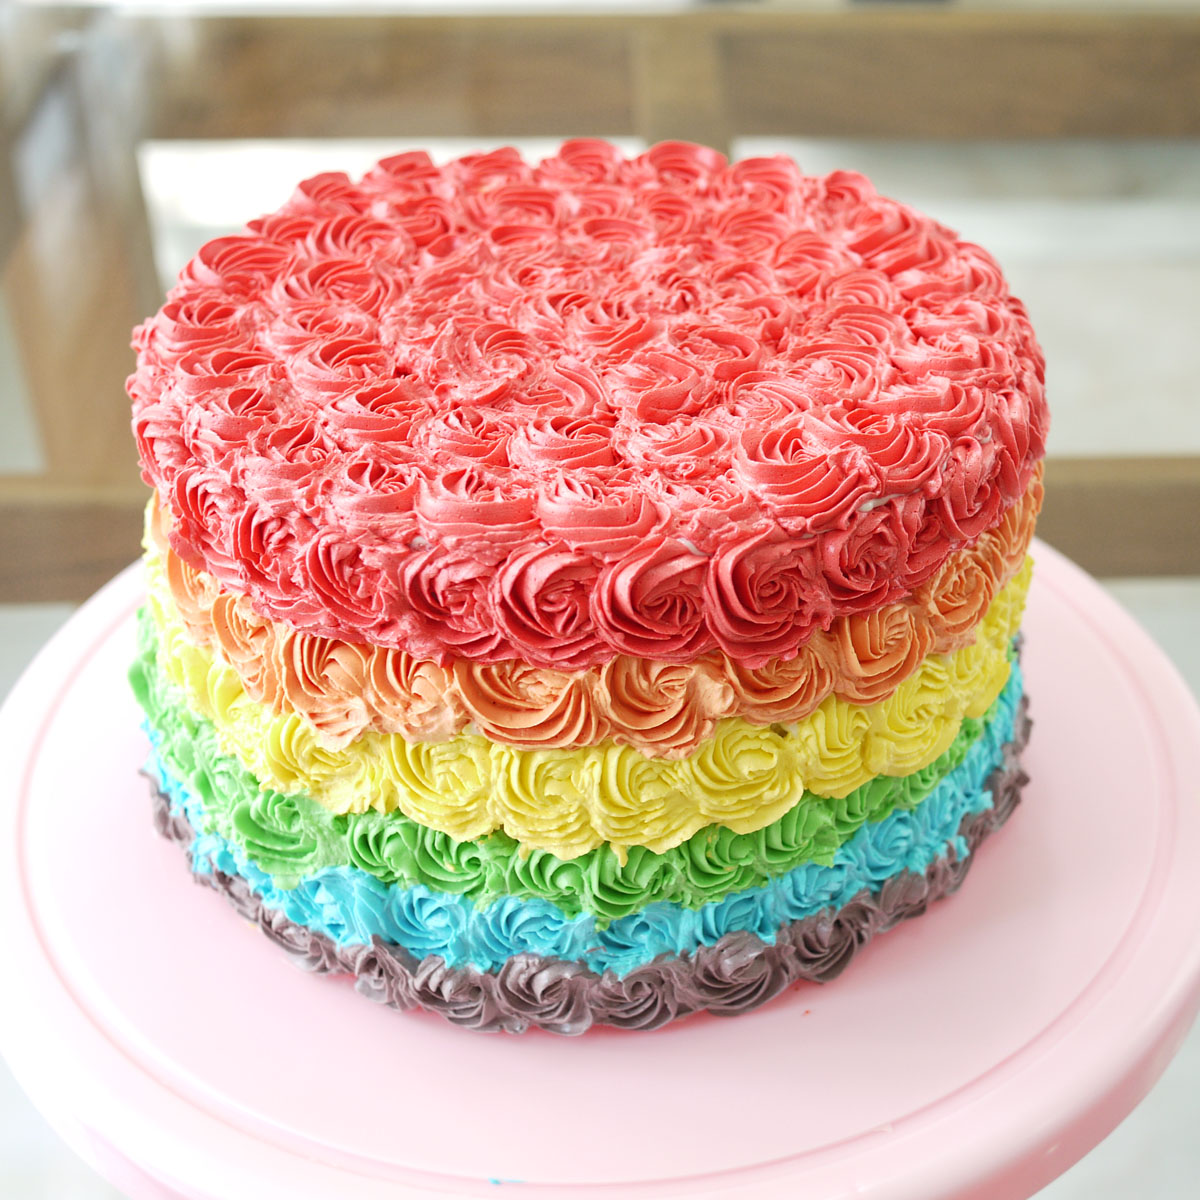
Rainbow Cake
I know, I know, rainbow cakes are ‘so yesterday’…
But truthfully, even at its rage, where every baker, every cake shops, and every blog was speckled with at least one ‘rainbow’ item. I wasn’t tempted at the very least to make one. Mostly because of the amount of work involved. And maybe because of the amount of food coloring that went into it.
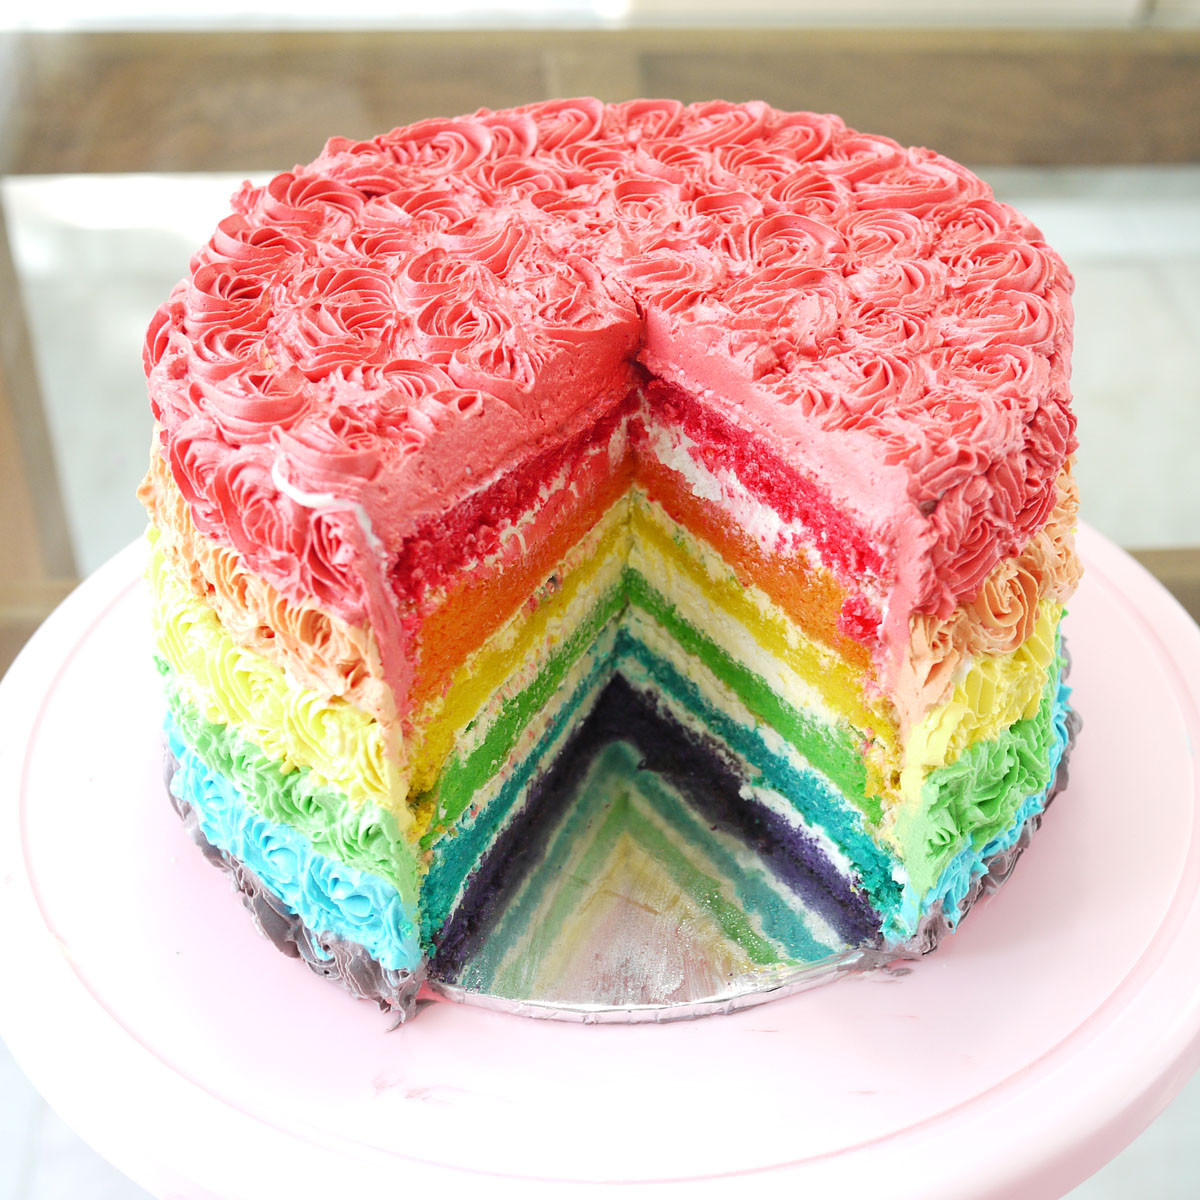
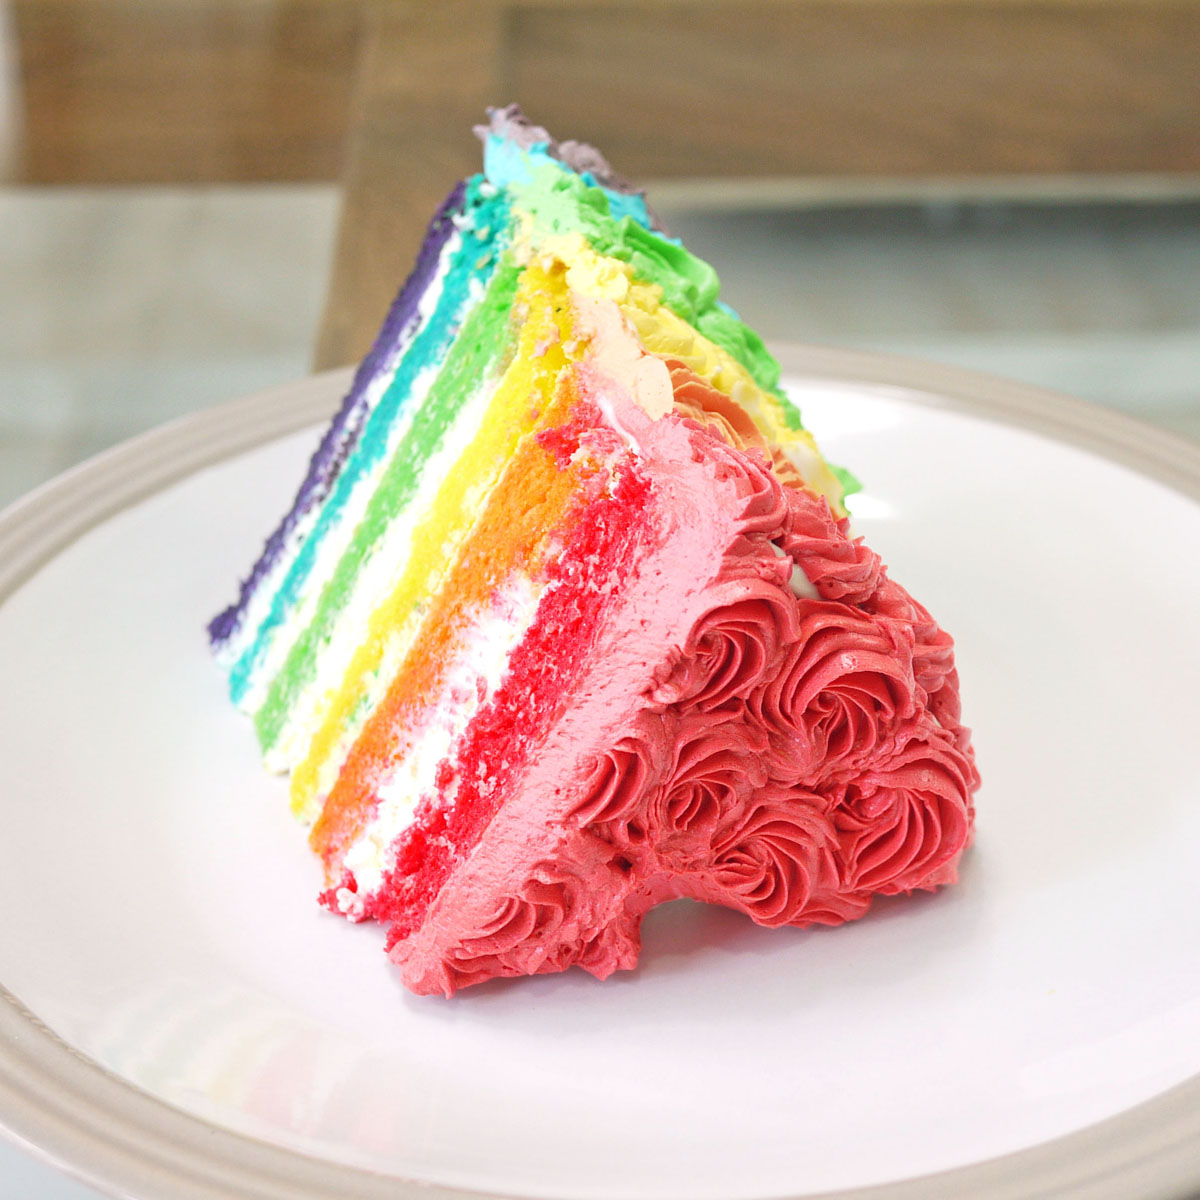
Even now, as i sit typing this, the one slice of cake that i cut for the photos remain untouched.
So why make rainbow cake you ask?
Well you see, a close relative of mine has just opened up a cafe. She wanted rainbow cake on the menu and I was to experiment with a few recipes and decorating options.

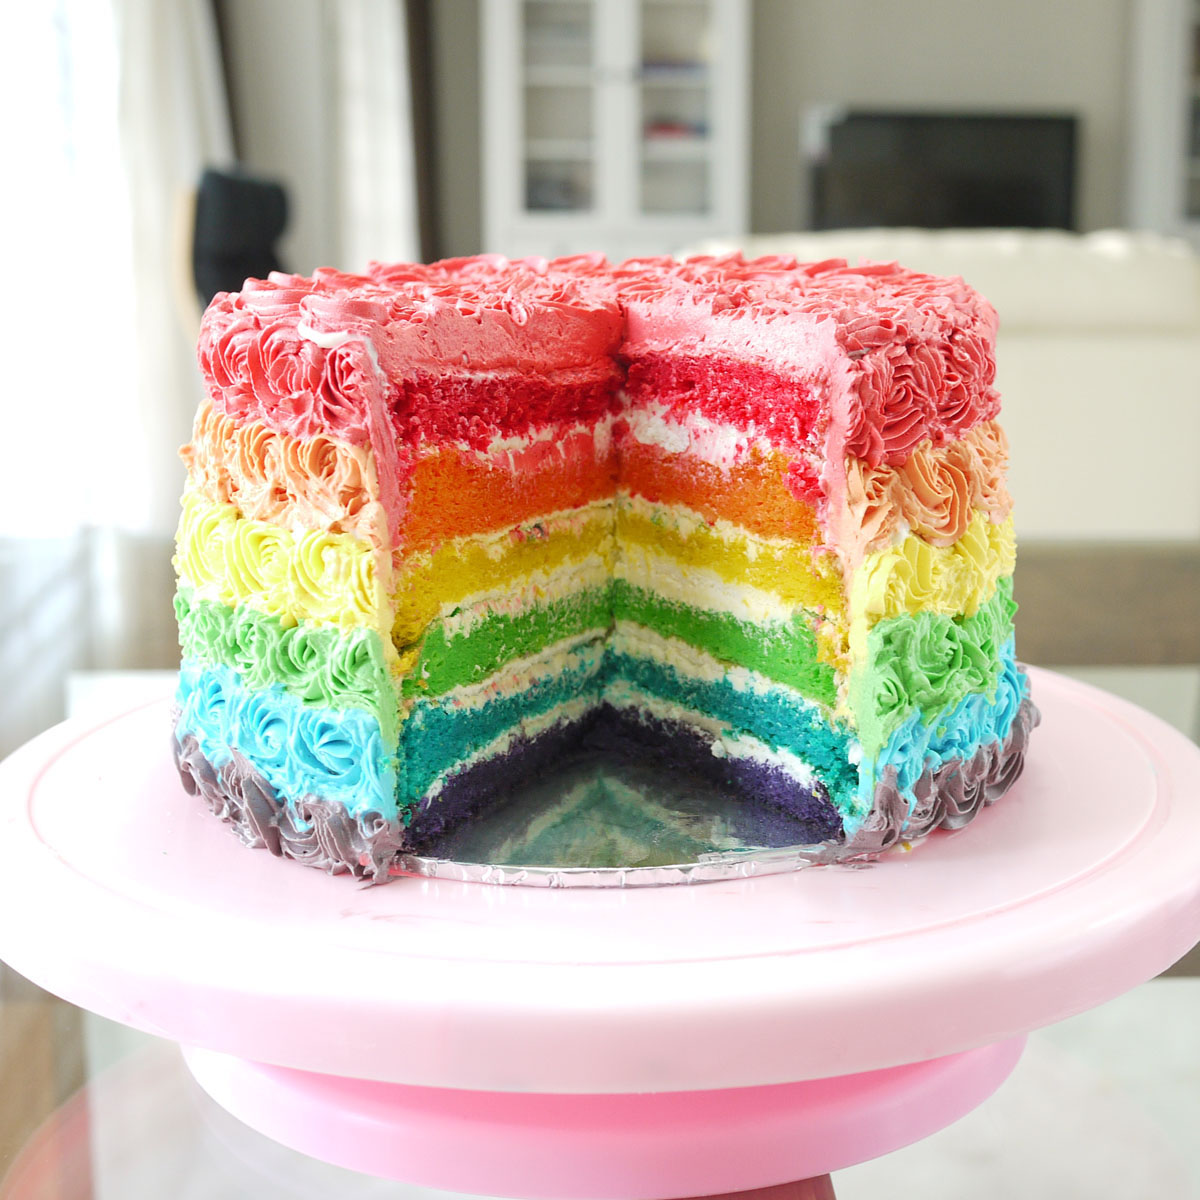
The cake had to be pretty enough to sit on her display chiller. So I decided to pipe rainbow roses around and on the cake.

It’s a lot of work, a lot of piping bags, and a lot of bowls. But i came up with a good solution on how to minimize them. First, I tinted a good amount of buttercream YELLOW. I took my first pipping bag, and piped yellow roses on where it should be. Then i divided ALL yellow buttercream into two. Onto one bowl of my yellow buttercream, and added a few drops of red to make ORANGE. In a way, you can say that i am recycling my yellow buttercream to make orange. And when i am done with my orange roses, i added even more red coloring to make my RED buttercream.
To the second batch of yellow butter, I added drops of blue to make GREEN buttercream. Leftover green buttercream were added with more blue coloring to make BLUE buttercream. And when i am done, I took leftover RED buttercream, mix with BLUE buttercream and my final color, which is PURPLE buttercream.
Which pretty much means that instead of ending up with all 6 colors of buttercream, I was left with only leftover purple buttercream.
Geez, I hope i dont confuse you.
Whatever the case, I hope my relative’s pastry chef has the patience of a Saint. Because if making this rainbow cake daily was one of the job descriptions, I would tender my resignation.
Rainbow Cake Recipe:
Taken from NCC Rainbows Week
SPONGE CAKE
by Hera
A:
16 egg yolks
8 egg whites
200 gram sugar
B:
160 gram AP flour
20 gr milk powder
20 gr cornflour
C
200 gr butter,melted
Red, Yellow, Orange, Blue, Green, Purple colorings
How To:
1) Beat eggs and sugar till ribbon stage
2) Sift ingredients B into a bowl. Slowly fold ingredients B onto the whisked eggs.
3) Fold in the melted butter.
4) Divide batter into 6, and add colorings into each one of them.
5) Pour each of the colored batter onto a tin measuring 20 cm in diameter.
7) Bake for 18-20 minute @ 175 °C or till cakes are fully cooked (You can do a skewer test here)
8) When the cake layers are cool, layer each cake with the cream cheese frosting
Frosting Cream Cheese:
Bahan:
350 ml Whipping cream
250 gr Cream Cheese
110 gr icing75 gr butter unsalted
Cara:
Whip the whipping cream, set aside in the refrigerator.
Beat Cream Cheese, butter n sugar
Add Whipped cream into the cream cheese mixture and beat till well mixed.
For the buttercream frosting, i used Martha Stewart’s Swiss meringue buttercream.
Recipe can be found here
Sourdough Sandwich Bread
After all the sourdough recipes you had to put up with, I am glad to say that the sourdough adventure is almost coming to an end.
You see, my previous recipes were all recipes that didn’t require the lifting powers of the yeast thriving in the sourdough starter. Items such as brownies, muffins, pancakes, waffles all had either baking powder or baking soda in them that did the lifting. The sourdough starter was superfluous at the very best. It’s just there to add flavour, or as a means to use up all the sourdough discard that came with each sourdough feeding.
Last night however, i put my sourdough starter to its ultimate test. I baked a bread with it.

Unlike instant yeast which probably takes two hours to proof, i had to let it sit for about three hours for its first proofing, and another 5 hours for its final proofing.

Nevertheless, I am pretty happy with the result. The bread came out sufficiently soft with that sour twang that trademark sour twang that comes with sourdough bread! I can’t believe i just baked a bread with yeast that i grew in my own kitchen!
Yay Me!
Sourdough Sandwich Bread
Slightly modified from “Rahasia Membuat Roti Sehat & Lezat Ragi Alami” by Sangjin Ko
375 grams Bread Flour
180 grams sourdough starter
7 grams salt
37 grams sugar
165 grams water
30 ml milk
45 grams butter
In a bowl, mix the flour, salt, sugar and sourdough starter. Make a hole in the middle and pour the water and milk into it. Mix well. Transfer the batter onto a table top that has been dusted with flour. Add the butter, and knead till is elastic and stops being sticky.
Shape the dough into a bowl. Cover and let to proof at room temperature till it doubles in size (3 hours).
Punch the dough down to let out excess air. Divide dough into 2. Cover with plastic and let rest for another 30 minutes.
Grease you S\sandwich tin with butter. Preheat oven to 200 degree celcius.
Take one of the dough, flatten it and roll it up like a swill roll. Place the dough onto the sandwich tin.
Let the dough proof for another 2 hours (i left mine to proof for 5 hours).
Bake the dough at 180 degree clecius, for about 30 minutes till the tops get crusty and golden brown.
Sourdough Brownies
Not bringing anything much to the table today. Just another sourdough discard recipe.
*hangs head in shame*

I wasnt expecting anything extraordinary from this recipe. To me, it was just another recipe to help me save my daily sourdough discard.

But i must say, i am pleasantly surprised at how they turned out. Dense, fudgy, and very chocolatey.

Just like how good brownies should be!
Sourdough Brownies
Taken from the Wild Yeast
Yield: 24 brownies (9 x 13-inch pan)
Time:
- Mix: 10 minutes
- Bake: 40 minutes
Final Dough Ingredients:
- 300 g 72% cocoa (bittersweet) chocolate, chopped
- 226 g unsalted butter, cut into pieces
- 200 g sugar
- 6 g (1 teaspoon) salt
- 8.4 g (2 teaspoons) vanilla extract
- 160 g (3 whole) eggs, at room temperature
- 40 g cocoa powder
- 220 g mature 100%-hydration sourdough starter
Method:
- Preheat the oven to 325F.
- Butter a 9 x 13-inch metal baking pan. Line the bottom of the pan with parchment, and butter the parchment.
- In the microwave, melt together the chocolate and the butter. Check it frequently to make sure it doesn’t burn.
- Whisk in the sugar, salt, and vanilla.
- Add the eggs one at a time, whisking to combine after each addition.
- Sift the cocoa powder over the chocolate mixture and stir to combine.
- Add the starter and stir gently until it is completely incorporated.
- Turn the batter into the prepared pan and bake for about 40 minutes, until a bamboo skewer inserted in the center come out clean.
- Cool in the pan for 20 minutes, then loosen the edges with a knife, invert onto parchment paper, and re-invert onto a cooling rack.
- When completely cool, cut into squares.
Sourdough Chocolate Chip Muffins
Please bear with me as i yet again put up another sourdough recipe.
This time, i used my sourdough discard to make chocolate chip muffins.

The sourdough here acts as an acidic base for the baking soda, which made the muffins get an extra “oomph” while rising in the oven.

As always with muffins, i was extra generous with my chocolate chips. I loved picking the chips with my fingers when i eat my muffins.

Taste wise, i couldnt really taste the sour twang of the sourdough starter. Neither did Mr.Crustabakes… I know this because he didn’t complain. You see, Mr. Crustabakes isn’t a big fan of sourdough related items. He thinks they are stinky and rotting. Little did he know that he just scarfed a whole muffin of sourdough. Ha!
Sourdough chocolate chips muffins
Yields about 8 muffins
Adapted from Sourdoughhome.com
- 1 C “discarded” sourdough starter
- 1 C All Purpose flour (sift flour prior to measuring)
- 1 egg
- 1 tsp vanilla
- 1/4 tsp salt
- 1/4 C oil
- 1/2 C sugar
- 1 tsp baking soda
- ~1/2 C chocolate chips
Preheat oven to 425F.
Combine dry ingredients in small bowl. Stir in chocolate chips. Combine wet ingredients in medium bowl. Add dry ingredients to wet ones.
Line your muffin tins with cupcake wrappers. Mix the wet and dry ingredients quickly and spoon into your muffin cups.
Bake at 425 for about 20 minutes.
My very first Fondant Cake
The reason why you’ve never seen a full fledged fondant cake on Crustabakes, is because i have a mortal fear of fondant.
I’ve heard all about it being sticky, and uncooperative to work with.
It cracks, it sweats, it tears, and the list of troubles goes on and on.
I’ve also never cared about its taste.
And the fact that everyone just tears out the decorative fondant after they’ve sung the birthday song and blown the candles didn’t help either. Imagine, all those endless hours shaping the fondant defunct in just a split second.
But something spurred me.
Baby Crustabake’s first birthday.
Her birthday is just in a little over more than two months.
And I would love to make something “passable” to celebrate that special day.
So today, i start practicing.
My very first full fledged fondant cake.
A simple cake with a bow of pastel colors.
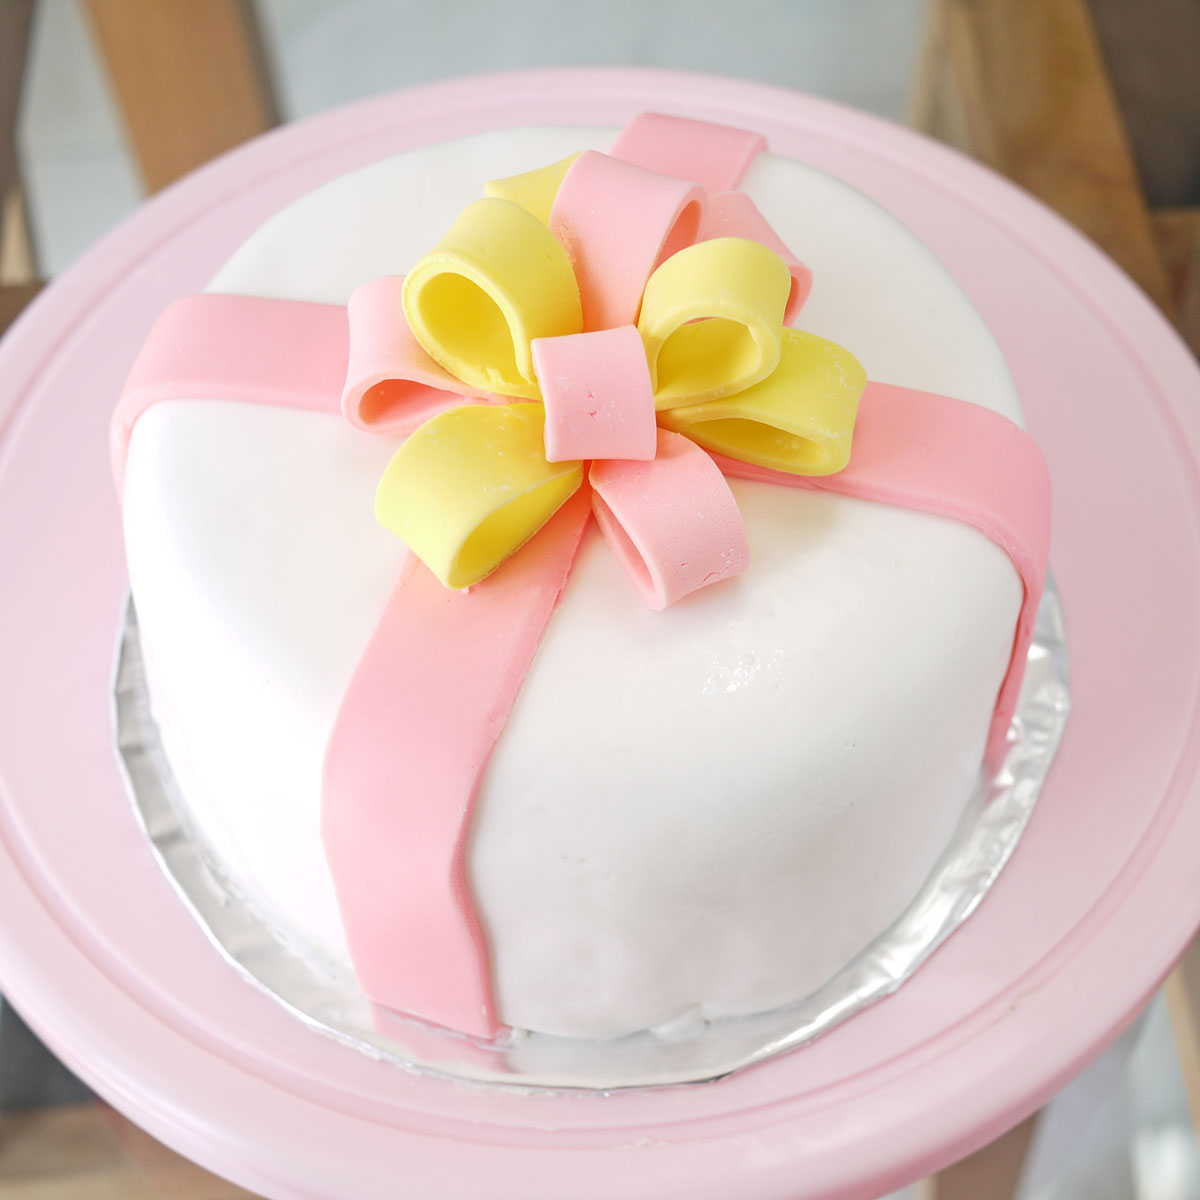
The fondant did sweat, and it has fine “wrinkles”
I need to troubleshoot on that. It’s really a long, arduous journey ahead.
Me vs fondant.
Bread Pudding with Brown Sugar Crumbles
Using yesterday’s swirled sweet potato sandwich bread, i made this bread pudding, with brown sugar crumbles.

It’s a recipe re-visited, from HERE

Happy Friday everybuddy!
Another potato bread, this time, swirled.
I know I just posted a purple sweet potato bread yesterday. But the truth is, the bread was made last week. And we finished it.
And I just had to make another one.

This time however, i used two types of sweet potatoes. The regular orange skinned, white flesh sweet potatoes and the purple ones.
Then i swirled them together.
It takes a little bit more effort making this, I had to divide everything into two. Which means double the dirty bowls, double the kneading process, double almost pretty much everything.
But I wanted to see how it would swirl so badly, that i decided to go ahead and did double duty on this bread.

So here it is, the bread swirled.
And here it is, as a ham sandwich. Whoopee!

Swirled Sweet Potato Loaf
(adapted and modified from Jess of J3ss Kitch3n)
Recipe
Starter Dough Ingredients
200g bread flour
1/2 tsp instant yeast
65 cooked purple sweet potato (mashed)
65 cooked white sweet potato (mashed)
Water
- Combine bread flour, instant yeast and mashed PURPLE sweet potato in a mixing bowl, add in sufficient water to form a soft pliable dough, cover with cling wrap or a wet cloth and prove for 1hr or until double in size.
- In another bowl, Combine bread flour, instant yeast and mashed WHITE sweet potato in a mixing bowl, add in sufficient water to form a soft pliable dough, cover with cling wrap or a wet cloth and prove for 1hr or until double in size.
Main Dough Ingredients
15g bread flour
25g all purpose flour
33g cooked PURPLE sweet potato (mashed)
10g sugar
20g olive oil
15g bread flour
25g all purpose flour
33g cooked WhITE sweet potato (mashed)
10g sugar
20g olive oil
- Combine all of the PURPLE Main Dough Ingredients with the PURPLE starter dough ingredients in your bread maker machine or stand mixer and knead till the window pane stage, cover with cling wrap or wet cloth and prove for 1hr or until double in size.
- In a separate bowl, do the same for the White main dough and white starter dough ingredients.
- Punch out the air from the proofed dough and divide the dough into 2 equal parts, cover and rest the doughs for 15mins.
- Punch out the air from the rested dough, wrap the white dough in the purple dough, roll it up swiss roll stylea nd shape into rounds, place into bread tin and prove for 1hr.
- Bake in preheated oven of 170C for 38mins or till golden brown, remove bread from tin immediately once done and cool completely on a cooling rack before slicing.
Purple Sweet Potato Bread
Some of you are probably sick of the babyfood posts that i’ve been putting up lately.
Today, I shall suspend baby-related activities and return to regular Crustabake-y kinda post.
“Back to basics” as everyone would say.
Basics, in Crustabakes, would probably be baked goods.
While still on a “healthy” strike,
I bring you this Purple potatoes sandwich swirled bread.

No, its not gluten free, and yes, there is sugar involved in making this.

But it’s low gluten, due to the potatoes.
And no artificial coloring was used to get this beautiful hue.

It’s all natural from the pureed purple sweet potatoes.
Purrty ain’t it?
Sweet Potato Loaf
(adapted and modified from Jess of J3ss Kitch3n)
Recipe
Starter Dough Ingredients
200g bread flour
1/2 tsp instant yeast
130g cooked purple sweet potato (mashed)
Water
- Combine bread flour, instant yeast and mashed sweet potato in a mixing bowl, add in sufficient water to form a soft pliable dough, cover with cling wrap or a wet cloth and prove for 1hr or until double in size.
Main Dough Ingredients
All of Starter Dough
30g bread flour
50g all purpose flour
65g cooked purple sweet potato (mashed)
20g sugar
40g olive oil
- Combine all of the Main Dough Ingredients in your bread maker machine or stand mixer and knead till the window pane stage, cover with cling wrap or wet cloth and prove for 1hr or until double in size.
- Punch out the air from the proofed dough and divide the dough into 2 equal parts, cover and rest the doughs for 15mins.
- Punch out the air from the rested doughs and shape into rounds, place into bread tin and prove for 1hr.
- Bake in preheated oven of 170C for 38mins or till golden brown, remove bread from tin immediately once done and cool completely on a cooling rack before slicing.
Gluten Free, Sugar Free, Banana Chiffon Cake
Before you click this window shut due to its unappetizing title, let me just say that this was purely experimental.
I wanted to know whether i could beat egg whites to its “soft peak” stage (as required in chiffon making), without the use of sugar.
And if the egg white was successfully beaten till soft peaks, would it stay that way during the baking time in the oven? Would it aerate my chiffon the way it should when it is accompanied by its sugar sidekick.
So, to put it shortly,
Is sugar indispensable in chiffon making?
The answer is,
Nope!
And i’ve got proof,

Here’s a banana chiffon cake, made completely without sugar. It rose VERY well,in fact i must say, it rose better than some of the sugared chiffons i made.

So, to everyone out there who are opting the sugar-free ( to whom i offer the utmost respect and admiration ), and gluten free life
and to baby Crustabakes,
This gluten free, sugar free, chiffon cake is dedicated to you!
PS: this cake does not taste as horrible as i would have thought! In fact it’s so light, i managed to scarf down both cakes in one serving.
Sugar Free, Gluten Free Banana Chiffon Cake:
Makes 2 Cupcake size (Sorry about that, told you it was experimental)
15 gram rice flour
5 gram corn starch
5 gram oil
30 gram overripe bananas (mashed)
1 egg white
1 egg yolk
Sift the flour and the starch together.
In another bowl, mix oil and mashed bananas
Dump flour and starch onto the banana bowl, add egg yolk and mix till well combined
Beat the egg white till soft peaks (without sugar it wont be glossy, but it’s ok, it will still work)
Slowly fold in egg white to the egg yolk batter
Pour onto two cupcake cases,
Bake at 170 degree celcius for 30 mins or till fully cooked.
Baby Pineapple Tart
A sugar free, gluten free homemade pineapple tart for Baby Crustabakes!

Pastry
140 gr gluten free flour
95 gram unsalted butter (cold)
1 egg yolk (free range)
Rub butter with flour till crumblike, add yolk, mix till well combined. Set aside to chill in refrigerator
Pineapple Jam
1 pineapple (get the small, ripe ones)
Cinammon stick
Cloves
Peel Pineapple, get rid of its “eyes”
Blitz pineapple with a food processor along with its core (do not discard core as it gives the jam the fiber it needs).
Cook pureed pineapple, cinammon stick and cloves over stove till it thickens and has a jam like consistency. Discard clove and cinammon stick
Set aside to cool. Roll into balls.
Wrap pineapple jam in pastry.
Bake at 180 degree for 20 mins.
Pigs chillin in Mud Cake
So i have seen quite a few versions of this cake dotting the food blogsphere. While i have no clue to the imaginative genius who came up with it, i must say that it’s absolutely adorable and cute.
And i absolutely have to make it.
So off we go with my version. 🙂


oink !
Crusty Brownies
I wanted instant gratification today. I wanted to make something which is quick, fast, and doesn’t need pages of instructions to execute.
Hence,
Brownies.

With just a lil bit of melting and mixing, brownies are usually ready to go.
Butter & chocolate melted over fire, sugar stirred in, flour folded in and voila! Very foolproof.
That’s where i was wrong.
Because the way you melt butter and chocolate, the way sugar is stirred in, affect the way your brownie turn out.
Let me try breaking it down.
Brownie recipes usually start with
Here’s an extract of the recipe I worked with
- Place butter and chocolate in a large heatproof bowl set over (but not touching) simmering water; stir frequently until chocolate and butter are melted, about 7 minutes. Remove bowl from heat; let cool to room temperature, 10 to 15 minutes.
- Stir sugar into cooled chocolate mixture until combined. Whisk in eggs one at a time, whisking until smooth after each addition. Whisk in vanilla. Gently fold in flour and salt.
See the instructions in red?
That’s where this recipe deviates. Because as far as i know it, brownie recipes usually ask for the sugar to be stirred into the hot butter chocolate mixture to let it dissolve, and to create that papery thin shiny skin in brownies.
But then again, this is a Martha Stewart recipe.
She’s Martha Stewart. I am me.
Who am i to point out something Martha Stewart surely, surely can’t miss.

So, off i go, proceeding with the recipe as written.
But just as I suspected, the resultant brownie was just… meh…
Instead of the shiny papery crust, i got a dull cookie like crust that seemed to form a dome above the cookie. I think the crust must have risen in the oven while the rest of the brownies stayed. This dome cracks when i slice through the brownies.
Also, all that undissolved sugar also seemed to settle at the base of the brownies, thus forming another sugary crust.
So unless i must have somehow mis-understood, or mis-executed the recipe. I guess this is not the brownie i would fall back on.
So, Martha Stewart, while your recipes usually rock my world, this one, unfortunately barely caused a tremor.
Still a big fan though.
XOXO

Fudgy Chocolate Brownies
Taken from Marthastewart.com
Ingredients
- 1/2 cup (1 stick) unsalted butter, plus more for pan
- 8 ounces bittersweet chocolate, coarsely chopped
- 1 1/2 cups sugar
- 4 large eggs
- 1 teaspoon pure vanilla extract
- 3/4 cup all-purpose flour
- 1/2 teaspoon salt
Directions
- Preheat oven to 350 degrees. Butter an 8-inch square baking pan or heatproof glass dish. Line pan with parchment paper, leaving a 1-inch overhang on 2 sides. Set aside. Place butter and chocolate in a large heatproof bowl set over (but not touching) simmering water; stir frequently until chocolate and butter are melted, about 7 minutes. Remove bowl from heat; let cool to room temperature, 10 to 15 minutes.
- Stir sugar into cooled chocolate mixture until combined. Whisk in eggs one at a time, whisking until smooth after each addition. Whisk in vanilla. Gently fold in flour and salt.
- Pour batter into prepared pan, and smooth top with an offset spatula. Bake until cake tester inserted in the center comes out with only a few moist crumbs attached, 40 to 45 minutes. Transfer pan to a wire rack to cool completely.
- Run a knife or offset spatula around the edges of the pan. Using parchment, lift brownies out of pan and onto the rack. Transfer to a cutting board; cut into 2-inch squares.
Another Cheesy Post
After the Oreo Cheesecake and the Strawberry Swirl Cheesecake earlier this year, you might think that i am done with cheesecake for now. After all, it’s only the beginning of March.
But nope, i went ahead and baked two more cheesecake. Even though it’s only the beginning of March.
So that makes it four cheesecakes in less than three months.
I am such an over-achiever sometimes.
So, let’s review my achievements shall we?

First up,
The good old plain cheesecake with fruit toppings.

Oh, so you noticed the “Happy Birthday” sign!;)
Yup, this cake is made for my dearest, dearest friend, Jeffy.
She was my bridesmaid the day i got married.
She woke up at the ungodly hour of 3.30 A.M that day.
She broke her back picking after my crazy train of a wedding gown.
She held my bouquet, wiped my sweat, fetched me water and food.

Yes, i owed this cake to her.
So, Happy Birthday Jeff!
xoxo.
Okayyyss. so there goes one, let’s move on to the other.
The Coffee Chocolate Cheesecake

uh-huh, uh-huh. It’s cheesecake again, with coffee and chocolate this time.

\And topped with chocolate rubbles.

“Why did you make another cheesecake?” you ask?
Well, no particular reason.
I just wanted a coffee cheesecake with chocolate rubbles on it.
Geez. what a cheesy post. Sorry guys, you see It’s 5.47am, and i just fed my daughter. I am going back to bed now (PS: no judging. it’s Saturday!!). nite nite peeps!
Recipe taken from Use Real Butter
Abbey’s Infamous Cheesecake
crust
2 cups / 180g plain cookies
4 oz butter, melted
2 tbsp / 24g sugar
1 tsp vanilla extract
plain cheesecake
24 oz cream cheese, room temperature
1 cup / 210g sugar
3 large eggs
1 cup / 8 oz heavy cream
1 tbsp lemon juice
1 tbsp vanilla extract (or the innards of a vanilla bean)
1 tbsp liqueur, optional, but choose what will work well with your cheesecake
chocolate espresso cheesecake
24 oz. cream cheese, room temperature
1 cup / 210g sugar
3 large eggs
1 cup / 8 oz. heavy cream
4.5 oz. semi-sweet chocolate, melted
1 tbsp espresso powder
1 tbsp boiling water
1 tbsp vanilla extract (or the innards of a vanilla bean)
1 tbsp Kahlua or coffee liqueur
Preheat oven to 350°F. Begin to boil a large pot of water for the water bath. Mix together the crust ingredients and press into your preferred pan.
Set crust aside. Combine cream cheese and sugar in the bowl of a stand-mixer (or in a large bowl if using a hand-mixer) and cream together until smooth. Add eggs, one at a time, fully incorporating each before adding the next. Make sure to scrape down the bowl in between each egg. Add heavy cream, vanilla, lemon juice, and alcohol and blend until smooth and creamy.[For chocolate-espresso: combine boiling water with espresso powder. Add cream, chocolate, espresso, vanilla, and Kahlua to the cream cheese batter and mix until smooth and creamy.]
Pour batter into prepared crust and tap the pan on the counter a few times to bring all air bubbles to the surface
Place pan into a larger pan and pour boiling water into the larger pan until halfway up the side of the cheesecake pan. If cheesecake pan is not airtight, cover bottom securely with foil before adding water. Bake 45 to 55 minuteuntil it is almost done – this can be hard to judge, but you’re looking for the cake to hold together, but still have a lot of jiggle to it in the center. You don’t want it to be completely firm at this stage. Close the oven door, turn the heat off, and let rest in the cooling oven for one hour. This lets the cake finish cooking and cool down gently enough so that it won’t crack on the top. After one hour, remove cheesecake from oven and lift carefully out of water bath. Let it finish cooling on the counter, and then cover and put in the fridge to chill. Once fully chilled, unmold and serve.
Strawberry Swirl Cheesecake

This cake would have been the perfect Valentine’s day Cake. But Valentine’s day this year didn’t fall on a weekend. It fell on a Thursday.
I couldn’t make a cheesecake on a weekday.
Not with the long baking hour involved.
So, I thought I would get my act together in the weekend (dates 16-17 Feb) to make this post Valentine day cake.
But nope, I waited another week. And made this cake today (23 Feb).
So here goes my post-post Valentine Day Cake.

Hope everyone had a blast celebrating it.
Recipe taken from Use Real Butter
Abbey’s Infamous Cheesecake
crust
2 cups / 180g oreo cookies without the filling
4 oz butter, melted
2 tbsp / 24g sugar
1 tsp vanilla extract
strawberry swirl cheesecake
24 oz cream cheese, room temperature
1 cup / 210g sugar
3 large eggs
1 cup / 8 oz heavy cream
1 tbsp lemon juice
1 tbsp vanilla extract (or the innards of a vanilla bean)
1 tbsp Grand Marnier
1 cup strawberries, puréed
2 tbsps sugar
Preheat oven to 350°F. Begin to boil a large pot of water for the water bath. Mix together the crust ingredients and press into your preferred pan.
Set crust aside. Combine cream cheese and sugar in the bowl of a stand-mixer (or in a large bowl if using a hand-mixer) and cream together until smooth. Add eggs, one at a time, fully incorporating each before adding the next. Make sure to scrape down the bowl in between each egg. Add heavy cream, vanilla, lemon juice, and alcohol and blend until smooth and creamy.
Pour batter into prepared crust and tap the pan on the counter a few times to bring all air bubbles to the surface
For strawberry swirl: mix the sugar and the strawberry purée together then top the cheesecake batter with the mixture and create the swirl design by running a toothpick through the surface.
Place pan into a larger pan and pour boiling water into the larger pan until halfway up the side of the cheesecake pan. If cheesecake pan is not airtight, cover bottom securely with foil before adding water. Bake 45 to 55 minuteuntil it is almost done – this can be hard to judge, but you’re looking for the cake to hold together, but still have a lot of jiggle to it in the center. You don’t want it to be completely firm at this stage. Close the oven door, turn the heat off, and let rest in the cooling oven for one hour. This lets the cake finish cooking and cool down gently enough so that it won’t crack on the top. After one hour, remove cheesecake from oven and lift carefully out of water bath. Let it finish cooling on the counter, and then cover and put in the fridge to chill. Once fully chilled, unmold and serve.
Happy Birthday Sis!
It feels G-R-E-A-T to be back to normal life. The great flood has made me appreciate things i have taken for granted in my life. Little things like clean running water, electricity, and the internet.
Water rose up to my knees in my home during the flood. Electricity was cut off. Our water tanks were contaminated with filthy flood water.
I evacuated my home on day#2 of the flood. Water level stayed stagnant for up to a week. And i know of some people and friends who didn’t evacuate their homes and stayed in their water logged homes for the entire week. I declare them as heroes.
Anyway, enough of my ramblings, Here is what i have for you today.
A pink Ombre Cake.

A cake with piped roses of colours that gradually get darker.
Or so it was supposed to be.
Halfway pipping, i realized that i probably had too much white. Another layer of pink would have been nice.
Oh, in case you were wondering what the “happy birthday” was for, it’s for my sister.
Happy Birthday Sis!
Ombre Cake
Taken from Sajian Sedap
Recipe in Indonesian
Bahan-bahan/bumbu-bumbu:
15 kuning telur
9 putih telur
225 gram gula pasir halus
1/4 sendok teh garam
1/2 sendok makan emulsifier (sp/tbm)
185 gram tepung terigu protein rendah
30 gram maizena
40 gram susu bubuk
3/4 sendok teh baking powder
150 gram mentega tawar, lelehkan
75 gram white cooking chocolate, lelehkan
Pewarna Ungu
Bahan Filling:
200 gram cream cheese
100 gram mentega tawar dingin
50 gram gula tepung
175 gram white cooking chocolate, lelehkan
125 gram krim kocok
Bahan Olesan:
250 gram butter cream putih
75 gram butter cream biarkan putih
75 gram butter cream, tambahkan 3 tetes pewarna ungu 3 tetes, aduk rata
75 gram butter cream, tambahkan 7 tetes pewarna ungu
75 gram butter cream, tambahkan 15 tetes pewarna ungu
75 gram butter cream, tambahkan 1/8 sendok teh pewarna ungu
Cara membuat:
- Kocok kuning telur sampai kental. Sisihkan.
- Kocok putih telur dan garam sampai setengah mengembang. Tambahkan gula pasir halus sedikit-sedikit sambil dikocok sampai mengembang.
- Masukkan kocokan kuning telur dan emulsifier. Kocok hingga mengembang kembali.
- Tambahkan tepung terigu, susu bubuk, maizena, dan baking powder sambil diayak dan diaduk rata.
- Masukkan margarin leleh dan white cooking chocolate leleh sedikit-sedikit sambil diaduk perlahan.
- Bagi adonan 5 bagian. Adonan 1 ditambahkan 1/2 sendok makan pewarna ungu. Adonan 2 ditambahkan 3/4 sendok teh pewarna ungu. Adonan 3 ditambahkan 1/8 sendok teh pewarna ungu. Adonan 4 ditambahkan 15 tetes pewarna ungu. Adonan 5 biarkan putih.
- Tuang masing-masing adonan ke dalam loyang bulat diameter 20 cm tinggi 3 cm yang dioles margarin dan dialas kertas roti.
- Oven dengan api bawah suhu 190 derajat Celsius 20 menit sampai matang.
- Filling, campur cream cheese dan mentega tawar. Kocok hingga lembut. Tambahkan gula tepung dan white cooking chocolate leleh. Kocok rata. Masukkan krim sedikit-sedikit sambil dikocok perlahan. Aduk rata.
- Ambil selembar cake. Oleskan filling. Tumpuk dengan cake lainnya. Lakukan hal yang sama sampai habis dengan urutan warna yang paling gelap di bagian bawah.
- Olesan, kocok butter cream sampai lembut.
- Bagi 6 bagian adonan. Satu bagian biarkan putih. Sisanya ditambahkan pewarna ungu dengan warna bergradasi seperti warna cake.
- Tutup seluruh permukaan cake dengan butter cream putih. Semprotkan warna yang paling gelap di bagian paling bawah, bergradasi dengan warna paling muda di atasnya. (Kn)
Drowning sorrows in Oreo Cheesecake
I am writing this post from a very sad sad place.
Here’s what it looks like

I am sure news of the great Jakarta Flood has reached international news. Trust me, it’s happening and it’s real.
I was supposed to go to work in the morning and have friends over for dinner tonight. I even baked a cheesecake for it.
That didn’t happen.
Yup, i am flooded in.
Oh wait,
work and dinner didn’t happen.
Cheesecake did.

So while i wait for things to get back to normal.
I’ll just keep calm and eat a cheesecake.
Recipe taken from Use Real Butter
Abbey’s Infamous Cheesecake
crust
2 cups / 180g oreo cookies without the filling
4 oz butter, melted
2 tbsp / 24g sugar
1 tsp vanilla extract
plain cheesecake
24 oz cream cheese, room temperature
1 cup / 210g sugar
3 large eggs
1 cup / 8 oz heavy cream
1 tbsp lemon juice
1 tbsp vanilla extract (or the innards of a vanilla bean)
1 tbsp liqueur, optional, but choose what will work well with your cheesecake
Preheat oven to 350°F. Begin to boil a large pot of water for the water bath. Mix together the crust ingredients and press into your preferred pan.
Set crust aside. Combine cream cheese and sugar in the bowl of a stand-mixer (or in a large bowl if using a hand-mixer) and cream together until smooth. Add eggs, one at a time, fully incorporating each before adding the next. Make sure to scrape down the bowl in between each egg. Add heavy cream, vanilla, lemon juice, and alcohol and blend until smooth and creamy.
Pour batter into prepared crust and tap the pan on the counter a few times to bring all air bubbles to the surface
Place pan into a larger pan and pour boiling water into the larger pan until halfway up the side of the cheesecake pan. If cheesecake pan is not airtight, cover bottom securely with foil before adding water. Bake 45 to 55 minuteuntil it is almost done – this can be hard to judge, but you’re looking for the cake to hold together, but still have a lot of jiggle to it in the center. You don’t want it to be completely firm at this stage. Close the oven door, turn the heat off, and let rest in the cooling oven for one hour. This lets the cake finish cooking and cool down gently enough so that it won’t crack on the top. After one hour, remove cheesecake from oven and lift carefully out of water bath. Let it finish cooling on the counter, and then cover and put in the fridge to chill. Once fully chilled, unmold and serve.
*note: I added crushed oreos into the batter before baking.
Kue Lapis Legit
I have always shy-ed away from making kue lapis legit simply because there’s just too much on the line.
This cake is not only labour intensive, but it is also time AND capital intensive.
Why do I say so ?
The lapis legit, or the rich layer cake, is made by baking each layer individually. This means that you have to stand in front of your oven and top your baking tin with new cake batter each time the previous layer gets cooked.
It also means that you can’t pop it into the oven and run to feed your baby. You can however, bring the baby to the oven and hope she doesn’t get too cranky from hunger when her mom is hawking over the oven for her layers to bake.
Capital intensive, because it involves lots of butter and egg yolks. A 20 x 20 cm sized cake can use up to 40 egg yolks! Talk about “eggspensive”!
But when the Aspiring Bakers announced their 27th theme as Through Thick and Thin – Kue Lapis Classics. I decided to jump on the bandwagon because I know that if i let this chance slip, i might never never attempt to bake kue lapis !
So let’s take a stroll through my adventure.

Or should i call it my misadventure?
As you can see, this is not a great looking lapis legit.
1.The layers are uneven and the cake is reallly shorrttt..
I guess i only have myself to blame. I halved a recipe i found on the net thinking that i would compensate by using a smaller baking tin. Well, the tin wasn’t that small. I should have used 75% of the recipe instead.
2.The surface is all crinkly.
Can anyone help me troubleshoot this? My only guess is that i have my oven turned up too high.

Nevertheless, a lapis legit IS a lapis legit. I mean with that much amount of butter and egg yolks, i don’t think it can ever taste bad. This cake is really sinfully rich and delicious despite it’s appearance.
I would definitely try making this cake again, this time with more batter and lower temperature. Wish me luck !
This post is submitted to Aspiring Bakers #27 – Through Thick and Thin – Kue Lapis Classics. Do head over to Sweet Samsations to learn about it and join the layerings!
Kue Lapis Legit
by Fatmah Bahalwan
recipe HERE
Horlicks Doggie Cookies
I know it’s a long long way to go before baby Crustabakes starts eating cookies. But i guess, it’s never too early to experiment! So here goes!

There is no sugar involved in the making of these cookies. Instead it uses milk powder and Horlicks (a malted drink powder) for taste and flavour.
To further add sweetness to these otherwise rather bland cookies, we wrap chocolate chip cookies in the malted cookie dough

Then, we stuck two cocoa crunch for “ears”, chocolate rice for eyes and a chocolate chip for nose.
And there it is!
Horlicks Doggie Cookies
Taken From Happy Home Baking
Ingredients:
(makes about 48 cookies)
180g butter, soften at room temperature
80g Horlicks (original flavour)
200g top flour or cake flour
25g corn flour
25g milk powder
100g chocolate chips
some chocolate rice
some Koko Krunch
Method:
- Pre-heat oven to 140deg C. Line baking tray with baking paper and set aside.
- Sieve top flour, corn flour and milk powder.
- Cream butter and Horlicks for about three minutes at low speed. Do not overbeat.
- Put in top flour, cornflour and milk powder and beat for about one minute to form dough.
- Divide dough into 10g each. Put three chocolate chips into each piece of dough and roll into balls.
- Insert two pieces of Koko Krunch to form the ‘ears’, chocolate rice for the “eyes”, and a chocolate chip in the centre for the ‘nose’.
- Bake at 140 deg C for about 25 minutes. Depending on your oven, it may take another 5 to 10 minutes more for the cookies to be ready.
- Leave to cool on wire rack before storing in an airtight container.
Christmas is here! (almost)
So i had a mini pre-christmas gathering yesterday. It was for a party of 10.
I would have loved to cook and bake myself silly. But i decided to abandon that over-ambitious idea. I decided it was almost impossible to be running back and forth from kitchen to baby’s room while food was cooking, or burning on the stove.
So i decided to bake. I decided it was less of a fire hazard for things to be baking in the oven rather than cooking on an open flame..
So here’s what we had.
1. A log cake

I have no inkling to the relationship between Christmas and log cakes. Why do people bake log cakes at Christmas?
I would have googled it, but really, i am too stoned right now to do anything productive.
Nevertheless, i followed cue. So, there was a log cake for my party.
2. Rudolph and Frosty

Now,at least, i know about these. Rudolph, Santa’s red nosed reindeer. And of course Frosty, the snowman.
While these are not the best looking pictures around, and i am seriously contemplating not putting any post about them up. I am glad i did it. Cause I’m sure, it will be something i would love to look at down the road =)
Mango Yogurt Muffins
Let’s welcome the Mango Season with these mango Yogurt muffins!

Mango Yogurt muffin*makes 12 muffins
Taken from Nasi Lemak Lover
(printable recipe)
125g unsalted butter
150g cake flour
110g sugar
200g chopped fresh mango
100g yogurt (natural flavour)
2 eggs (medium)
1tsp baking powder
1/2tsp baking soda
1/4tsp salt
1. Beat butter, salt and sugar till pale and creamy.
2. Add egg one at a time, mix well.
3. Sift in flour, baking powder and baking soda, add in yogurt, combine well
4. Add in chopped mango, and lightly mix well.
5. Spoon batter into a muffin pan, sprinkle some chopped mango on top.
6. Bake at preheated oven 180c for 25mins or till golden brown.
Chocolate Chocolate Chocolate Chip Muffins
Chocolate Chocolate Chocolate Chip Muffins.
Who could resist a muffin with a name like that?

One moment, I was in bed reading a blog post off the Food Librarian,

And the next thing i knew, I was in the kitchen taking butter out of my fridge.
Chocolate Chocolate Chocolate Chip Muffins
From: Joy the Baker Cookbook (Via the Food Librarian)
1/2 cup (1 stick) butter
5 ounces semisweet chocolate, coarsely chopped (I used Nestle semi-sweet chocolate chips)
2 cups all-purpose flour
1 teaspoon baking powder
1 teaspoon baking soda
1/2 teaspoon salt
1 teaspoon vanilla extract (or 1 teaspoon instant espresso powder)
1/2 cup packed brown sugar
2 large eggs
2/3 cup buttermilk
1 cup (6 ounces) semi-sweet chocolate chunks (I used Nestle semi-sweet chocolate chips)
1/2 cup white chocolate chips (I used 96 grams of Nestle white chocolate chips)
Preheat oven to 350 degrees. Prep a muffin pan. Joy’s recipe says it yields 12 muffins, but I must have made mine a bit smaller and got 16 muffins.
Create a double boiler (place some water in a saucepan and bring to a simmer) and place the butter (chopped into about 8 pieces) and 5 ounces of chocolate into a heatproof bowl over the simmering water. Don’t let the bowl touch the water. Melt the butter and chocolate together, stirring together. Once melted, remove and set aside to cool a bit while you mix the rest of the ingredients.
In a medium bowl, whisk together the dry ingredients: flour, baking powder, soda, salt.
Whisk the brown sugar into the chocolate mixture. Follow with the eggs, buttermilk, vanilla. Add the flour mixture all at once and fold together. Don’t overmix. Add the chocolate chunks.
Dish into muffin tin. Bake for 18-20 minutes – until a toothpick comes out clean. Remove from pan after 5 minutes and place muffins on wire rack to cool completely.
When the muffins are cool (or as long as you can wait), melt the white chocolate like you did the semi-sweet chocolate. Note that white chocolate melts at a lower temperature. Once melted, have fun drizzling it over the muffins.
Chocolate Mochi Brownies
If you ever had mochi before, I am sure you will be no stranger its chewy texture.
So when i first came across these “Chocolate Mochi Brownies”, i was like “whaaa…t?”
Chewy brownies? Really?
Naturally curiousity got the better of me, and here i am, 
True to its promise, these brownies were indeed chewy.
If anything, they remind me of the Chinese “nian gao” or rice cakes that are so popular during the Lunar New Year.

But they still retained the dark, fudgy characteristics of a good brownie. So it’s like eating a really rich, dark, chocolatey brownie. But with extra jaw work out.

I am not saying that i prefer these to the traditional dark, fudgy brownies, but they are definitely definitely worth a try.

And they fulfill both my chocolate craving and my curiosity.
Chocolate Mochi Brownies
Taken from Just Jenn
Ingredients:
1 cup mochiko (sweet rice flour)
1 cup sugar
1 teaspoon baking soda
pinch of salt
4 Tablespoons butter
1/2 cup chocolate chips
1 (12 oz) can evaporated milk
1-1/2 teaspoons vanilla
1 egg
1/2 cup chocolate chips
Preheat the oven to 350 degrees. Line an 8×8 pan with parchment and butter it. This will make your life way easier when you go to take these out.
In a saucepan over low heat, melt the butter and chocolate chips and stir to combine. Set aside and let cool for a bit.
In a bowl whisk together the mochiko, sugar, baking soda and salt.
Add the melted chocolate mixture, evaporated milk, vanilla and the egg. Mix until combined.
Pour the batter into your prepared pan. Sprinkle the chocolate chips on top of the batter, then bake in the oven for 35-40 minutes until the center is done, it’s hard to tell since the mochi does give these a little more ‘spring’ than the average brownie, but you can kind of tell when it’s cooked through.
Let cool in the pan for about 10-15 minutes, then using the overlapping parchment, pull the brownies out of the pan and let cool on a wire rack. Cut the brownies into squares and you are good to go!
Scalloped Potatoes, SPAM and Cheese
I am glad the lazy bug who’s been sprinkling lazy dust all over me took off. I’m not sure how long will his leave of absence be, but he was definitely away this morning as i got myself busy with scalloping potatoes, cubing SPAM and grating Cheese.
Yup, you must have guessed that’s the ingredients I am gonna use for today.

Potatoes, SPAM and Cheese. That sounds like the start of something hearty and filling.

Layers of scalloped potatoes are sprinkled with bits of SPAM & cheese, then drowned in a slightly peppered mixture. Ahh.. Yumms..
That’s carbs, with some protein and definitely some fats. A comfort meal fitting to feed the cold and the hungry. Not that i am ever cold in this oven hot-climate of Indonesia, but i am certainly hungry.

I’m not sure if you can cut this dish up and present it nicely. For me, i just used the largest spoon nearby and spooned it out into my mouth, which i learnt is not such a good idea when it’s pipping hot.
So, please take the time to find a stray dish to save your tongue ( I learnt this the hard way…)

And when you are done with your mini heap, you can always go back for more!
🙂
Scalloped Potatoes, SPAM and Cheese
Taken from The Pioneer Woman
- 3 pounds Russet Or Yukon Gold Potatoes, Washed Thoroughly
- 2 Tablespoons Butter
- 1 whole Yellow Onion, Diced
- 3 cups Diced Ham (*subbed with SPAM)
- 1-1/2 cup Half-and-half
- 1-1/2 cup Heavy Cream
- 1/4 cup Flour
- Black Pepper To Taste
- 1 cup Grated Cheddar Cheese
- 1 cup Grated Monterey Jack Cheese
- Chopped Parsley (optional)
Preparation Instructions
Preheat oven to 350 degrees. Butter a large casserole dish.
Heat butter in a large skillet. Add onions and cook for 1 to 2 minutes, or until they start to turn translucent. Add ham and cook for 3 to 4 minutes until thoroughly heated. Remove from heat and set aside.
Combine half-and-half and cream in a microwave-safe container and nuke for a minute or so, until no longer cold. Whisk in flour and black pepper until totally combined. Set aside. (You may add salt, but cheese and ham are salty, so add sparingly.)
Combine the two grated cheeses. Set aside.
Using a mandoline or slicer, slice potatoes into 1/8-inch slices (very thin.) Layer 1/3 of the potato slices in the buttered casserole dish. Sprinkle on 1/3 of the ham/onion mixture, then 1/3 of the cheese, then pour on 1/3 of the cream mixture.
Repeat this twice more, ending with a sprinkling of cheese and a pouring on of the rest of the cream mixture. Cover dish with foil and bake for 40 minutes. Remove the foil and bake for an additional 20 minutes at least, or until bubbly and hot.
Cut into squares and serve. Sprinkle on chopped parsley if you’d like!
(Note: To speed along the process a bit, you may boil sliced potatoes for 3 to 5 minutes before assembling the casserole. Just drain and slightly cool before assembling.)
Nutella Bottomed Cake
I made a boo-boo with this one.

Instead of having a Nutella Swirl Cake, I ended up with a Nutella BOTTOMED cake.

Seemed like all the Nutella sank while baking.
I could only think of one reason for this. Homemade Nutella (Yes!I made Nutella from scratch!)
My homemade Nutella was probably denser than the commercial ones as i have decided to altogether skip a “drizzle hot milk to thin” instruction on the recipe.
I guess the cake batter wasn’t able to put up with all that weight and gave way as the homemade Nutella made its royal descent to the bottom of the pan.

But waitt!! Please don’t give up on it yet!
Although this cake is not picture perfect, i didn’t say it wasn’t delicious. Because it damn well is!
The Nutella formed a very thick, fudgy texture when baked.
It’s like eating a butter cake, with fudge topping.

Just that the fudge TOPPING, happened to be fudge BOTTOMS.
Really, It’s just a matter of the order of the two layers.
No biggie!
Nutella-Swirl Pound Cake
- Contributed by Lauren Chattman
Ingredients
- 1 1/2 cups all-purpose flour, plus more for dusting
- 4 large eggs, at room temperature
- 2 teaspoons pure vanilla extract
- 3/4 teaspoon baking powder
- 1/4 teaspoon salt
- 2 sticks unsalted butter, softened
- 1 1/4 cups sugar
- One 13-ounce jar Nutella
- Preheat the oven to 325°. Lightly grease and flour a 9-by-5-inch loaf pan, tapping out any excess flour. In a glass measuring cup, lightly beat the eggs with the vanilla. In a medium bowl, whisk the 1 1/2 cups of flour with the baking powder and salt.
- In a large bowl, using a handheld mixer, beat the butter with the sugar at medium-high speed until fluffy, about 3 minutes. With the mixer at medium-low speed, gradually beat in the egg mixture until fully incorporated. Add the flour mixture in 3 batches, beating at low speed between additions until just incorporated. Continue to beat for 30 seconds longer.
- Spread one-third of the batter in the prepared pan, then spread half of the Nutella on top. Repeat with another third of the batter and the remaining Nutella. Top with the remaining batter. Lightly swirl the Nutella into the batter with a butter knife. Do not overmix.
- Bake the cake for about 1 hour and 15 minutes, until a toothpick inserted in the center comes out clean. Let the cake cool in the pan for 15 minutes. Invert the cake onto a wire rack, turn it right side up and let cool completely, about 2 hours. Cut the cake into slices and serve.
Banana Caramel Cream Pies
While banana cream pies are many and aplenty, banana CARAMEL cream pies are not. And while a large banana cream pie is to be sliced and shared, my banana caramel cream pies came in mini sizes.

I have not exactly mastered the art of making caramel. Some days my caramel curdle, and the milk solids would separate away (does anyone have any insight on this???).
But fortunately, there is no need to that stress inducing scenario today. Because instead of dumping cream into burning sugar, we add chopped bananas. And don’t worry about bananas and hot hot cooking sugar. They wont separate on you.

The recipe for this is a multi steps process. First we blind bake the crust.

Then the banana custard goes into it. The banana custard gets cooked twice. Once over the stove, and once in the oven. The custard would already be fully cooked over the stove. The second oven time is just to further caramelize the custard for a deeper flavour. oh yeah.

Top it off with whipped cream, shaved chocolate and toasted almonds,

And we’re good to go!

Banana Caramel Cream Pie
Taken from Daily Delicious
Sweet Shortcrust pastry
125g …………………………. Plain flour
25g …………………………… Icing sugar
…………………………………. A pinch of salt
75g …………………………… Unsalted butter, cold but pliable
1 ………………………………. Egg yolk
1-2 tsp …………………….. Iced water
Banana caramel filling
75g …………………………… Caster sugar
25ml ………………………… Water
350g ………………………… Bananas, peeled and chopped into pieces
25g …………………………… Unsalted butter
50ml ………………………… Milk
1 1/2tbsp …………………. Cornflour (cornstarch)
150g …………………………. Whipping cream
Topping
250g …………………………. Whipping cream
30g …………………………… Caster sugar
1tbsp ………………………… Rum
1 ……………………………….. Banana
………………………………….. Sliced almond, toasted
………………………………….. Dark chocolate, shaved
Mix flour, icing sugar and salt together in a bowl, add the butter and rub until combine.
Add the egg yolk and water, mix until the dough come together.Take the dough out of the bowl and knead until smooth.
Pat into a block, warp and chill for at least 30 minutes before using.Preheat the oven to 150°C.
Roll the pastry out thinly and line 18cm-round round tart pan.
Line the pastry with aluminium foil, and blind bake for 20 minutes, then remove the foil and beans and cook until a pale golden brown, 10-15 minutes.
Increase the oven temperature to 180°C.Heat the sugar in a saucepan with 25ml water and boil over high heat until the sugar turns into a caramel. Add the banana pieces and butter, and simmering gently until the banana is soft. In a bowl beat the milk and cornflour until smooth, then take the pan out of the heat, beat the milk and cornflour mixture into the saucepan with the whipping cream.
Return to the heat, cook until boiling.Pour into the pastry case, bake for 10-15 minutes until golden.
Remove from the oven and allow to cool.Whip the cream with sugar, and rum until soft peaks formed.
Spoon the whipped cream over the top with banana slices, dark chocolate, almond and drizzle with the caramel sauce.
Swiss Roll With Mixed Berry Jam
Beside the New Year’s Day, we Chinese also celebrate another occasion known as the Lunar New Year. The exact date for this celebration is not fixed.
I haven’t got the slightest clue how or what the date calculation is based upon, but it usually lapses from the conventional new year just by a couple of weeks.This year, the Chinese New Year was observed on 22 January 2012.
Which means on top of Christmas and New Year, our holiday season is somewhat extended. Of course, this also means the holiday bulge from the festive eating usually lingers a while longer with us.
Anyways,
Back to Chinese New Year.
It is a common practice for families and friends to send hampers of foodstuff amongst each other during this season. It’s almost like gift exchanging at Christmas.
Usually wrapped in transparent decorative plastic, we are able to see through into the goodies and treats that lay inside each hamper. As a kid, I used to gawk at the goodies neatly assembled within, and however tempted, I never dared to rip any one open without the consent of my parents.
My eyes would “lock” on the items that suited my fancy, and when the day came for the hamper to be unwrapped, I would go straight for these items.
So fast forward to twenty years later, I was visiting my parents’ home this January for Chinese New Year when my eyes locked on fancy jar of jam within a hamper that they had received.
A tall jar of “All natural”, “100% fruit”, “no sugar added” jam.

And like so many years, i still couldn’t bring myself to help myself to it without first asking for permission. Feeling like the kid i was years and years ago, i expressed my longing toward the said jam. And my parents, being the generous souls that they are (bless them!) pushed the entire basket of treats my way, and proclaimed me as its new owner.
I reached home that night, grabbed a spoon from the kitchen and did a taste test. I thought it tasted pretty good. I reversed the spoon, and using its handle (No double dipping!) scooped a tiny amount and popped it into the husband’s mouth.
And what other people valued “no sugar added”, he considered “sour”.
And the “100% fruit”?, he dismissed as “gritty with all the berry seeds”.
Convinced that it was a bad jar of jam, I chucked it to the side door shelf of the refrigerator, where it took up residence for the next one month.
Finally this morning, i decided to act upon it.
I baked a cottony, soft, chiffon swiss roll, and spread the controversial jam into it.

Good enough to eat on its own, the jam was just supplemental. And if you were as fussy as the husband, you could do exactly what he did and scrape away all the jam and worked just on the cake.

I brought the Swiss roll to work. And it seemed like the good and mature people at work were kinder to the jam.

No one made any unfavourable remark.
Because in all fairness, the jam is NOT bad at all,

It’s just that i happen to live with a man with a rather under-developed, child-like palate.
Chiffon Swiss Roll with Mixed Berry Jam
* Recipe to follow
Egg Tarts
So i made these egg tarts and served it for breakfast yesterday.

So when the question” Where are my favourite egg tarts?” came about on the breakfast table this morning, i knew i hit gold with this recipe.

If i had to guess, these egg tarts are more Chinese than anything else.
Made of a butter cookie like tart shell, this dessert are filled with baked custard

Soft, silky custard on top of a butter cookie.
It’s pretty amazing!
Each of these tart was baked in its individual little tartlet tin.

The crust got baked first before the custard mixture was poured in and the tarts went into the oven a second time.
Sure, it’s double the effort and double the baking time,

But it’s damn worth it!
Egg tarts
Taken from Yochana’s Cake Delight
Ingredients:
Pate Sucree:
125 gm. Butter – chilled
60 gm. icing sugar
1/2 egg white
1 egg yolk
200 gm. plain flour
1/2 tsp. vanilla essence
Egg Custard:
280 gm. fresh milk
160 gm. sugar
3 nos. eggs
1 tsp. rum
1/2 tsp. vanilla essence
Method:
(1) For pate sucree: beat butter and icing sugar till wellmixed.
(2) Add in white and yolk and mix.
(3) Add in vanilla essence and then the flour and mix into a dough. Rest for 10 mins. Press dough into small tart moulds.
(4) Bake the tart shell till half-cooked.
(5) For egg custard, heat sugar and milk together. Once sugar dissolves, off heat.
(6) Whisk eggs and pour into the milk mixture. Do not whisk till frothy.
(7) Add in rum and vanilla essece.
(8) Sift the egg custard and pour into tart moulds and bake at 175C till egg custard sets.
Note:
Half baked should be around 10 mins at 175C. I didn’t put the timing cos everybody’s oven is different. Judge yourself and see that it’s like puff up slightly and turned white.
After pouring in the custard, bake at a lower shelf to make sure that the pastry will be cooked at 175C. Bake for about 10 mins and watch over it. If you see the custard is about to puff up into a ball, take it out from the oven immediately. Once it puffs up, the egg tart will wrinkle when it’s cooled. What you can do is to shake the tray of egg tarts and if the custard wobbles, then it a sign that it’s not cook and if it doesn’t wobble, then it’s set and you can take it out from the oven.
Yam Chiffon Cake
Here i am, dusting off the layers of dirt that has piled on this old, deserted blog.
If anyone is still reading this blog, i am sorry for the long leave of absence.
Anyways, here is me trying to make up for lost time..
Let’s get things rolling, because time’s a wasting!
Today, i made a Yam flavored Chiffon cake.

Soft, fluffy, sponge like cake, artificially flavored (whoops!) with yam paste.
Yes, yes, i should have known better than to use something artificial. But It’s been such a long time since i baked something, and i figured i shouldn’t be to ambitious.
Yam paste is actually this thick liquid that has both the yam flavor as well as its unmistakable rich shade of purple. All i did was just to tip a couple of drops of it into the batter, and voila, instant yamm-iness!

There’s the cake in its mold.

And, there is the cake out of the mold…

As you can see, i am not exactly an expert at unmolding cakes. I pretty much skinned the gorgeous golden brown top layer off this cake (Hence the brush, needed to dust off all the crumb deluge).

Love the pastel purple shade. It makes me feel all princess-y ! 🙂
Yam Chiffon Cake
Ingredients:
115 grams cake flour
25 grams sugar
75ml coconut milk (again, i used the instant one)
60 grams oil
About 5 drops of magical yam paste
5 egg yolks
7 egg whites
1/4 tsp salt
1/2 tsp cream of tartar
100 grams sugar
Directions:
1. Sift the cake flour. Add the sugar. Whisk them together.
2. In another bowl, mix the coconut milk, oil and the magical yam paste together.
3. Slowly, stir the mixture into the flour mix. Add the egg yolks and combine. Set aside.
4. In yet another bowl, beat egg whites, salt and cream of tartar till foamy. Slowly add the sugar, beat till the egg whites form stiff but not dry peaks.
5. Gently fold the egg whites into the flour mixture
6. Pour mixture into an ungreased tube pan (my pan measures to be 20 cm on top, 15.5 cm bottom, height 10 cm).
7. Bake in a preheated oven at 160 degree Celcius (not F) for 55 minutes. Immediately invert baked cake still in pan to cool before unmolding.
Blackberry Japanese Cheesecake
After making the Brownie Swirl Cheesecake, i had just under half a cup of cream cheese left in my fridge.
91 grams to be exact.It was pretty unnerving and I was really really itching to rid of it, but there aren’t many recipes that call for such a scant amount of cream cheese.
Then I remember the Japanese Cheesecake.

Unlike the western cheesecake, the Japanese cheesecake usually involve minimal amount of cream cheese. In fact, from the way it was made, and from its light and fluffy texture, this cake is closer to a chiffon cake rather than a cheesecake.

The Japanese cheesecake is usually subtly sweet, and rely on some kind of sweet jam for it sweetness.
I’ve used blackberry jam on this.
U can of course use other jams, (strawberry jams being most common).

Oh, you do want to be gentle when slicing into this cake. I really suggest in using a sawing motion with a serrated knife. Yes, this cake is THAT soft and delicate.
Japanese Cheesecake
I took the recipe from an Indonesian cookbook (50 Resep Cheesecake Variatif)
100 gr cream cheese (i only used 91 grams)
25 gr unsalted butter
50 gr heavy cream
1/2 tsp lemon zest
1/2 tsp juice of a lemon
40 gr cake flour
50 gr egg yolk
100 gr egg whites
1/8 tsp salt
1/4 tsp cream of tartar
50 gr sugar
Directions:
1. double boil cream cheese till it is soft, smooth and not lumpy. Add the butter and heavy cream. Mix well.Add the lemon zest and lemon juice.
2. Sift flour into the cream cheese mixture. Mix till combined. Add egg yolks gradually. Set aside
3. With an electric mixer, whisk egg whites with salt, cream of tartar. Gradually add the sugar, and beat till peaks form.
4. Fold in egg whites mixture to cream cheese mixture.
5. Pour into a baking tin ( my pan was 18cm x 18 cm x7). Put the baking tin into a larger tin and spoon in about 2 TBS of water into the larger tin to create a water bath.
6. Bake in a preheated oven at 350 for 50 minutes or till cooked
Midnight Black Sponge Cake
This cake is so dark that you would mistake it as a brownie.

Except it wasnt a brownie, it’s a sponge cake, made from the pack of black glutinous rice flour that was bought wrongly. I made a chiffon cake from that flour before. It was soft, fluffy and the flour imparted an unmistakable aromatic scent into the cake.
I wanted to do something different with the flour today. So, i decided on a sponge cake.

Just based on its color, it’s apparent that this cake is very rich in flavor. The aromatic glutinous black flour scent literally hit me smack in the face as i pulled open the oven door.
The scent hit me one more time as i took my first bite. I could feel it working up my nose. It was as though i were inhaling the cake instead of eating it.
Taste wise, the cake was pretty good too. With just the right amount of sugar, the sweetness of this cake was subtle, without overpowering the wonderful smell from the cake.

I would love to give this cake an A and continue to rave on about it. Unfortunately, it is the texture of this cake that fell short. The cake felt rough on my tongue. Gritty almost.I suspect it’s because of the lack of liquid in the cake batter. There wasn’t water, or milk in the recipe. There was only oil.
Oh well, i guess you cant win them all!
* Note: I won’t be providing the recipe for this as i dont think it really made the cut.
Junior Brownie Swirl Cheesecake
It seems like i have savoury posts on my blog more than ever.
Today, i return to the familiar grounds of cakes and cookie land with this Brownie Swirl Cheesecake.

This cheesecake sits on top of a brownie crust, and has chocolate swirls on it.

And if u were wondering what those squares of brownies at the bottom of the cake are, they are brownie bites.
The brownie bites were baked from the same brownie base batter. But they were baked in a separate pan. This brownie batch is then cut into 1 inch cubes and arranged at the base of the cake (on top of the brownie base) before the cheesecake mixture gets poured in.

I hope i didnt confuse you.
But read the recipe, then you will get what i mean.
Making these brownie bites is a bit more of a work.
But it also means more brownies in the cheesecake.

There is a crack in my cheesecake.
I am not letting it get to me.
Instead, i blitzed a few oreo cookies and made a ring around the cake to sort of divert the attention away from the crack.

The recipe called for walnuts to make that ring. But since the cake is already yellowish brown in hue, i thought the black oreo cookies would stand out more rather than the walnuts.
Plus, i didnt have any walnuts anyways.
Junior Brownie Swirl Cheesecake
Recipe taken from Suite 101
For the brownie crust and brownie bites:
- 8 ounces bittersweet
- or semisweet chocolate
- 1 cup (2 sticks) unsalted butter
- 11/2 cups all-purpose flour
- 1 teaspoon salt
- 6 extra-large eggs
- 2 cups sugar
- 1 tablespoon pure vanilla extract
For the Cheesecake:
- three 8-ounce packages
- cream cheese (use only full fat),
- at room temperature
- 11/3 cups sugar
- 3 tablespoons cornstarch
- 1 tablespoon pure vanilla extract
- 2 extra-large eggs
- 2/3 cup heavy or whipping cream, plus 1 tablespoon for brushing
- 2 ounces bittersweet
- or semisweet chocolate
- 1 cup coarsely chopped walnuts
How To Make A Cheesecake:
- Preheat the oven to 350°F. Generously butter the bottom and sides of a 9-inch springform pan and an 8-inch square baking pan. Line the baking pan (but not the springform) with parchment or waxed paper, leaving a 1-inch overhang over the sides. Wrap the outside of the springform with aluminum foil, covering the bottom and extending all the way up the sides.
- To make the brownies, melt the chocolate (page 23) with the butter and let cool. In a small bowl, combine the flour and salt. In a large bowl, beat the eggs with an electric mixer on high until light yellow and thick, about 3 minutes. With the mixer still running, gradually add the sugar, then the chocolate mixture and vanilla. Reduce the speed to low and blend in the flour mixture just until it disappears.
- Spread 2 cups of the batter in the springform to make the crust and the rest in the baking pan. Bake just until set around the sides, about 10 minutes for the crust and 25 minutes for the baking pan. (The centers will be slightly soft.) Let cool on a wire rack for 1 hour. Leave the brownie crust in the springform. Lift the brownies out of the square pan onto a plate, using the paper hanging over the sides as handles. Cover both the crust and the square of brownies with plastic wrap and refrigerate overnight.
- Cut the square of brownies with a serrated knife into 1-inch squares and set aside. Put one package of the cream cheese, 1/3 cup of the sugar, and the cornstarch in a large bowl. Beat with an electric mixer on low until creamy, about 3 minutes, scraping down the bowl several times. Blend in the remaining cream cheese, one package at a time, scraping down the bowl after each one. Increase the mixer speed to medium and beat in the remaining 1 cup sugar, then the vanilla. Blend in the eggs, one at a time, beating well after adding each one. Beat in the 2/3 cup of cream just until completely blended. Don’t overmix! Transfer 1 cup of the batter to a small bowl and set aside for the chocolate swirls.
- Cover the chocolate brownie crust in the pan with small brownie bites (12 to 16), covering as much of the crust as possible. Use only one layer of brownie bites in order to leave plenty of room for the cheesecake batter. (Eat the rest of the brownies!) Gently spoon the white batter over the brownie bites.
- Now make the chocolate swirls. Melt the chocolate (page 23) and stir into the reserved white batter until completely blended. Using a teaspoon, drop the chocolate batter on top of the white batter, pushing it down slightly as you go. Using a thin, pointed knife, cut through the batter a few times in a swirling “figure 8” design, just until chocolate swirls appear.
- Place the cake in a large shallow pan containing hot water that comes about 1 inch up the sides of the springform. Bake until the edges are light golden brown and the top of the cake has golden and dark chocolate swirls, about 11/4 hours. Remove the cake from the water bath, transfer to a wire rack, and let cool for 2 hours (just walk away—don’t move it). Leave the cake in the pan, cover loosely with plastic wrap, and refrigerate until completely cold, at least 4 hours or preferably overnight.
- To serve, release and remove the sides of the springform, leaving the cake on the bottom of the pan. Place on a cake plate. Brush the remaining 1 tablespoon cream in a 1-inch border around the top edge of the cake (this helps keep the nuts in place). Sprinkle the walnuts over the cream, pressing the nuts down gently, making a 1-inch border around the top outside edge. Refrigerate until ready to serve. Slice with a sharp straight-edge knife, not a serrated one. Cover leftover cake and refrigerate or freeze up to 1 month.
- Makes one 9-inch cheesecake, about 3 inches high.
Read more at Suite101: Junior’s Brownie Swirl Cheesecake Recipe: Junior’s Cheesecake Cookbook Chocolate Fudge Brownie Cheesecake | Suite101.com http://donna-diegel.suite101.com/juniors-brownie-swirl-cheesecake-recipe-a76551#ixzz1b1FafxMG
Black and White Glutinous Rice Flour
Truth be told, i had no intention to make this chiffon cake at all.

It all started when i was too lazy to head to the grocery store to buy some WHITE glutinous rice flour. And i happened to know that a friend was going to do her groceries anyway. I decided to take advantage of the situation, and asked her if she could pick it up for me.
Being a doll that she is, she came back with my glutinous rice flour.
But the black one, instead of the white.
I suppose, i could have gone to the grocery store and asked for an exchange.
But like what i said, i was too lazy to go to the grocery store.

So i made this black glutinous rice flour chiffon cake instead.
This chiffon cake is really popular in the Asian countries. It is soft, airy with bits of aromatic grits from the black flour.
That saved me a trip for the exchange.
But i still needed my white glutinous rice flour.

Because i wanted to make this.
This chinese dessert is known as tang yuan. They are balls of white glutinous rice dumpling boiled in a sugar syrup infused with ginger.
You can fill these dumplings as you want. But the popular ones revolve around red bean paste, ground peanut and black sesame paste.
I decided with the black sesame paste for this.

Black sesame seeds <not the afore mentioned black glutinous rice flour>, were toasted and ground, mixed with sugar and butter to form this filling.
While encasing the filling with the dumpling dough, you might want to make sure that the surface is smooth and is crack free, or they will burst open while cooking.

Hmm, black specks of deliciously messy, ground sesame against white dough balls…
Black Glutinous Rice Flour Chiffon Cake
Taken from Ancoo Journal
4 Egg yolks
20g Sugar
1/4 tsp Salt
50g Coconut cream (Kara brand)
2 tbsp Corn oil
30g Plain flour
55g Black Glutinous rice flour
1/4 tsp DA Baking powder
4 Egg whites
1/4 tsp Cream of tartar
50g Sugar
Method:
Sift plain flour, black glutinous rice flour and DA baking powder together and set aside.
Whisk egg yolks, salt and sugar together until sugar dissolved.
Mix corn oil and coconut together till combined and add to the egg yolks mixture, mix well and add flour ingredients into it and stir batter until smooth.
Whisk egg whites and cream of tartar till frothy. Gradually add in the 50g sugar and whisk till peak form.
Lower speed and slowly pour the egg yolks mixture into it. Stop machine and use a rubber spatula to fold mixture until well combined.
Pour batter into two mini moulds.
Bake at preheated oven at 160C for 25 mins and 150C for another 15 minutes.
Then switch temperature to lower grill and bake chiffon cake for another 5 minutes.
Remove chiffon cake from oven, invert mould onto table.
Allow the cake to cool completely before removing the cake from the mould.
Taken from Rasa Malaysia
Ingredients:
8 oz. glutinous rice (sticky rice) flour
180 ml water (3/4 cup water)
1/4 cup black sesame seeds
1/4 cup sugar
1/2 stick unsalted butter (1/4 cup or 4 tablespoons)
Ginger Syrup (姜茶):
5 cups water (reduced to 4 cups after boiling)
1 cup sugar
4 oz. old ginger (skin peeled and then lightly pounded with the flat side of a cleaver)
1/2 teaspoon sweet osmanthus (optional)
2 screwpine leaves or pandan leaves (tie them into a knot, optional)
Method:
Lightly toast the black sesame seeds over medium fire until you smell the aroma of the black sesame seeds. Please take note that the sesame seeds will start popping when they are heated, so use your lid to cover. Don’t burn the black sesame seeds; transfer them out and let cool as soon as they smell aromatic.
Use a mini food processor to grind the black sesame seeds until they become fine. Transfer the ground black sesame into a wok, add sugar and butter and stir well to form a thick paste. If they are too dry, add more butter. Dish out and let cool in the fridge. (This will make the filling easier.)
In a big bowl, mix the glutinous rice flour with water until it forms a smooth paste and no longer sticks to your hands. Divide it equally into 16-20 balls (depends how you like the size, the bigger the size, the easier it is to do the filling). Flatten each ball in your palm, and then use a pair of chopsticks to pick up some black sesame paste and lay it in the middle of the flatten ball. Fold the edge to seal the dumpling. Lightly roll it into a ball shape using both palms, very gently and delicately. Set aside.
Prepare the ginger syrup by boiling the water. Add the ginger and screwpine/pandan leaves (optional) into the water and boil for 10-15 minutes with medium heat. Add sugar and sweet osmanthus and boil for another 5 minutes. Lower heat to simmer and reduce to about 4 cups of water. Add more sugar to taste if you like.
Heat up another pot of boiling water. Drop the dumplings into the hot boiling water. As soon as they float to the top, transfer them out and into the ginger syrup. Turn off heat and serve the black sesame dumplings in a bowl immediately.
Thin Apple Tarts
This apple tart recipe was the perfect recipe for me today.
Firstly,
It allowed me to use up my stock of apples.

Secondly,
it allowed me to use my new mandolin slicer toy.
The apples were cored and quartered and then sliced to 1/4 inch thick. I loved how precise and uniform each of my apple slices were, thanks to that toy.

and thirdly,
there is no rolling pin required for this.
A soft dough cream cheese dough is patted into a circle, before the apples go on top.
Perfect for a morning weekday rush,
not to mention, very convenient.

I drizzled maple syrup over these tarts. They didnt really need it as they were sweet enough as they were.
I can be such an over-achiever.
Thin Pear Tart
Note: I changed the pear to apple obviously. ![]()
Taken from Martha Stewart’s Pies and Tarts
Ingredients
- 2 ounces cream cheese
- 4 tablespoons unsalted butter, room temperature
- 1/2 cup all-purpose flour, plus more for dusting
- 1/2 cup, plus 1 1/2 tablespoons sugar
- 1/8 teaspoon salt
- 2 tablespoons freshly squeezed lemon juice
- 2 tablespoons pear brandy
- 1 Bosc or Red Bartlett pear
- 1/8 teaspoon ground cinnamon
Directions
- Heat oven to 400 degrees with rack in center. Line a baking sheet with parchment. Combine cream cheese and butter in a food processor. Add flour, 1/4 cup sugar, and salt, and process until combined. Dough will be sticky. Turn dough out onto prepared baking sheet. With lightly floured fingers, pat dough out into a flat 8-inch circle.
- In medium bowl, combine 1/4 cup sugar with lemon juice and brandy. Halve pear lengthwise; core; leave skin on. Cut lengthwise into 1/4-inch-thick slices; transfer to lemon-juice mixture; coat well. Place slices in strainer to drain liquid. Arrange lengthwise around border of dough, overlapping slightly. Arrange remaining slices in center. Sprinkle tart with remaining 1 1/2 tablespoons sugar. Dust pears with cinnamon. Bake until golden, 25 to 30 minutes. Serve warm or at room temperature.
Star Studded, Caramel Walnut Cupcakes
It’s been a while since i made cupcakes, so i thought why not?
I havent really found a vanilla cupcake recipe that i really really would fall back upon, but if my memory served me right, the Magnolia Bakery’s one wasnt too bad.
So using that as the cupcake, i have topped one with some homemade caramel and walnuts,
I havent really mastered the arts of caramel making, so i wont be posting the recipe.
This recipe seemed pretty runny when i frosted, but then again, it was also still warm. It did kinda thicken up after some time.

As for the walnuts, they were just toasted for a bit in the oven. I wanted to make candied walnuts, but got too lazy to go about doing it.
This next cupcake is for the little niece,

A star studded cupcake for the little star.
She wiped out the star gummies on this cupcake. And the frosting.
The cupcake was pinched, crumbled and squeezed. I dont think she ate any of it. LOL

All packed up and ready to go !
Taken from foodnetwork.com
Ingredients
Cupcakes:
- 1 1/2 cups self-rising flour
- 1 1/4 cups all-purpose flour
- 1 cup (2 sticks) unsalted butter, softened
- 2 cups sugar
- 4 large eggs, at room temperature
- 1 cup milk
- 1 teaspoon vanilla extract
Icing:
- Vanilla Buttercream, recipe follows
Directions
Preheat oven to 350 degrees F.
Line 2 (1/2 cup-12 capacity) muffin tins with cupcake papers.
In a small bowl, combine the flours. Set aside.
In a large bowl, on the medium speed of an electric mixer, cream the butter until smooth. Add the sugar gradually and beat until fluffy, about 3 minutes. Add the eggs, 1 at a time, beating well after each addition. Add the dry ingredients in 3 parts, alternating with the milk and vanilla. With each addition, beat until the ingredients are incorporated but do not over beat. Using a rubber spatula, scrape down the batter in the bowl to make sure the ingredients are well blended. Carefully spoon the batter into the cupcake liners, filling them about 3/4 full. Bake for 20 to 25 minutes, or until a cake tester inserted into the center of the cupcake comes out clean.
Cool the cupcakes in tins for 15 minutes. Remove from the tins and cool completely on a wire rack before icing.
Coffee Crumb Cake with Lemon Cheesecake Filling
I sometimes feel that butter cakes are rather plain and boring. And they are seldom their worth in calories ( we all know how much butter that goes into them, hence the name).
Sure, you can use very high quality butter to make them extra fragrant and delectable. But instead of doing that today, i have decided to use the extra money i would have spent on more expensive butter and bought some cream cheese instead.

Two slices of butter cake sandwiching a cream cheese filling.
🙂

And of course we have to mention the crumb toppings.
Crumbly crumb toppings made of butter, flour and brown sugar.

Boring buttercake no more!
Let’s DigIn!
Buttery Cream Cheese Coffee Cake
Recipe taken from Kitchen Lab
CAKE
1 cup (225g) butter (no substitutes)
1 cup caster sugar
2 eggs
1/4 cup sour cream (I used crème fraiche)
2 cups flour
2 teaspoons baking powder
1/2 teaspoon salt
FILLING
2 (8 oz or 250g each) packages cream cheese, softened
1 egg yolk
1 cup caster sugar
1 teaspoon vanilla
TOPPING
1/4 cup light brown sugar
1/2 cup flour
1/4 cup butter
Set oven to 350F (175C) with oven rack set to second-lowest position. Grease a 13 x 9-inch (or an 11 x 7-inch, baking time will need to be increased slightly). Cream butter with sugar (about 3-4 minutes), add in eggs and sour cream or crème fraiche; beat well (about another 3 minutes). In a bowl, sift together flour, baking powder and salt.Add the flour mixture to the creamed mixture; beat well until combined (batter will be thick). Spread more than half of the batter in the prepared baking pan. In another bowl, cream together all filling ingredients, then carefully spread over the cake batter. Spoon the remaining cake batter over the top of the cheese mixture. Mix all topping ingredients, pinching together with fingers until the consistency is like crumbs, and sprinkle over the top. Bake for about 50-55 minutes or until middle feels set and not jiggly.
Mini Pizza Bites
I knew i had to make these the first time i saw it at Annie’s eats.

Mini Pizza Bites.
Mini buns of pizza dough, wrapping around cheese and pepperoni.

Totally handy to eat.
Because they dont drip and droop they way pizzas do,
and because they are bite sized.

They are also not crazily coated with pizza sauce. Which makes them light enough for breakfast.
Hmmm breakfast…
I am a morning person. Breakfast is totally my favourite meal of the day.

But if for some reason, sauce-less pizza bites for breakfast dont fly with you,
You can totally have pizza dipping sauce at the side (I just warmed ready made pizza sauce).
Either way, they were wonderful. And they are totally making it to my breakfast staple list.
Pizza Bites taken from Annie’s Eats
Fruit Tart
I made cream tarts today.

And topped it with strawberries and dragon fruit.
That’s health food allright.

It doesnt matter the butter in the crust.
Or the full fat milk and whole yolks in the pastry cream.
Having fruits on the tarts offset that.

In fact, having fruits on anything is healthy by default.
Right.
Fruit Tart
Sweet Tart Pastry
250gr butter
110 gr icing sugar
1 egg
1/2 tsp vanilla essence
430 gr AP flour
1. Beat butter and sugar till light and fluffy. Add egg and vanilla,
2. Beat flour into butter mixture till incorporated
3. Bake at 170 degree celcius till golden brown (about 15 – 20 mins)
4. Pipe pastry cream into baked shells
5. Arrange fresh fruits on pastry cream
Pastry Cream Recipe from Martha Stewart.
Cracked Sponge Cake and a Recovery Plan.
I baked a sponge cake today.
And it cracked.
It’s not even a cheesecake,
yet it had the cheek to split so deep right down its middle.
The cake looked as if an earthquake went through it.

Then i remember my pack of strawberries, frozen in time in my freezer.
And an idea hit me like a tornado.

Of course!
Making a strawberry jam out of strawberries.
Then flooding it over the cake.
A disaster recovered,

And a cake survived.
PS: I wont be posting the cracked cake recipe today as i don’t quite think that it is a recipe i would recommend to anyone.
Nutella Chocolate Chip Cookies
Just when you think life cannot get any better than chocolate chip cookies,
Someone came up with NUTELLA Chocolate Chip Cookies.

That’s chocolate chip cookies with Nutella swirls.

I know. Epic right?

The trick for these cookies is to not overmix the Nutella into the dough.
That way, you are able to see and taste the Nutella swirls.

And i wouldn’t recommend overbaking these cookies.
They are most perfect when they are soft, and chewy.
And also because soft cookies are perfect for growing little teeth.

Meet my little cookie monster.
My bubbly, singing niece of 3.
Isn’t she the most precious?
Yet another Chicken Pie
Seems like i can’t think of anything savoury to bake aside from chicken pies.

In fact, this is the third chicken pie within a month of each, the first one HERE, and the second one HERE.
Well, at least this one uses a different crust.
This crust uses sour cream.
And that’s epic.
At least for me.
Because i honestly wasn’t expecting the result i got.

Using sour cream creates a softer, wetter dough. It’s trickier than most of the dough i’ve handled.
But it is also more delicious than most of the dough i’ve handled.
It’s a trade-off.
And i am willing to trade.
The sour cream imparts a fancy twang of .. erm.. sourness into the dough (duh).
I can’t really describe it, but i would say, it made the crust taste somewhat more savoury.
And definitely more appetizing.

It also made me just want to pluck at the crispy, crimped edges around the pie. The edges which tasted really rich, and was light and flaky at the same time.
I almost wanted to run back into the kitchen and make another batch of chicken pie with the same crust.
But i really shouldnt. Cause that would be my FOURTH chicken pie between June and July.
Perhaps some of you can help me think up of savoury ideas other than pies to bake with ?
Thanks in advance!
Chicken, Leek and Pea Pie taken from Christine’s Recipes
Mottling Bananas and Frozen Fruits
I had a pack of strawberries in my refrigerator a few days ago. They were firm and fresh.
Besides eating them fresh alongside breakfast, lunch, dinner, and the occassional few i popped into my mouth each time i opened the fridge (That’s A LOT of strawberries judging at how often i visit the fridge btw), i had no other agendas planned for my strawberries.
I knew the window to use up these fresh strawberries was closing in on me. And before i know it, I would be feeding my trashcan with white, mossed strawberries in total remorse.
So i searched online for a strawberry recipe that would knock the socks off everyone while knocking out the chances of the impending fleece attack. But nothing screamed out at me. Nothing even whispered to me.
I chucked the strawberries into the freezer in resignation.

A few days later, i had the exact same problem.
This time, with another fruit.
Mottling bananas complete with its army of fruit flies.
Like the strawberries, i threw the bananas into the freezer, feeling incredibly grateful of this magical box where i was able to put aside my problems.
A couple days later, I bought another bunch of bananas and was faced with more of that mottling banana problem. Geez, when will i ever learn?
I yanked open the freezer door, and felt deeply unsettled with my growing frozen fruit forest AND the black speckled bananas in my hands.
I had to do something fast.
In fact, i had to do a COUPLE of things fast.
First I tackled the problem in my hands (literally).
A banana cake for my fully ripened bananas,

In case you havent already known, a banana cake is like the perfect docking place for all aging bananas.

A banana cake wouldn’t discriminate against how far along your bananas have gone.
In fact, the more spotty, freckled, and speckled your bananas are, the more precious your banana cake is because it will only get sweeter.

I’ve topped my banana cake with a bit of leftover chocolate fudge from a chocolate fudge cake i made earlier.
I dont think anyone minded. 🙂
Next up, i tackled the jungle of fruits i had in my freezer.
I heard that using frozen fruits, bananas especially, create the thickest shakes as you dispense with putting in ice cubes.

I decided to give it a whirl. In my food processor. Because i dont quite yet own a blender.
And you don’t really need a recipe for this.
I just went by feel.
A frozen banana, a handful of strawberries, and a splash of yoghurt.

PS: Pls ignore the advertorial texts on my cup. It’s a free cup from a local milk company.I havent gotten down to unpacking my usual props of plates and cups.
PPS: The strawberries at the sides are frozebitten, not fleeced with white moss. 🙂
Best Banana Cake from Dorie Greenspan Taken from Sugar and Spice
Strawberry Banana Smoothie
1 large frozen Banana
a handful of frozen strawberries
A splash of strawberry yoghurt
Icing sugar, to taste
1. Chop up the frozen bananas, strawberries.
2. Add sugar to taste
3. Add a splash of yoghurt
4. Whirl in your food processor till smooth and smoothie like
Bes
Chocolate Fudge Cake
I needed to thank my dressmaker today.
The lady who designed my gown.
She put up with every of my whims and fancy,
and tailored with the most lovely and beautiful gown.

Photo courtesy of Edward Suhadi
See the beads on the chest?
I painstakingly chose each and everyone of them. Because somehow, i have developed this super- visual abilities. I was able to spot how some beads are larger than the others. Or how some beads have more shine to them.
I didn’t even care that the beads come from the same box
or that they are from same manufacturer.
Thank God, the patient lady designer put up with me.
She even put out her palms to collect my chosen beads, and incorporated it to the gown.
She really really deserves a cake.

If you read my previous post, you probably knew that i am still getting to know my new kitchen. Without the familiarity, i was almost afraid to bake something sensitive.
With all the beaten eggs, a sponge cake is sensitive in this point in time. I decided to forgo that and opted for the more stable chocolate butter cake.

I also knew that i wouldnt be able to refrigerate this before passing it to Patient Lady Designer. Because with the newer, smaller kitchen, was the new, even smaller refrigerator.
So unless i wanna excavate my refrigerator from its everyday residents of eggs, milk, fruits, and Reese’s PB cups just to make room for it, i needed a plan B.
Plan B was chocolate fudge, which is most perfectly malleable at room temperature.
Here’s what i did:

Dollop.

Drop another layer of cake, and dollop some more!

Smooth and frost,

Arrange a few decorational strawberries
Oh, and unless you are planning to keep this for more than a couple of days, i wouldnt really recommend refrigerating it as the fudge will harden up.
I am really hoping that Patient Lady Designer polishes this off before it had the chance to make that trip to the chiller!
Recipe:
Apple Cherry Butter Cake
You can put a cherry on pretty much everything.
On a sundae,
on a milkshake,
in your cocktail,
in your cookies,
or for this instance, on a cake.

Don’t they just prettify ?
I have apple juice in this cake. And cherries both ON the cake and IN the cake.

Well, at least that was the intention. To have bits of cherries throughout the cake. But it seems like the Maraschinos had other plans. They all decided to go south to the bottom of the cake.

I patted the cherries dry before folding it into the batter. I sprinkled them with flour too. But neither seemed to work. I guess it must have been the batter which wasnt thick enough.
Anyways no point beating yourself about for sunken cherries. It just means you gotta dig deeper to get the good stuffs.

Or you can distract people by cutting the cake into fancy shapes, and of course, top it off with yet another cherry!
Lemon Cherry Cake
200 gr butter
125 gr caster sugar
4 eggs
200 gr AP flour
30 gr cornflour
15 gr milk powder
2 tsp baking powder
75 ml apple juice
100 gr maraschino cherries
1. Sift the AP, cornflour, milk powder and baking powder into a bowl.
2. Beat butter and sugar till light and fluffy. Add the eggs gradually, making sure that each is incorporated before adding the next one.
3. Add the flour mixture alternately with the apple juice.
4. Fold in the diced cherries.
5. Pour into a pregreased and prelined 22 x 22 x4 cm baking tin.
6. Bake at 180 degree celcius for 30 minutes or till it gets cooked.
Durian Cream Puffs
I kept quiet and held my breath as i watched my sisted picked one of these up to eat.

My sister didnt know it, but this cream puff was filled with durian whipped cream. And she absolutely hates durians. I was hoping that it will slide past her and she will eat it unknowingly.
But no such luck it seems. The puff came with a very potent scent that gave it away. She narrowed her eyes at me and asked suspiciously “is this durian?”.
A reluctant nod from me and the rest was history.
Notoriously (and deservedly) known as the King of Fruits, durians indeed evoke strong behaviours from its audience. Some cab drivers refuse your business when you are carrying durians. My sister dropped the puff like a hot potato.
On the other extreme though, there are fanatics who anticipate the durian season and participate in “all-you-can-eat” durian buffets. Some go from shops to shops to hunt for the “perfect durian”.
I guess i am a balance in this nature. I choose to straddle across the fence.

Made of choux pastry, these were filled with whipped cream with durian bits. It’s really quite interesting to find out how peoples’ reactions are when offered a puff. Just by learning whether they liked or disliked durians, i feel like i got to know them just a bit better.
Between the enthusiasts and the cynics, i am glad that the recipe yielded me only 8 puffs. Had it been more, i think i won’t be happily lugging an empty box home tonight.
Chicken handpies
Making puff pastries intimidates me. I remember clicking the “x” button in resignation on a web page that was trying to fill me in with some basic puff prophecy. It felt like reading an instruction manual on how to assemble a multi tier rack. A rack with its bonus packet of assorted bolts and nuts.
so for the past couple of years, i forged ahead with my baking journey. Carefully sidestepping recipes which included this elusive pastry. It was okay at first, but it became quite limiting after a while. I felt i was constrained in my baking menu.
I decided it was time to pick up that instruction manual again.

And boy, was it rewarding.
Truthfully, i was all set for disappointment and a tray of greasy, un-inflated dough. Imagine my sweet delight when i pulled a batch of puffy chicken handpies.
These puffy handpies came companionably with my puffed up my ego. It was one of those moments where i felt like i owned baking. Or that i must be the Martha stewart of my past life.

Well, they weren’t exactly perfect. Some of them burst open at the sides from the fillings. But that’s okay. it just meant whoever picked them up knew exactly what to expect inside the pastries.

A creamy mix of chicken, potatoes, broccoli and carrots. The same filling for my tube-shaped chicken pies actually.
or my chicken pot pie,

In which i filled a ramekin with pie fillings and topped it with a sheet of puff pastry.
Of course, with all that cutting and shaping, you are bound to get a few scraps.
And u know what they say! Waste not, want not…

I egg washed them, sprinkled some sugar and sent them to bake of course!
(This is the exact recipe as my previous post. Just that i served them different)
Chicken Pie
My chicken pie comes in a tube today.
If you have ever made puff pastry before, you would probably be familiar with the repetitive process of rolling your dough into a rectangle, and then folding the two ends (top and bottom) so that they overlap in the middle. This process is repeated for a total of 4 times (according to my recipe) before your puff pastry dough is ready for use.
I was doing just that this morning. As if on autopilot mode, i was either rolling the dough upward, or downward to maintain the rectangular shape of my dough. And that was what happened even after i completed my fourth turn. Instead of rolling my dough into a circle for the base of the pie, i spacily rolled it to its accustomed rectangle.

But instead of beating myself up over it, i decided to make do with my blunder. Rather than docking my puff pastry into a pie plate, i pipped the fillings for this pie down the long side of my rectangular puff pastry then rolled it from the short side up to seal. Which pretty much explains the tunnel of chicken pie.

But then again, no one had to know of your carelessness, cause this looks perfectly normal as a roulade.

Filled with chicken, potatoes, broccoli and carrots, this pie is pretty much a meal on its own. Warm, hearty and satiating. It made a good breakfast menu for me, but i am already thinking about it for lunch, AND maybe if there’s some left, dinner.
Slicing into this pie was a dream too. I absoultey loved hearing the soft crunch as my knife sliced into the top of this very tender and flakey pie.
And as you can see, the puff pastry didnt rise much when weighed down with the filling. However, at the sides where i sealed the skin together, it rose up quite a bit!

I am no expert when it comes to rolling pie pastry, and i must say i am pretty happy with the way this puffed up!

And biting into a raised puff pastry is messy. But it sure is delicious. So be sure to hold a plate under your chin to catch the crumbs!
Chicken Pie
Taken from Baking Made Easy by Agnes Chang
*my notes in red
Puff Pastry :
360 gr plain flour, mixed with 1tsp salt, sifted, + 60 gr butter
8 – 10 TBS cold water, mixed with 1 tsp lime juice
180 gr pastry margarine
1 beaten egg, mixed with a pinch of salt (for glazing)
Filling:
300 gr diced chicken meat, mixed with 1/2 tsp cornflour and 1 tsp concentrated chicken stock (I omitted the cornflour, and used powdered chicken stock)
2 sausages, diced
1 cooked potato, diced
10 button mushrooms, diced (omitted)
1 big onion, chopped, + 3 TBS butter/ oil
salt and pepper to taste
pinch of nutmeg (omitted)
2 TBS flour, + 1/2 Cup water
1. Pastry: Put the sifted flour into a big mixing bowl, Rub in butter, add enough water to mix into a pliable dough. (I placed flour, salt and butter in a food processor and blitzed it before gradually adding the water mixture) Knead till smooth. Rest for 15 mins. Roll into oblong shape. Put pastry margarine into 2/3 of dough, fold into 3 layers. Roll again into oblong shape and fold into 3 layers again. Repeat 3 more times ( rest pastry for 15 minutes each time)
2. Filling: Heat up butter/oil in a fruing pan. Sautee chopped onions till fragrant. Add chicken meat and fry till fragrant. Add potato, carrot, button mushrooms(omit), nutmeg powder (omit) and salt and pepper to taste. Dish up. Heat up another 1 TBS oil and fry plain flour till fragrant. Add water to form a thick sauce. Mix in the chicken meat mixture. Dish and leave to cool.
3. Roll the pastry into 3 mm thickness. Cut into rounds and press into the pie dish. (I rolled it into a long rectangle, piped the filling down the middle, and rolled it up from the sides to form a roulade)Add filling and cover up with another piece of pastry. Glaze with beaten egg and slit on top to let steam out during baking. Bake in a preheated oven at 200 degree celcius till golden brown (about 25 – 30 mins). Remove from oven and ready to serve.
Sunken Chocolate Cake
Oh no. It can’t be.
This blog hasn’t seen chocolate in weeks!
A rectification of the situation is in order. A quick one preferably, cause even under such dire situations, i still need to get to the office by 9 am.
Okay 9.30 if the boss ain’t around.

Or maybe 9.45 since i needed to make a grand entrance with this cake.
This mysteriously dark, luxurious, rich chocolatey cake.

It started off as a cake, baked in a springform pan.
This cake has seen greater heights when it was still baking in the oven. It reached the brim of the springform.

But take it out of the warm oven, and it starts to sink. That’s the thing with fallen cake, they are supposed to look like crap. But i am kind of liking how this cake turned out. It is charming in its own way. Curvaceous and waisted. Sexy isnt it?

Slice into it and you see a dark, bold and intensely chocolatey cake. I didn’t even have to taste it to know how chocolatey it was. The scent that hit me as i was slicing the cake gave me hints.
Texture wise, it is soft and sponge-like. It’s actually like a super soft sponge cake, but with a taste as rich as a brownie.

It’s like nothing i’ve ever tasted before. You really gotta try this to know what i am talking about!
Recipe from Happy Home Baking
Egg Mayonnaise Buns
I have always wondered what happens if i fill my bread dough with mayonnaise and sent them to bake?
Would the mayo turn into a runny goo and spill out of the buns?
And just for the fun of it, i decided to give it a go.
This bun was filled with egg mayo and ham.

Then i sent it to bake as usual.

and voila! No runny goo, no spills!
Just delicious buns with egg mayonnaise and ham as fillings!
Black Olive Sable Cookies
If you haven’t read the title, i think you wouldn’t have guessed in a million years what those black stuffs in my cookies are.

Well, they are black olives.
Okay, did that weird you out?
But waittt! Before you go clicking on the ‘x’ button on my page, please allow me to have a squeak to convince you on these cookies.

These cookies are a Pierre Hermes creation. The mad genius who seduced the world with his famed macarons.
Okay, did that work?
It must be if you are still reading this.

Using Extra Virgin Olive (EVO) oil, these cookies were still light and crisp. They were very tender and they snap with the lightest pressure, without being crumbly. They have a melt in your mouth quality to them. And of course i bet they are healthier than your average butter cookies.
Tastewise, they were really straddling the fence between savoury and sweet. A very sophisticated, complex taste that you will want to savour with your eyes closed. It’s like a delicious awakening to the tastebuds and sense of smell.

I think these would serve as great appetizers for some fancy event.
And by mean fancy, i am not talking about a kid’s 5 year old birthday bash. Because these are definitely very adultrated cookies. Delicious, adultrated cookies.
Recipe taken from Kokken69.
Creamy Lemon Bars
All these while, i have only made stirred lemon curd. The type of lemon curd you labour over your stove over.
Which is quite the irony cause my competence in stove cooking is pretty much a joke at best.
So i decided to do what i do best (or at least better) and BAKE some lemon curd instead.

These are Martha Stewart’s Creamy Lemon Bars. Buttery shortbread crust with creamy lemon curd.
From the couple of lemon bars recipes featured on her site, this one stood out cause it had the additional “creamy” word in it, as opposed to just “lemon bars”.
Here’s why.
This curd has a whole can (yes, all 14 ounces) of condensed milk in it.
And as opposed to just the average “lemon bars” which uses whole eggs for the curd, this “creamy lemon bars” topped them by using only the yolks, which i conclude produces a richer, thicker curd.

Thick, creamy curd which you can pretty much just spoon onto your plates had it not been for the crust.

And while the suggestion was to dust these with icing sugar. I decided a bit of leftover raspberry curd could join in the fun and add some needed colour to these pale beauties.

Get ready to pucker up with these two sourheaded fruits!

Lemon Cupcakes with Pastry Cream and Raspberry Curd
I think the local Indonesian confectioner’s sugar is not as finely grained as the rest of the world out there. Because each time i made the American Buttercream, which only involved beating the butter and sugar together, it comes out gritty.
My favourite buttercream to date is the Meringue buttercream. Sure, it is dreary and tiresome as it involves heating and beating egg whites before you add the butter in, but it’s really worth the effort in my case.
But what’s most frustrating is when i laboured over the said buttercream, fastidiously pipped them over the cupcakes,only to have them scrapped aside.

Because that’s what always happens around this health conscious household.
Ditto for frostings which involve whipped cream.

So i have decided to go on the safe road and used pastry cream for today’s cupcake frosting. If they had no qualms eating it as fillings for my Boston Cream Donuts, this pastry cream is pretty much insured from getting the brush off.
Using Martha Stewart’s pastry cream recipe, this pastry cream doesn’t even contain butter. And considering that i am using it as a frosting, this is as good as it gets. I dont think you can get any healthier than that.
Or any more boring.
So i’ve decided to jazz it up a bit.
And started off with a lemon cupcake.
With an apple corer, i decided to take a bit of the middle off,

And piped a perimeter of the pastry cream around it. A note when cooking this pastry cream though. To get that pippable consistency, i cooked the pastry cream way more than what the recipe suggested. At the end of the cooking, you should get a thick, gloopy mixture that sits (and not dissolve) when you let it fall back into your pan from your spoon.

Then i filled up the cavity I created from the apple corer with raspberry curd.
Raspberry curd. Sure, it might have a bit of butter, but definitely way lesser compared to a full fledged buttercream.
Besides, raspberries are fruits. They fall into the bottom of the food pyramid, which mandates that everyone eats more of. Which is why i created the cavity in the first place. And made sure that i filled it all the way up.

Lemon Cupcakes, pastry cream and raspberry curd.

That’s like sunshine on mah plate!
Of course, if for some reasons, you happen to squeeze waaaaay too many lemons for your cupcakes and have waaaaay more lemon juice sparing around, you could also make these lemon curd versions.

Like so!
Lemon Cupcakes with Pastry Cream and Raspberry (or Lemon) Curd
Lemon Cupcakes from Dash of Sass
For the cake:
2 1/2 cups cake flour
2 teaspoons baking powder
1/2 teaspoon baking soda
1/2 teaspoon salt
1 cup (2 sticks) butter, room temperature
1 1/2 cups sugar
2 whole eggs
3 egg yolks
2 teaspoons vanilla extract
3 teaspoons lemon zest
1/4 cup fresh lemon juice
1/2 cup sour cream
Directions:
– Preheat oven to 350 degrees. Butter and flour two muffin pans or line with paper liners. Set prepared pan aside.
– In a medium-sized bowl, stir together the flour, baking powder, baking soda and salt. Set aside.
– In the bowl of an electric mixer, beat butter on medium speed until smooth and creamy. Add sugar. Beat until light and fluffy, approximately 3 minutes.
– Beat in the whole eggs and egg yolks, one at a time, beating until fully combined before adding the next one. Wipe down the sides of the bowl between each addition.
– Once all eggs and yolks are combined, add the vanilla and lemon zest. Stir to combine.
– Add the lemon juice. Mix on low speed to combine.
– With the mixer still on low, mix in the dry ingredients in three separate additions. Between each addition of dry ingredients, add half of the sour cream. Wipe down the sides of the bowl between additions. Stir until fully combined.
– Fill each prepared muffin tin 1/2 way with lemon cake batter. Bake for 18 to 20 minutes, or until a toothpick inserted in the cake comes out clean. Rotate the pans halfway through to ensure even baking.
– Remove cupcakes to a wire cooling rack. Let cool to room temperature before serving.
Pastry Cream from Martha Stewart
Raspberry Curd from Annie’s eats
For the raspberry curd:
8 tbsp. unsalted butter
1 pint ripe raspberries or 1 12-oz. package frozen raspberries, thawed
5 large egg yolks, lightly beaten
3/4 cup sugar
Pinch of salt
2-3 tsp. fresh lemon juice
To make the raspberry curd, melt the butter in a large saucepan over medium heat. Add the raspberries, egg yolks, sugar and salt, and cook, mashing the berries. Stir frequently at first and then constantly at the end, until thickened, about 10 minutes. Pour the mixture through a coarse strainer set over a bowl, pressing hard on the solids to extract as much liquid as possible. Cool to room temperature; the curd will continue to thicken as it cools. Stir in lemon juice to taste. Cover and refrigerate until ready to serve.
Lemon Curd from Martha Stewart
Yam Cookies
I’ve used a different flour for these cookies. It’s called the “sagu” flour. It’s a very common flour here in Indonesia.

Derived from the sago palm plant, this flour has properties very much like the tapioca flour. It is starchy and although i can’t verify it, i am pretty sure that this flour falls under the gluten free category.
The use of this flour in cookies calls for the flour to be stir fried before it goes into the cookie batter. I’ve seen recipes using tapioca flour with the same procedure. I wonder why? Does anyone know?

Anyway, as with no protein, or low protein flours, these cookies came out crumbly and tender. The type of cookies you can break just by lightly pinching them between your fingers.
I’ve flavoured mine with yam paste, and added thick coconut cream to help the dough bind.
Yam and coconut cream go hand in hand. I love the combination of both.

I’ve also added some chopped almonds, just for that mini bits in your bites!
I am wondering though, whether everyone outside Indonesia has heard of this flour?
It sure will be interesting to find out!
Yam Sagu Cookies
100 gram Butter
100 gr icing sugar
1 egg
250 grams sagu flour, toasted. (i dumped mine in a big chinese wok and was left with 225 grams after i was done toasting it)
1 TBS thick coconut milk
yam paste
50 grams chopped almonds
1. Beat butter and sugar till light and fluffy.
2. Add the egg, beat till combined
3. Add the sagu flour, and thin it with the coconut milk if it gets too dry to form a dough. (I used more than what was specified in the recipe)
4. Knead in the yam paste ( I added the yam paste after the egg, before the flour instead. I find this easier rather than having to knead in the coloured yam paste)
5. Add in the chopped almonds (Make sure they are really really fine. Big pieces will clog up your pipping tip)
6. Load your pipping bag with the dough, and pipe a circular wreath onto a pre-lined and pre-greased cookie sheet
7. Bake at 150 degree Celcius for 25 minutes or till cooked.
Lemon Curd, Pastry Cream Cake
So i opened up the refrigerator this morning.
It looked like someone is hosting a tupperware home party in there.
Plastic containers and tubs were swarming my refrigerator shelves and door. All of which containing an array of leftovers from all my baking stints. Most of them were actually frostings. Cookie frostings, buttercream, jam, caramel.. you name it.
A spring cleaning is definitely in order.
And today, spring cleaning starts with the tubs marked “pastry cream 02/06/11” and “lemon curd 27/05/11”.

And came out with this.
The lemon curd, pastry cream cake. A yellow cake sandwiching pastry cream and topped with lemon curd.
For the cake, i have used Rose Levy Berenbaum’s Favourite Sour Cream Yellow Cake which gave me the chance to use up “egg yolk 04/06/11”
Using only egg yolks without the whites, the cake came out deliciously rich and moist. But it was also tender. Mine came out a bit too tender and crumbly. I think i might have underbeaten it.

Nevertheless, this cake still played a very good host to the layer of lemon curd and buttercream. In fact, this is somewhat like your boston cream pie. With the lemon instead of the chocolate on top of course.
What i really loved about this cake is the slight tang from the lemon curd against the sweet pastry cream. It’s bright and refreshing. And the cake provided just enough matter to make it more substantial and not too pudding-like.

And best of all, no one has to know that they are really leftovers!
Baguette and Mushroom Crostini
This is ground breaking.
I think i might have cooked (as opposed to baking) today.
And i think i might have liked it!

In fact, i liked it so much that i am gonna focus on the cooking today, and downplay the fact that the cooking lies over homemade, freshly baked baguettes.

Homemade baguettes. That’s pretty groundbreaking too.
I am always baking Asian breads, so this is a bit out of my area. Literally.
But let’s keep that to another day.
So what was cooking anyways?
Sauteed creamy mushroom, flavoured with cheese and garlic
Sure, it’s nothing impressive. But it’s a mile stone for me (I can barely cook an egg!)

They call this arrangement a “crostini”.
And just as i like these crostinis, i think i am liking cooking too!
Recipe from Tomcat in the Kitchen
Chocolate Chip Cake with Caramel Glaze
Something is not quite right when the props around the food you take photos with receive more comments than the actual food itself. And lately that has been the case with the friends i hang out with.
The flowers i so often include in my pictures are by far the biggest attention hoggers. My florist of a friend for example was always commenting on the flowers, and never the food. The rest of them were happier commenting on the cups, plates, cutlery i used.
I guess i must have done a poor job on arranging the set-up to make sure that the spotlight is on the food. Or that the props i used were too much of a distraction. But whatever the case, today, i shall try going propless,

with this oatmeal chocolate chip cake, with caramel glaze.
The original recipe for the chocolate chip cake didn’t ask for the caramel glaze, but without the glaze AND without the props, the pictures turned out so dull and dreary.

No one will grant a second glance at it and see for themselves what a soft, moist, chocolate chip cake this was. That would be a shame.
Plus, i am sure no one would mind the caramel glaze for one bit.

Yum yum. Beautiful golden, and semi molten caramel.

A little seasalt to further bring out the caramel. That will kick this up a notch.
Oh, did i mention that this cake is healthy too? It’s got oatmeal, whole-wheat flour. With such a high fiber content, that bit of caramel over it is totally justified.

Now now, while this post have been fun without the props, i think i still prefer my pictures to have all its “supporting actors” in the background. I will definitely try to tone it down a bit and hopefully everyone’s attention won’t be sidetracked in time to come!
Oatmeal Chocolate chip Cake
Recipe from Haverecipes-willcook
Click HERE
Caramel Glaze*
* You can use melted Caramel Candies, or make your own using the recipe HERE
Souper Quiche
I have recently taken up yoga in my attempt to “counter” all the sinful forces that are lurking in my blog here. And in my journey to yoga-dom, i was introduced to the term “yogic power”.
But instead of taking in that word, and listening to what it signifies, i giggled foolishly in class. Geez, I must have came across as a moron, disrespectful of Yoga and its terms. But please, please forgive me, for that was not at all my intention. You see when i heard the word “yogic power”, my mind wandered to public parks and stealing picnic lunches, a power possessed by YOGI Bear.
Yogic power. Yogi Bear’s power. See the connection?
Seems like everything eventually comes around to food in here.
Predictably, for today’s post, i had picnic lunches in my mind. While sandwiches are probably the most common items, so are pies. But i decided to take on the savoury road on this one.

and made a broccoli and ham quiche.

As mentioned before, i am not much of a cook. I was therefore more than happy to pop open that can of Campbell soup and SPAM for this. Easy Peasy right?

But before you go all judgemental on me, let me redeem myself by telling you that i did make that pie dough, and boiled those broccolis. 🙂

And what came out of this homemade crust and storebought cans of food was indeed a very beautiful union. The custard was able to set up so perfectly. It was silky smooth and was yet firm enough to slice through. It’s almost like the squares of soft, Japanese tofus you see in supermarket, only waaaaay more tastier.
The custard was not only creamy, but it was so full bodied and rich. With Campbell soup, i dont think you can err in terms of taste. They must have spent a gabazillion dollars and years upon years of research perfecting that. You can be sure to bank in on that.

As for the crust, i have used Martha Stewart’s patee brisee, which almost always produces the flakiest and tenderest of pie crusts. It’s one of my favourite pie crusts recipe to date.
So between the reliable Martha Stewart pie crust, and the uncontestedly delicious Campbell soup in the custard, this quiche is soupberply good. In fact it is so good that i am thinking of organizing a picnic lunch around it.
For Pate Brisee Recipe, Click HERE
For Filling Recipe:
Taken from Cooks.com
1 can (10 3/4 to 11 oz.) condensed soup
1/2 c. light cream
1 c. shredded cheese
SPAM
1/2 c. Broccoli
2. Sprinkle cheese, meat and vegetable evenly over pie crust. Pour soup mixture over all. Sprinkle with nutmeg.
3. Bake at 350 degrees F. 50 minutes or until center is set. Let stand 10 minutes before serving. Makes 6 servings.
* Note: I blind baked my pie crust before adding in the custard and baked it a second time.
Green Tea Cupcakes with Red Bean Paste

I know i shouldn’t be mentioning words like “boils” in a food blog, but this cupcake really looks like it has boils all over it.
Well, it wasn’t supposed to be like that. 
Before i go any further, lemme just put your minds at ease and clarify that the “boils” were rounded red bean paste and the cupcakes, are green tea cupcakes.
Green tea and red bean- another classic combination.
But the real reason why i baked these today was because i wanted to finish my tub of expiring yogurt which I know for a fact will cook to the most moist and delicious cupcakes.
Plus, the pictures didn’t show anything wart-like.
Because I was just supposed to pinch the red bean paste and drop it into the batter, NOT make rounded balls. What a pair of overzealous, idle fingers i’ve got this morning!
Green Tea Yogurt Cupcakes
A
120 gr butter
60 gr icing sugar
50 gr unflavoured yogurt
B
135 gr plain flour
1 tsp baking powder
1 tbs green tea powder
C
100 gr red bean paste filling
1. Beat butter and sugar of ingredient A until smooth. Add eggs in slowly and then yogurt. Mix well. Next mix in ingredient B.
2. Add in ingredints C, mix well. Spoon into paper cups, three quarters of the way up. Arrange on a baking tray. Bake in a preheated oven at 150 degree celcius for 20 – 25 minutes. Cool on a wire rack.
Cream Cheese Jelly Berry Pie
I’ve never seen a pie like this.
A graham cracker crust, a jell-o layer, and a cream cheese layer.
All in a pie.

Fresh strawberries are arranged on the baked graham cracker crust before a layer of jell-o was poured over it. The jell-o would set and hold the strawberries in place. Then, a layer of cream cheese filling gets frosted over it.
And boy, what a creamy creamy cream cheese filling that was.

By blending an instant pudding mix into the cream cheese, this was not only fuss free but was also tasty. We all know how delicious those pudding mixes are right?
And if you think that’s where it ends, u’ve got another thing coming. Beside the instant pudding mix, a whole can of condensed milk also goes into the cream cheese. Yes, you read that right, a whole can. A pretty bold but befitting move, for not only does the condensed milk add on to the creaminess of the cream cheese but also was able to sweeten it without the grittyness that powdered sugar has.
And I think i might just have found myself a favourite cream cheese filling recipe.
Cream Cheese Jelly Berry Pie
Pies ( Taken from Taste of Home)
1-1/4 C graham cracker crumbs
5 Tbs melted butter
2 Tbs sugar
1 Tsp ground ginger (I omitted this)
Filling
3/4 C sugar
2 Tbs + 3/4 tsp Cornstarch
1 Tbs Strawberry gelatin
3/4 C cold water
2 C sliced fresh strawberries, divided
1 Can (14 ounces) sweetened condensed milk
1 package (8 ounces) cream cheese
1/4 c cold milk
1 Package (3.4 ounces) Banana Cream instant pudding mix ( I used white chocolate flavour)
1. Combine graham cracker crumbs, butter, sugar and ginger. Press onto the bottom and up the sides of n ungreased 9 inch pie plate. Bake at 350 for 8-10 mins or until lightly browned. Cool onwire rack
2. For filling, in a small saucepan, combine sugar, constarch and gelatin. Stir in water until smooth. Bring to a boil, cook and stir for 2 minutes or until thickened. Cool slightly. Arrange 1 C strawberries over crust. Pour gelatin mixture over strawberries, Refrigerate for 2 hours or until set.
3. In a large bowl, beat sweetened condensed milk, cream cheese, milk and pudding mix for 1 minute. Spread over the top of pie. Refrigerate for 2 hours or until set. Garnish with remaining strawberries. Refrigerate leftovers.
Chicken and Cheese Buns
My incompetence in cooking magnifies itself whenever i make savoury buns.

With so many choices for a filling out there, i had to fall back on either frozen sausages or canned Spam.
Just because i didnt know how to grill, sautee, or stir fry for the life of me.

Today’s chicken and cheese buns are not any different. I’ve suckered and used frozen chicken nuggets.
I know… frozen chicken nuggets. How lame can i get?
Well, at least i wrapped some cheese in it,
piped tomato sauce on the surface, and sprinkled some dried herbs over.

And my family will just have to swallow the unfortunate situation and stomach these for now.
Chicken and Cheese Buns
For the Bun recipe, CliCk HERE
Caramel Drenched Chocolate Loaf
U know that pot of gold beneath the rainbow?
I think i may just have found it.

My very pot of molten golden caramel.
And like all basic commodity, you can pretty much apply it in anyway you fancy.

Like on a bed of lusciously dark, and almost black gold.

The good people at Wall street term “black gold” as anything ranging from coal, oil, or even coffee.
They must have unintentionally missed out on chocolate. What a shame.
But for us bakers, chocolate might be worth more than their weight in gold.

And with this lush chocolate cake topped with molten, sweet golden caramel.
I think we have hit a double gold mine here!

Caramel drenched Double Chocolate Loaf
Recipe taken from How sweet it is
Click HERE for recipe
Orange Creamsicle Cookies
Each time i make something so sinfully rich and luxurious, i feel the need to repent. Yesterday’s rich brownies with the coffee buttercream was one of those wicked dessert that i needed to right.
So how do i remedy such a situation anyway?

I bake something fruity.
Okay, i admit, they are not exactly the kind of healthy food that i needed to undo a previous naughty treat. But, by adding a fruit component (orange zest), at least i tried. LOL.

And just like its name suggests, these cookies delivered all the creamy-vanilla goodness, thanks to the white chocolate. I believe creamy-vanilla goodness is like the bedrock in baking. They also make me wonder why i wouldnt bake more with white chocolate.
I guess with all the fancy flavours that has been popping out all over the place, vanilla has taken a very undeserved backseat.

What a shame.
I need to get seek and get re-acquainted with my inner (baking) core. (* Please pardon the language, i just got back from my yoga lesson and thats the kind of words the trainer used.)
So here’s to white chocolates and creamy vanilla desserts!

Orange Creamsicle Cookies
Taken from Sweet Pea’s kitchen
For recipe, Click HERE
Coffee Cream Brownies
Here in Crustabakes, we tend to get a little over-indulgent.
Take these brownies for instance.

They are pretty much delicious as they are. Chewy, fudgy, and moist.
But we just had to go the extra mile,

And spread some coffee flavoured buttercream. YUM!
Then, we like to go further and push the limits,
with this poured on chocolate ganache.

Chocolate brownies with coffee frostings and chocolate ganache. Can you really say no to that?

Coffee Cream Brownies
(Taken from Brownies & bars from Taste of home )
1/2 C butter
3 Ounces chopped Chocolate
2 eggs
1 C sugar
1 tsp Vanilla extract
2/3 C All purpose Flour
1/4 tsp Baking Soda
Filling:
1 TBS whipping cream
1 tsp instant coffee granules
2 tbs butter, softened
1 C confectioner’s sugar
Glaze:
1 C ( 6 ounces ) semi sweet chocolate chips
1/3 C heavy whipping cream
1. In a microwave, melt butter and chocolate. Stir until smooth. Cool slightly. In a small bowl, beat the eggs, sugar and vanilla. Stir in chocolate mixture. Combine flour and baking soda, gradually add to the chocolate mixture.
2. Spread into a greased 8 inch square baking pan. Bake at 350 for 25-30 minutes or until a toothpick inserted near the centre comes out clean. Cool on a wire rack.
3. For the filling, combine cream and coffee granules in a small bowl. Stir until the coffee is dissolved. In a small bowl, cream butter and confectioners sugar until light and fluffy. Beat in coffee mixture, spread over brownies.
4. In a small saucepan, combine chips and cream. Cook and stir over low heat until chocolate is melted and mixture is thickened. Cool slightly. Carefully spread over filling. Let stand for 30 minutes or until glaze is set. Cut into squares. Store in refrigerator.
This post has been submitted to
Aspiring Bakers #7 – Chocolate Delight (May 2011) hosted by DG from Tested and Tasted
Cranberry Almond Yoghurt Cupcakes
These might not be the prettiest cupcakes around,

But please, don’t let their modest appearance deceive you. For these are one of the most delicious cupcakes i have ever tasted.
I was quite surprised myself at how much i loved these cupcakes. Then i took a closer look at the recipe, and understood why the cupcakes turned out so great.

It’s quite a brilliant recipe me thinks.
For one instead of using regular sugar, these cupcakes call for icing sugar to be beaten with the butter.This results in a cake texture with the tightest crumbs and finest texture.

See what i mean?
Also, instead of regular milk, the recipe also call for yoghurt. And we all know how yoghurt always makes cakes so much more moist and soft. Plus i think the acidity in the yoghurt might have reacted better with the baking powder to result in a better rise in these cupcakes.
Of course, all these deductions are just shallow observations from a home-baker and i might be gravelly wrong. I have never been professionally trained in baking and am no expert when it comes to how ingredients react with each other.

But i think i might have eaten enough cupcakes to know that these are good!!
Cranberry Almond Yoghurt Cupcakes
(Recipe from Cupcakes by Coco Kong)
110 gr butter
80 gr icing sugar
1 egg
50 gr unflavoured yoghurt
30 gr almond powder
120 gr plain flour
1 tsp baking powder
50 gr dried cranberries, chopped
1. Beat butter and sugar till smooth. Add egg in slowly before adding in the yoghurt.
2. In another bowl, sift flour, baking powder and almond powder together. Stir flour mixture into the butter mixture. Add in cranberries
3. Spoon batter into paper lined cupcake tins till they are three quarters full.
4. Bake at 150 degree celcius for 20-25 minutes, or till they are cooked.
Tres Leches Cake
I am such a bad bad daughter. I didn’t even know that today was mother’s day until late last night. Between that and having just came back from my Singapore vacation, there was no way i could have whipped up a fancy cake to celebrate the occasion.
Nevertheless, i make do.

With this Tres Leches cake, or in English, The three milk cake. Three different types of milk that is.
Due to religious beliefs, my mom is a vegetarian. While she doesn’t eat meat, she does take in animal products like milk, cheese and even eggs. So i’ve decided to milk (no pun intended) on that with this cake.
Besides, Three milk cake, doesnt it sound enticing?

So we start off with a chiffon cake. But unlike most chiffon cakes, this cake has no oil.
NO oil? I know i know, you must be ready to condemn this cake with its predictable dry and rough texture from the lack of fats, but trust me it’s for a good cause.
But on the way to goodness, we have to first take plunges,

Plunges with a fork that is. This is to ensure even distribution in the goodness.
Next, the goodness

See, i told you there is no need to worry. Because that dry desert of a cake is about to be inundated with a mixture of condensed milk, evaporated milk, and heavy cream.

Oh, and I’ve also added my own homemade vanilla extract into the milk mixture, just because i dont see why not.
And, make sure you get to all parts of the cakes, the edges especially where it’s the driest.

… Don’t be shy with the pouring. I poured mine till i had a pool of milk mixture around the cake.
While the suggested frosting for this was whipped cream, i had some leftover pastry cream.

I decided to use that instead.

Yummmm, can you see how much of the milk the cake has soaked up?
Milky, moist, pudding-like cake.
And yet it still cuts well!

Have a happy Moo-ther’s Day everyone!
Tres Leches Cake, from Pioneer Woman
Recipe HERE
Hidden Cheese and Spam Burgers
Just the usual bread dough, stuffed with cheese and SPAM

And it’s pretty easy too. I just rolled the bread dough into a square, lay the cheese and Spam on the bottom half of the square, fold the top half over the filling, and seal it at the edges. Bake, and

cut them as desired!
It’s like having a hidden Burger!
Hard Boiled Egg Chocolate Chip Cookies
I am quite adventurous when it comes to my food. And a recipe titled hard boiled egg chocolate chip cookies intrigued me more rather than gross me out.
If you are skeptical about it, take it from me. You won’t even notice it there.

See the surface of the cookies? No traces of boiled egg at all!
But why put a boiled egg in anyway? Why not the conventional raw egg into the batter?
Well, for one, the egg adds extra moistness in the cookies.
And second, adding a hard boiled egg as opposed to a raw one makes a dry cookie dough. You know how sometimes cookie doughs get muggy and mud-like? Or how they need to be refrigerated before they can be handled?
Well, this is not it.That would safe a bit of time.

On top of that, the raw cookie dough are also salmonella safe, which made me an extra happy baker this morning, sneaking in chunks of dough into my mouth instead of the awaiting cookie tray.

Recipe taken from Tablespoon.com
For recipe, click HERE
Very Vanilla One Bowl Cake
This would be one of the times where “less is more”. A simple Vanilla cake dusted with icing sugar

Using custard powder as one of its ingredients, this cake is very deeply scented with vanilla. Of course, a heavy dose of my homemade vanilla extract doesnt hurt.

This cake turned out rich,moist, and quite chewy. It’s like a cross between a blondie and a butter cake. While i would have preferred this to be more light and fluffy, I liked the gorgeous rich yellow the colour of this cake turned out. It totally epitomizes the widely used boxed “yellow cake” mix. And making this cake is almost as easy as the mix.
But what i am loving most about this cake is still the strong vanilla flavour in this.

Quite possibly the best scent around!
Recipe from My Diverse Kitchen : Very Vanilla One Bowl Yellow Cake
Grandma Sylvia’s Salt Butter Cookies
Grandma Sylvia’s Salt Butter Cookies. That’s quite an odd name for a cookie isn’t it?

But nonetheless, it caught my attention all right.
I really like it when a name gets attached to a recipe. Take Mrs Milman for instance. She makes pretty good chocolate ganache frosting.
I am kinda hoping Grandma Sylvia would work her magic as well. She seems to know her stuff, cause she had the word “salt” in her butter cookies (We don’t even need to go on and on again about how i love salt in my desserts). By using salted butter, i think Grandma Sylvia and i might just make the best of friends!

Besides the salt, these cookies also sandwich a chocolate filling. While the cookies were perfectly crumbly, tender and deliciously buttery (i think this might just be my to- go butter cookie recipe now), i am not too sure about the filling. The filling was a bit on the runny side for me. It runs down the sides of the cookie, and make messy globs where it lands. That is even after i refrigerated it for a bit. I guess i should have added more confectioner’s sugar to get it to set.

But I am not running away from this runny frostings cause it was pretty delicious. All that confectionar’s sugar in the filling recipe went very well with the subtly sweet butter cookies. I went forward and spread it to one side of the cookie. But instead of generously piling the frosting on like i always do, i had to be quite strategic about it. A mini blob on each cookie. Nothing too much as it will spill over the sides of the cookies and make quite the mess.

Once you are done with that one, make a couple more strategic blobs,

to get more cookies.
Don’t forget to bring them to work. They would make you popular person of today!

Grandma Sylvia’s Salt Butter Cookies
Taken from America’s Test Kitchen’s Holiday Cookies
1 tsp. vanilla2
New York Cheesecake
I gotta say, baking a cheesecake is like a training ground for your patience skills. Not only does it take a long time to bake, it also needs to be refrigerated (preferably overnight).
That’s not exactly easy for me. I am one who restlessly jabs at the elevator button when it doesnt arrive in 2.2 second despite being fully aware that the action is wholly useless.

For this cheesecake however, i battled my demons and victored.
I have heard of the many pittfalls making a cheesecake involve. One of the more common one is the cracked surfaces. I was quite convinced that my cheese cake was going to have Harry Potter’s lightning scar across its surface that i had a backup plan. I made more of the cookie graham cracker base than what was required in the recipe and had every intention to sprinkle it over whatever scars the cheesecake cracked for me.

Like so.
But turned out, i didnt need it! At least for this time

Look ma! No cracks! 🙂
So i learnt that to prevent your cheesecake from breaking up on the surface, you have to leave the cheesecake in the oven for hours after it is done baking to ensure that it cools slowly.
A cheesecake which has been left to cool rapidly will crack up (no pun intended) under the pressure.
There is also the issue on under or overcooked cheesecake

An undercooked cheesecake will probably not set, while an overcooked cheesecake would be tough and dry.
I think my cheesecake did ok. It sliced well without being too tough. It was also dreamily creamy and smooth. I guess it’s a beginner’s luck!
But as a general rule of thumb, u want to bake your cheesecake just till the surface jiggles slightly when you shake the pan. It will further set as it cools and firm up when refrigerated.

I have taken the repressed pastry chef’s recipe for this. I think the success of this cheesecake is because of her failproof recipe.
So here is to NYC and its cheesecakes!
This post has been submitted to Aspiring Baker #6: Say Cheese, hosted by Jean of needmorenoms. Thanks for hosting Jean!
The Rabbits and the Lamb Buns
Instead of making Hot Cross Buns to celebrate Easter this year, i made these bun(nies)

This bunny definitely taste better than rabbit foods.
And they are pretty easy to make too.
It started with a dough looking like this.

I have stuffed a generous ball of Pineapple Jam within the rabbit head and a line of the same jam along the ears.
See the ball of golden pineapple jam? (Sorry wabbit for the surgery)
As for the facial features, i just melted a bit of chocolate and drew them on.

Pretty easy right?
And since i was already on the hare-y journey, i have decided to get acquainted to another hairy friend.
The lamb
Unlike the bunnies, big guy here is pretty huge.

Each bunny is made of one ball of dough (pictured on the right), weighing 35 grams. So u can pretty much imagine how many bunnies it would make to make up Big guy here.
Anyways after baking in the hot oven, big guy here gets lotioned with good moisturising mayonnaise,

The hairy business comes next

I have used Chicken floss for “hair”.
While this lamb may look all fluff and airy without much substance, i promise you that it is not. Because within each ball of dough, i have fitted a mini sausage.

Like so.
And as usual, i have used my bun recipe to make the dough for this.
Happy Easter everybuddy!
Easter Cookies
Guess who just bought a set of Easter cookie cutters?

All mine!
Can you spot the bunny cookie cutter? That’s my favourite from the set of 5, which include an egg, a tulip, a butterfly and a duck cookie cutter.

While the bunny and the egg are cruxes of Easter, and i can somewhat assimilate that butterflies and tulips probably hang out in the garden where the bunny hid the eggs, i am not too sure about the duck. Shouldnt it be a chicken ?
Anyways, duck or no duck, this is my first time experimenting royal icing. Believe me or not, after baking for donkey’s years, i have never decorated my cookies with royal icing. I guess my track record of retarded looking pipping works might have to do something with it.

I have used meringue powder for the icing instead of egg whites as i was giving these away and i didn’t want to take any chances with salmonella issues. I gotta admit though, that didn’t taste that great, but it wasnt bad enough to stop me from licking the icing off my fingers as i worked with it.

So while these are not the best looking cookies around, i am glad i decided to embark on the royal adventure on the meringue icing, and now, it doesnt scare me that much anymore.
I clung on to every word on Bake at 350 ‘s instructions on the icing. She is truly the Queen of cookie-dom. So do head over to her site for the most beautiful cookies and the most intricate and creative frostings.
Almond Brownies With Sliced Cheddar
Some of you areprobably wrinkling your nose in disgust at the title.
Brownies with cheddar cheese? Really?

If you have noticed, i really like salt in my dessert. They are like my personal fairy dusts, powerful and magical, and at the rate i am sprinkling them, you can call me a seasoned salt sprinkler.

By using cheddar cheese, i was expecting to introduce the same kind of savoury depth into these brownies.

You might need to use your super sight powers to spot the slice of cheese in here. But it’s there, almost at the bottom of the brownies.
Okay, a word of warning, the next picture might gross you out as i had to practically mince the brownies to reveal the cheese.

Whoops, sorry for the carnage.
While putting cheddar into your dessert may sound foreign, it’s very common here in Indonesia. We sprinkle grated cheese on our cakes,and cookies all the time. And the fact is, the combination works, for me at least, or maybe it’s an acquired taste, since i grew up with it.

But do give this a shot! who knows you might like it too!
Almond Brownies with Sliced Cheddar
(Taken from Sedap Magazine)
150 gr Butter
200 gr Dark Chocolate
3 eggs
125 gr sugar
30 gr AP flour
15 gr cocoa powder
50 gr almond flour
1/2 tsp baking powder
3 tsp almond extract
15 gr sliced almonds (to be sprinkled)
1. Heat butter till melted. Add chocolate and stir till both are melted and well combined.
2. In another bowl, beat eggs and sugar till they get slightly thick. Add the egg-sugar mixture to the chocolate mixture and mix well.
3. Sift AP flour, cocoa powder, ground almonds and baking powder into the chocolate-egg mixture. Add the almond extract and mix till just combined.
4. Pour half of the batter into a pregreased and prelined (with overhang to lift the brownies easily later)8×8 baking tin. Arrange cheese slices over the batter, the pour the remanining batter over the cheese.
5. Bake at 180 degree Celcius (not F) for 25 minutes or till they are well cooked
6. Slice into squares to serve.
Gingy-Bread Men
When my nephew came into the room squealing “ie ie (auntie), can you make gingy for meeeeee?”, i shot his mom, a blank look.
“Gingy”, my sister explained, “the gingerbread man from Shrek”

Geez, of all the characters in Shrek, it had to be Gingy who made an impression on him.
But then again, I guess i should have counted my luck that he asked for Gingy. Had it been Princess Fiona, or Donkey, i would have thrown in the towel at his request.

Owning a regular gingerbread cutter is one thing, but making Gingy is another. Having googled various images of Gingy, i found that he was a nonstandard gingerbread. In the story, Gingy had his legs broken when Lord Farquar tortured him. Hence, his feet was pointing down instead of upward with stitches at the knees.
Besides the different feet, regular gingerbread also had spindly arms, not quite like Gingy who probably had some time in the gym and had bulkier arms.
So i did a little recontruction. Right after i cut the dough with the cookie cutter, i pushed down the feet, and added a bit of dough into the arms.

Can you tell the difference?
These are probably not significant differences to us adults, but i guess when you are my nephew, a kid, you tend to get really analytical about the nitty gritty. And the last thing i wanted was to dissapoint him.

For the buttons, i have used blackcurrant chewy gummies. I just cut them into mini sizes and roll them into balls with my fingers. And with the help of a little bit of icing, i was able to attach them to the cookies.

Voila!
Oh, and just for the record, these are not really Gingerbread cookies. I knew that the ginger, honey or various spices wouldnt sit too well with my nephew. These are just regular butter cookies to which i have added chocolate paste for colouring!
For Butter Cookies recipe, Click Here!
And do head over to Diamonds for Desserts, for a clear step by step instructions on how to make Gingy!
Eclairs
I wanted to break away from the monotomy of baking the usual cakes and cookies. Much as i liked baking them, i can see the end users of my bakes losing their interests in what i brought out from my kitchen.
So i journeyed west, and went a little French this morning with the French Eclairs.

Finger shaped choux pastries filled with pastry cream and topped with chocolate.
Before baking, my choux pastries started out sleek and smooth. They were just slightly bigger than regular pencils, only half the lengths.

But, they grew in the oven though, and turned out like these Frankenstein fingers. Fat and ripped.
Not that i minded of course. Ugly, big, fat fingers was exactly what i was looking for. In fact, they bigger they get, the better, cause it means they got bigger caves in them.

Which means you can pipe in more fillings!

Of course, the choice of fillings is completely up to your discretion. I’ve made both vanilla and chocolate pastry cream. Just because majority end users are pro-chocolates!

Recipe taken from Ounces and Grams
For Recipe, Click–> Eclairs
Garlic Cheddar Rolls
This would be one of the very rare moments when I post something savoury.

A crown of cheddar cheese rolls, topped with sliced cheese and dried herbs. Breakfast fit for the kings, or at least the kings dwelling in my house.
These buns are made from my Rotiboy bun recipe. I wanted to have ultra soft rolls which can remain moist and tender overnight without having to be reheated for breakfast the next day. Because Kings don’t do things like re-heating. I dont even think they know how to work the oven.

As you can see, i have retarded shaping skills. They were supposed to be perfect rounds, not irregularly egg shaped.

Here is one of the weird eggs, haphazardly pulled apart from its circle of friends.

And what’s going on underneath that cheesy exterior?
MORE cheese of course. I absolutely loved the cave the cheese made within each bun.
I used a sliced cheese for each bun. I tore each slice into mini pieces and stuff them into the dough. The cheese will melt, coat the walls of the hollow and turn chewy, making it my favourite part of the bun.

While the buns may remain soft and moist for extended periods of time, these buns taste best when they are served warm. The cheese in them would be in its gooey, semi-molten state when warm. Poor kings, if only they knew how to on the oven.
The buns get brushed with garlic butter the minute they get out of the oven. The butter will ensure the skin of these buns to remain flexible and soft, while the garlic will just enhance the delicious aspect of these buns. Cheese, herbs and garlic. Who can go wrong with that?

For the Bread Dough
Adapted from and Indonesian Cookbook Roti Unyil by Chendawati (Please pardon my poor translation)
Ingredients A
700 gr Bread Flour
300 gr AP Flour
250 gr Sugar
5 Egg Yolks
2 Egg Whites
150ml Evaporated Milk
275 Iced Water
20 gr Instant Yeast
10 gr Bread Softener *
50 gr Milk Powder
Ingredients B
75 gr Butter
75 gr Margarine
50 gr Butter Substitute **
10 gr Bacom (Bread emulsifier) *
15 gr salt
*( U can omit these if you like, but i think they really helped in making the bread that much softer and moister)
** These are butter flavoured margarine.
1. Combine Ingredients A till the dough stops sticking all over the surface and starts getting tacky and elastic.
2. Gradually add ingredients B and knead till the dough gets so elastic, you are able to stretch it into a thin membrane.
3. Gather the dough into a ball, and leave it covered for its first proofing for about 30 mins.
4. Punch down the dough, and scale the dough into balls weighing 30 grams each. Let them rest for 15 minutes, covered.
5. Roll the dough, fill with sliced cheese, seal, and shape it into rounds.
6. Let it proof for a second time till it doubles in size (60 minutes).
7. Brush the surfaces with some evaporated milk, and put a square slice of cheese over it. Sprinkle with dried herbs.
8. Bake at 160 degree CELCIUS or till cooked. The surface will turn a gorgeous shade of golden brown (about 20 mins).
9. Pull bread from the oven and brush some melted garlic butter over it.
10. Store in airtight containers.
This post has been submitted to Aspiring Baker #6: Say Cheese, hosted by Jean of needmorenoms. Thanks for hosting Jean!
Nutella Crunch Brownies
You know you made good when people come back for seconds right after they finished their first bars.
These brownies are one of it.

A chewy brownie base is topped with crunchy chocolate rice krispies, held together by chocolate and Nutella.You can of course use the original plain rice krispies. I used the chocolate ones to just re-inforce my excessive personality.

And having Nutella in any of your recipe is like having a latent insurance that your brownies will be in great demand. Trust me, i have done my market research.

I was half expecting the rice krispies to go soggy on me after being soaked in the Chocolate -Nutella mixture. But surprisingly, theystayed lightly crisp.
The chewy and moist brownie base was just of the right structure to support the frostings. You can lift each of these bars up without having the brownie base crumble upon you from the weight of the rice krispies frostings. Yet, they were also soft enough for your knife to slice through with the least resistance.
Like wise for the topping. I didnt refrigerate the brownies as i didnt want problems slicing through the hardened chocolate. But much to my delight, the frosting did set and dry on its own at room temperature resulting in a semi-soft, truffle-like consistency with crunchy bits from the rice krispies.

And i do love a good, dry chocolate surface. They are not as messy and you can easily stack them up together for storage. Not that these would be in storage for long though.

Recipe taken from Pastry Chef’s Baking
*(I scaled downthe recipe to fit an 8×8 baking tin in red)
Ganache Dipped Chocolate Chip Cookies
Any chocolate chip cookie with brown sugar in it is by default a winner in my book. But by having a quick dip in a chocolate ganache pool, these were bigger winners!

Okay, i admit, these are a bit indulgent.
I would have made these a long long time ago if it weren’t for the 2 hours chilling time. I do most of my bakings in the morning, and the 2 hours chilling time is not exactly convenient in my daily mad morning rush.
I could have made the dough the night before , but i don’t like the idea of going to the kitchen and start pulling out my mixers, mixing bowls, and other related cookie making kitchen utensils in the evenings.
So, finally, this morning, i woke up extra early, and get myself a 2 hours head start just for these. And boy, was it worth it.
Oh, I really wouldn’t advise you to skip the chilling, cause without it, the dough would be too soft to handle.

So anyways, instead of dumping chocolate chips into the batter, individual scoops of unbaked cookie doughs were rolled into the choco chips . This caused the underside of the cookies to be delightfully overpopulous with said chocolate chips 🙂 Even i myself was pretty surprised.

While the cookies were deliciously chewy, moist and worthy of the classic american chocolate chip cookie title, the ganache wouldnt completely dry out. And since i was bringing them to work ( i cant trust myself to leave them at home), stacking them together was quite a messy business.

So if you were planning to take these on a trip outside your home, i would suggest reducing the cream from the chocolate ganache. And unless you have some Herculean willpower, i woud really really suggest you bring these out of the house asap!
For Recipe, Click: HERE! Ganache Dipped Chocolate Chip Cookies
Buns, buns, buns
Besides the common round buns, these are some of the other shapes that the Asian sweet bread buns take form

The caterpillar buns
For instructions on how to shape these buns, head over to Happy Home Baking
and,

and the sakura buns. I don’t have a reference on how to shape the sakura buns. But it is pretty easy. You just filling in the dough as per usual, flatten it a bit and using a knife make 5 mini slits around the circumferece bread at regular intervals before you leave it to proof.
Both of the fillings for these buns are made with store bought red bean paste, while the recipe for the dough is the same dough i used for my rotiboy.
The recipe that never fails to produce the softest, and moistest breads.

Butterscotch Praline Cream Pie
When i first saw the name Butterscotch Praline Cream Pie, i was very vague on what was going on.
Frankly speaking, i don’t know my butterscotch from my toffees, or my toffees from my caramels. All i know is that sugar cooking is involved.
So to set things straight, here goes!
Caramel is a beige to dark-brown confection made by heating any of a variety of sugars
Toffee is a confection made by caramelizing sugar or molasses (creating inverted sugar) along with butter, and occasionally flour
Butterscotch is similar to toffee, but for butterscotch the sugar is boiled to the soft crack stage, and not hard crack as with toffee
-Thanks Master Wikipedia !
Right, now that we are all a little bit smarter, let’s get back to the matters on hands.
Butterscotch Praline Cream Pie– A tender, flakey pie crust containing a deep, smokey butterscotch custard.

Let’s start with the pie crust. A buttery patee brisee with a scant amount of sugar.

And you know something, between all that rolling, chilling and blind baking, I am never one to agree with the term “easy as pie”.
They should really change it to “Easy as pie eating“. That i can definitely relate to.
So anyways, into this crust, i pile on the butterscotch custard.

I met with a bit of a technical difficulty with this butterscotch. It was not the lush luscious custard that i was expecting.
If you can see it closely, it is quite lumpy. They are not really serious and significant, but they are still visibly noticeable.Thankfully, the sandiness didnt present itself when u spoon the custard into your mouth. I suspect it’s globules of fats from the cream which was not well incorporated as i poured it into the hot caramel. Thankfully it was not intolerably rough, but it was enough to make me grit my teeth (no pun intended).
Grits or no grits, i soldiered on to the whipping cream, which was pleasantly folded with praline.

Praline – a family of confections made from nuts and sugar syrup.
Although the suggested nut in the recipe was hazelnut, i used good ole peanuts. Just because that’s the only nuts i have.

I wouldn’t advise on skipping the whipping cream to save the calories though. The lightness of the whipped cream was so pleasant against the dark, smoky butterscotch custard. A good balance of complex and simple flavours. But then again, i wouldnt skip on the praline either, just cause it gives a good crunch.

And so there you have it, A crash course on toffee, butterscotch, caramel, and a Butterscotch Praline Cream pie!
Butterscotch-Praline Cream Pie
Taken from Martha Stewart
Ingredients
- All-purpose flour, for surface
- 1/2 recipe Pate Brisee
- 3 ounces (6 tablespoons) unsalted butter
- 1 cup dark-brown sugar
- 2 cups heavy cream
- 1/4 cup cornstarch
- 3/4 teaspoon salt
- 2 cups whole milk
- 4 large egg yolks
- 1 teaspoon pure vanilla extract
- Crushed Hazelnut Praline
Directions
- On a lightly floured work surface, roll pate brisee to 1/8-inch thickness. Fit into a 9-inch pie dish. Trim edges, leaving a 1-inch overhang. Tuck overhang under dough so edges are flush with rim, and crimp edges. Lightly prick bottom of dough with a fork. Refrigerate for 30 minutes.
- Preheat oven to 375 degrees. Line dough with parchment, and fill with pie weights or dried beans. Bake until edges begin to turn gold, 15 to 18 minutes. Carefully remove weights and parchment. Bake until crust is golden brown, 12 to 15 minutes. Let cool completely on a wire rack. (Crust can be stored overnight.)
- Melt butter in a medium saucepan over medium heat until butter browns. Stir in sugar until it dissolves, about 5 minutes. Slowly pour 1 cup cream down the side of the pan, stirring constantly until smooth (caramel will bubble). Remove from heat.
- Whisk cornstarch, salt, and milk in a small bowl until smooth. Whisk into butter mixture until well combined. Cook over medium-high heat, stirring constantly, until bubbling and thick, about 7 minutes total (about 2 minutes after it comes to a boil.)
- Whisk yolks in a medium bowl until combined. Pour in milk mixture in a slow, steady stream, whisking until completely incorporated. Return mixture to the saucepan, and cook over medium heat, stirring constantly, until it returns to a boil, 1 to 2 minutes.
- Immediately remove from heat, and stir in vanilla. Let custard cool in saucepan on a wire rack, whisking occasionally, for 10 minutes.
- Pour custard into piecrust. Press plastic wrap directly on surface of custard. Refrigerate until custard filling is chilled and firm, at least 4 hours (or overnight).
- Whisk remaining 1 cup cream until stiff peaks form. Reserve 2 tablespoons praline, and fold remaining praline into cream. Spread cream over pie, and sprinkle reserved praline on top. Serve immediately.
Crushed Hazelnut Praline
Ingredients
- Vegetable-oil cooking spray
- 1/2 cup sugar
- 1 teaspoon light corn syrup
- 1 tablespoon water
- Salt
- 1/3 cup hazelnuts, toasted, skins rubbed off with a damp cloth
Directions
- Coat a rimmed baking sheet with cooking spray. Heat sugar, corn syrup, water, and a pinch of salt in a small saucepan over medium-high heat, stirring constantly until sugar dissolves. Continue to cook, without stirring, until deep amber. Remove from heat, stir in nuts, and spread evenly on baking sheet. Let cool completely on sheet on a wire rack.
- Break praline into medium pieces, and transfer to a resealable plastic bag. Using a rolling pin, crush into pea-size pieces. (Crushed praline can be stored for up to 1 month.)
Brewer’s Blondies
I know i am pushing my luck in posting this,
because this is my third and yet another malt/whopper treat.

Okay, you can throw your shoe at me now. I deserve it.

But in my defense, i could have just let this slide, and not blog about it. But some things are just worth the risk, and trust me, this blondie is worth that risk.
Made of only brown sugar excluding white sugar, this blondie is the very representation of the terms “moist” and “chewy”. This is the kind of fudgy, dense brownie that you think is only achievable when you add chocolate into. And i mean lots of chocolate.

But this came along, bearing all the said qualities of a perfect (at least in my opinion) brownie without any chocolate. Except for the chocolate chips of course, but that doesnt count.
Malt powder and Whopper malted milk balls joined in for the ride. The malt taste was a little too subtle. In fact, i don’t even know if i would miss it at all if it weren’t included. However, the whoppers were fun guys, they added some crispy excitement to each bite.
But still undisputedly, the real winner for this blondie is still the brown sugar, in all its aromatic and fragrant glory.

Anyways, like i said, i am probably risking the title of a one trick pony blog with my triple streak on Malt powders, but please make this, i am sure your judgement will change.
Taken from Sweet Pea’s Kitchen
Ingredients:
- 2 1/3 cups all-purpose flour
- 1 1/2 teaspoons baking powder
- 1 teaspoon salt
- 2 tablespoons malted milk powder
- 14 tablespoons unsalted butter, softened, cut into 1-inch cubes
- 1 3/4 cups firmly packed dark brown sugar
- 2 large eggs
- 2 teaspoons pure vanilla extract
- 3/4 cup malted milk balls (like Whoppers or Maltesers), coarsely chopped in a food processor
- 3/4 cup semisweet chocolate chips
- 3/4 cup toasted walnuts, chopped
Directions:
- Preheat the oven to 350 degrees F. Butter the bottom and sides of a 9-by-13-inch baking pan.
- In a medium bowl, whisk the flour, baking powder, salt and malted milk powder together.
- In the bowl of an electric mixer fitted with the paddle attachment, beat the butter and brown sugar on medium speed until completely combined. Scrape down the bowl, add the eggs and vanilla, and beat until combined.
- Add the flour mixture in two batches until just combined. Add the malted milk balls, chocolate chips and walnuts and beat until just combined, about 10 seconds. The mixture will be thick. Turn the mixture out into the prepared pan and use an offset spatula to spread it evenly.
- Bake in the center of the oven for 25 to 30 minutes, or until a toothpick inserted into the center of the blondie comes out clean.
- Transfer to a wire rack and let cool for 20 minutes.
Source: Baked: New Frontiers In Baking
Malted Whooper Drops
I am sorry for the back to back post on malt/whooper cookies.

But you know the thing with malt powder and humidity? They don’t react too well with each other. They form these lumpy nuggets after a while.
I guess i could have fixed it with a tight, air and water-proof cannister. But i just didn’t have spare empty ones hanging around. So please bear with me as i try to use up my box of Ovaltine.
So anyways, today’s menu is Chocolate Malted Whooper Drops.
That’s a long name, but i am sure you can figure it out.
A drop cookie with malt and cocoa powder,
and topped with chocolate chunks and whoopers.

Oh, and cocoa and malt powder?
They work! They impart such a wonderful smoky, rich flavour in these cookies. I am tempted to introduce malt and chocolate as the next dynamic duo, right next to peanut butter and chocolate.

I would describe these cookies as cakey, but since they are generously horded with an army of big, boxy chocolate chunks, it’s inevitable that each bite was accompanied by something moist and fudgy.

Who can resist to that?
My mind subconsciously reached for them as i was trying to take pictures. I think i must have eaten at least, 3, or maybe 5 or 6, cause at the end of the photoshoot, i was feeling uncannily full.

i have also planted my chopped malted milk balls onto each individual unbaked cookie dough drops, instead of mixing them into the cookie batter. Combining them into the batter makes them disappear, and i think i much prefer them to be visible.
Chocolate Malted Whopper Drops
(Taken from Sweet Pea’s Kitchen)
- 1 3/4 cup all-purpose flour
- 1 cup malted milk powder
- 1/4 cup unsweetened cocoa powder
- 1 1/2 tsp baking powder
- 1/4 teaspoon salt
- 1 stick plus 3 tbsp butter (11 tablespoons), at room temperature
- 2/3 cup granulated sugar
- 2 large eggs
- 1 tsp vanilla extract
- 1/4 cup whole milk
- 2 cups (6 ounces) Whoppers, coarsely chopped
- 6 oz. bittersweet chocolate, coarsely chopped
- Preheat oven to 350°F. Line 2 baking sheets with parchment paper or silicone mats.
- In a large bowl, sift together flour, malted milk powder, cocoa, baking powder, and salt; set aside.
- In the bowl of a stand mixer fitted with the paddle attachment, beat the butter and sugar together on medium speed for about 3 minutes, until thoroughly combined. Add the eggs one at a time, beating for 1 minute after each addition. Beat in the vanilla until combined. Add half of the dry ingredients and beat at low speed just until combined. Mix in the milk, then the remaining dry ingredients, mixing until just combined. With the mixer on low, mix in the malted milk balls and chopped chocolate.
- Drop the dough by rounded tablespoonfuls on to the sheets, leaving about 2 inches of space between each. Bake for 11 to 13 minutes, rotating the baking sheets front to back and top to bottom halfway through the baking time. Let the cookies rest for 2 minutes before using a wide metal spatula to transfer them to the racks to cool to room temperature.
Malted Chocolate Tart

Or shall i say that this is a cookie baked in a tart pan?
A jumbo sized cookie the size of a skillet, and kicked up a notch with some malt powder.
The malt powder in the cookie is a welcoming fresh take than the usual chocolate and vanilla cookie. It gave the cookie such different depth and flavour.

And since it’s been a while since i had a malted milkshake, or malted anything, i dont think i could have put a finger on what could have brought about the familiarly comforting taste.
And the thing with malt powders, they are salted. We all love that bit of salt in our desserts don’t we? 🙂
These cookies are frosted with melted chocolate, and then topped with chopped malted milk balls. The malted milk balls were so delightful. They added a nice crunch to the cookie, and i really liked how it made the cookies look more interesting. I added Maraschino cherries too, just for aesthetical pleasure.

Oh, u don’t want to overbake this. These are best when they are soft baked, just so that you can easily slice into them.

Taken from FoodBabbles
Ingredients
1 1/2 cups all-purpose flour
1 cup malted milk powder
1/2 cup sugar
1 teaspoon (scant) coarse kosher salt
3/4 cup unsalted butter, cut into 1-inch pieces, room temperature
3/4 cup bittersweet chocolate chips (do not exceed 61% cacao)
1/2 cup malted milk balls, coarsely chopped
– Preheat oven to 325°F. In a food processor, pulse the flour, malted milk powder, sugar, and coarse salt. Add the butter and pulse until moist clumps form.
– Transfer dough to work surface; gather into ball. Press evenly onto bottom of 9-inch-diameter tart pan with removable bottom.
– Bake crust until evenly golden brown, about 25 minutes. Scatter chocolate chips over; let stand 5 minutes to soften…
…then spread melted chocolate over hot crust in the well that forms as center sinks.
– Sprinkle malted milk balls over.
– Cool completely. Remove tart from pan; cut into wedges.
– Enjoy!
Zebra Cake
Zebra cakes are very much like the more commonly seen swirled cake. In both cases, two toned batters, usually chocolate and vanilla meet, mingle, and became best friends.

The only difference between the zebra and the swirled cake, is in how the two best friends hooked up.
In swirled cakes, the two batters meet spontaneously. They interact carelessly with each other, creating a swirly effect that was haphazard and unpredictable. The resultant effect is no less pretty than the zebra cake, that is of course considering the swirler is not me competent enough for the job.

The pattern in the zebra on the other hand, is more structured. The batters are poured alternately in specific amounts to get that orderly, systematic zebra-ish pattern. The kind of methodical operation that is not exactly in my blood. Geez, my own handwriting is barely legible.
Anyways, back to the cake,
To check for done-ness,

Ah, good ole’ skewer test. Where would we be without it?

Whistling clean, just the way i like it 🙂
You couldn’t imagine how excited i was to slice through this cake. This is one of the incidents where the real thing couldn’t quite compare to the spoof. I dont remember being this excited to see the authentic zebra horse on my first trip to the zoo.

Moment of truth time.
Honestly, i wasn’t very much impressed. This is definitely one of the prettiest zebras in the stable. Too much black, too little white. Too little spacing between the black and white. Plus the swirls are kinda squiggly.

Oh wells, let me claim the customary “A” for the effort at the very least.

So let’s get horsing around!
(Taken from AJ’s Cooking Secrets)
Ingredients
4 large eggs, at room temperature
1 cup (8 oz / 250 g) granulated sugar
1 cup (8 fl oz / 250 ml) milk, at room temperature
1 cup (8 fl oz / 250 ml) oil (corn, vegetable or canola)
2 cups (10 oz / 300 g) all-purpose flour
1/3 teaspoon vanilla powder
1 tablespoon baking powder
2 tablespoons dark cocoa powder
Directions
1. Preheat the oven to 350F (180C).
2. In a large mixing bowl, combine eggs and sugar. Using a hand-held electric mixer or wire whisk beat until the mixture is creamy and light in color
3. Add milk and oil, and continue beating until well blended.
4. In a separate bowl, combine and mix flour, vanilla powder and baking powder. Gradually add the flour mixture to the wet ingredients and beat just until the batter is smooth and the dry ingredients are
thoroughly incorporated. (DO NOT OVERBEAT to prevent air pockets from forming in the batter.
5. Divide the mixture into 2 equal portions. Keep one portion plain. Add cocoa powder into another and mix well.
6. Lightly grease the pan with oil. If you don’t have non-stick baking pan, grease whatever pan you have then line it with parchment paper (baking paper).
7. The most important part is assembling the cake batter in a baking pan. This is what you do. Scoop 3 heaped tablespoons of plain batter (you can also use a ladle that would hold 3 tablespoons) into the middle of the baking pan. Then scoop 3 tablespoons of cocoa batter and pour it in the center on top of the plain batter. IMPORTANT! Do not stop and wait until the previous batter spreads – KEEP GOING! Do not spread the batter or tilt the pan to distribute the mixture. It will spread by itself and fill the pan gradually. Continue alternating the batters until you finish them.
8. Bake in the oven for about 40 minutes. Do not open the oven door at least the first 20 minutes or the cake will shrink and will not rise. To check if the cake is ready, insert a toothpick into the center. It should come out clean when ready. Remove from the oven. Immediately run a small thin knife around the inside of the pan to loosen the cake, then invert the cake onto a cooking rack. Turn the cake back over and let cool. You can sprinkle the top of the cake with some powdered (confectioner’s) sugar or leave it plain.
Saltine Cracker Toffee
How would you categorize these?
Are they cookies?

Or more like Candies?

I say candies.
Growing up, i have always had a preference over candies with a little crunch on it. The crunch could be anything from rice krispies studded candy bars, or even the cookie bits from Hershey’s cookies and cream chocolates.

These saltine cracker toffee, with the saltine cracker bases promised just the crunch that i was looking for in my candies. And of course, with the word “salt” in “saltine”, these crackers are savoury. I am a religious dessert salt sprinkler, so you can pretty much guess how this candy is totally up my alley.
So there we have it. Savoury saltine crackers blanketed with toffee and given another coat of chocolate.
Do you think you are ready for that?

Using dark brown sugar instead of the regular white, the toffee colour came out a perfect amber. The rich colour was reflective of the stronger caramel, and buttery taste. Everything was good, except for the fact that you gotta wrestle a bit with the toffee. The toffee is slightly sticky. Just slightly though, nothing major.
So the next time i am making these, i will be sure to practice a little restraint, and cook my sugar just a little longer before i pull it out of the oven. I would also wanna spread the toffee just a bit thinner. I think reaching the hard candy stage and a thinner layer of the toffee would give it the light, brittle snap rather than a chewy one that was kinda tacky. It will at least be something that my dentist would approve of a little bit more.

So till then, these will have to do. And of course, let’s not forget my crazy fixation over the extra salt over the chocolate. I wouldn’t even consider it as being optional.
40 salted saltine crackers or enough to line your pan
1 cup unsalted butter
1 cup packed brown sugar
2 cups milk chocolate or semisweet chocolate chips
(optional) 3/4 cup chopped pecans
*You can either use salted butter or salted saltines but not both. I used salted crackers and unsalted butter in this one.
Preheat oven to 400 degrees and line a cookie sheet or jelly roll pan with saltine crackers in a single layer.
In a small pot combine sugar and butter and bring to a boil. Once mixture is at a boil, continue boiling for 3 minutes. Mixture should be a deep caramel color. Immediately pour over saltines and spread to cover crackers completely.
Bake at 400 degrees 5 to 6 minutes. It will get all bubbly. Remove from oven and sprinkle chocolate chips over the top and let sit a couple of minutes to melt. Sometimes I melt the chocolate chips in the microwave for about 1 minute then spread it on. Spread melted chocolate and top with chopped nuts if desired. Cool completely and break into pieces.
Cappuccino Meringue Cookies
I gotta be honest with these,

While they look cute as buttons, these Cappuccino Meringue Cookies didnt exactly rock my world.
Because in my opinion, although the cookies were aromatic enough with cappuccino powder in it, they didn’t have the melt-in-your-mouth butter cookies texture.
They were the type of cookies your mom would force upon you to keep your tummy filled rather than the fancy soft baked, chocolate chip studded ones that would satisfy your sweet tooth. These are practical sturdy cookies.

Thank goodness for the meringue filling – sweet egg whites beaten senseless with sugar. It was really the lifesaver for the cookies.
The recipe even foresaw our pain in the messiness involved in most frosted cookies, be it sandwiched or as a topping. It was sharp enough to include the extra step of baking the filled cookies to dry out the meringue.
Just so you can stack them up, roll them around or shake them about in the cookie jar and they will still look as perfect.

Speaking of cookie jars, i thought these would be one of those cookies which would last forever (and ever) in the cookie jar. I thought i would have the problem ridding these cookies before they eventually stale and meet the trashcan.
Thank goodness i have a brother, a true problem solver.

He emptied the cookie jar, in one sitting. I think he must be really hungry.

Or maybe these cookies werent really that bad, and i was just being a demanding nitpicker.
Cappuccino Meringue Cookies
Taken from a free Cookie insert from Saji (an Indonesian food magazine)
150 gr Margarine (I used Butter)
100 gr Icing Sugar
1 Egg White
1 Sachet (25 grams) Cappuccino premix powder, dissolved in 1 TBS hot water (set aside to cool)
225 gr AP
25 gr CornFlour
1/2 tsp Baking Powder
Meringue Filling
1 Egg White
150 gr Icing Sugar
1/4 tsp Lemon Juice (I omitted this)
20 gr Chocolate Rice
Directions:
For the Cookies
1. Beat margarine and icing sugar till creamy (about 1 min). Add the egg yolk and the dissolved cappuccino mixture. Beat till well oombined
2. Sift in the AP, cornflour and baking powder. Mix till just combined.
3. Roll cookie dough into 1 inch sized balls, then flatten them with a fork on a pre-lined and greased baking sheet.
4. Bake at 150 degree Celcius (not F) till they get cooked (about 25 mins). Set aside to cool
5. Take a piece of the cookie, frost it with the meringue filling and stack another cookie over the filling.
6. Bake the sandwiched cookie in the oven for another 3 mins or till the meringue dries.
For the Meringue Filling
1. Beat the egg white till it forms soft peaks. Gradually add the icing sugar and beat till it gets really thick. Add in the lemon juice, and beat till they are well combined. Fold in the chocolate rice.
Rotiboys
What’s the weird saucer looking thing on my plate?

Commonly known as “rotiboys” or “mexican buns”, these UFO looking things took the world by storm quite a few years ago. Most of the people living in Asia would probably need no introduction to these, but for those of you who are unfamiliar, these are actually pillow soft Asian buns with a slightly crispy, coffee scented topping.

In fact, if i were to describe them, these rotiboys are like buns with a piped cookie topping.
They are usually filled with diced unsalted butter. But i decided to stray and filled mine with chocolate… again ( this blog is getting too predictable isn’t it?)

The name “Rotiboy” is actually a brand which made this type of buns famous, and soon after, the name got attached to the product, just like how tissues are sometimes called “kleenex”
Of course, after seeing the success of Rotiboy, every other family member wanted a piece of that fame, and names like “mama buns” or “roti papa” came about.

Not that i mind of course, i find that most of these replicas are almost as good as the original Rotiboy.
And this happens to be one of those replicas!

Crispy, cookie skin covering a soft and moist bread with a chocolate filling.

Or can i call it the “Roti Girls”?
RotiBoys
For the Bread Dough
Adapted from and Indonesian Cookbook Roti Unyil by Chendawati (Please pardon my poor translation)
Ingredients A
700 gr Bread Flour
300 gr AP Flour
250 gr Sugar
5 Egg Yolks
2 Egg Whites
150ml Evaporated Milk
275 Iced Water
20 gr Instant Yeast
10 gr Bread Softener *
50 gr Milk Powder
Ingredients B
75 gr Butter
75 gr Margarine
50 gr Butter Substitute
10 gr Bacom (Bread emulsifier) *
15 gr salt
*( I think U can omit this if you like, but i think this really helped in making the bread texture, making it that much softer and moister)
1. Combine Ingredients A till the dough stops sticking all over the surface and starts getting tacky and elastic.
2. Gradually add ingredients B and knead till the dough gets so elastic, you are able to stretch it into a thin membrane skin.
3. Gather the dough into a ball, and leave it covered for its first proofing for about 30 mins.
4. Punch down the dough, and scale the dough into balls weighing 30 grams each. Let them rest for 15 minutes, covered.
5. Roll the dough, fill with chocolate filling, and seal it in.
6. Let it proof for a second time till it doubles in size (60 minutes).
7. Pipe toppings onto the surface of the unbaked dough
8. Bake at 200 degree CELCIUS till the surface looks crispy and brown (about 10 mins)
For the Chocolate Filling
20 gr Cocoa Powder
30 gr Milk Powder
100 gr Icing Sugar
100 gr Margarine
1/2 tsp Vanilla essence
Mix all ingredients together till well combined.
For the Coffee Topping
50 gr Buter
50 gr Margarine
100 gr Icing Sugar
100 ml Egg whites
120 gr Cake Flour
20 gr Milk Powder
1 TBS Coffee Paste
Mix all ingredients together till they are well combined.
Happy Birthday Cousin!
It’s cousin Irien’s birthday a couple of days ago!
And ideally, I would have loved baking, frosting and decorating a no expense spared, collosal cake with all the works. A monster sized cake just as big as her heart.
But cousin Irien is so tiny! Barely into her twenties, she could be the dictionary illustration of “fashionably thin”. She could be a pea sharing a pod with Nicole Richie, and boy would they rock that pod.
So i crossed that big collosal cake idea, and went for something small.

Inspired by Grace of La Mia Vita Dolce, these are called the Hot Fudge Sundae Cupcakes. But i strayed away from her recipe and settled on something i was familiar with. I guess i was not comfortable with experimenting with a new recipe when the stake (the birthday) is high.
So i started with baking cupcakes. A certain moist, and delicious chocolate cupcake

to which i piped on a white chocolate ganache frosting

And, dont worry, there is no need to go digging out your fancy pipping tips for this. In fact, i just loaded up my pipping bag sans any tip.

Because it will be covered with a good drizzle of melted chocolate. YUMMM..*licks spoon.

Some fancy coloured sprinkles,

And of course a cherry on top to officiate the Sundae look.

Taa-Daaah!
That was easy peasy wasn’t it?

I’ve said it once, and i will say it again.
“Happy Birthday Cousin, may you stay eternally pixie cute, and be abundantly showered with love!”
The Best Chocolate Sheet Cake. Ever.
(Taken from Pioneer Woman)
Ingredients
- FOR THE CUPCAKES: (Makes about 12)
- 2 cups Flour
- 2 cups Sugar
- ¼ teaspoons Salt
- 4 Tablespoons (heaping) Cocoa
- 2 sticks Butter
- 1 cup Boiling Water
- ½ cups Buttermilk
- 2 whole Beaten Eggs
- 1 teaspoon Baking Soda
- 1 teaspoon Vanilla
Preparation Instructions
In a mixing bowl, combine flour, sugar, and salt.
In a saucepan, melt butter. Add cocoa. Stir together.
Add boiling water, allow mixture to boil for 30 seconds, then turn off heat. Pour over flour mixture, and stir lightly to cool.
In a measuring cup, pour the buttermilk and add beaten eggs, baking soda, and vanilla. Stir buttermilk mixture into butter/chocolate mixture. Pour into cupcake lined tins and bake at 350-degrees for 15 minutes.
For the White Chocolate Ganache
200 gr White Chocolate, chopped
200 gr Whipping Cream
1. Double boil white chocolate till it fully melts, set aside to cool slightly
2. Whip the whipping cream to soft peaks. Drizzle in the cooled melted white chocolate, and whip to firm peaks (You want this to be of pipe-able consistency)
For Decorations:
Some melted chocolate
Some Fancypants sprinkles
Some maraschino cherries
Sleek, glossy Chocolate Cookies
Like a spanking brand new leather wallet, i was totally drawn into the glossy, smooth, dark surfaces of these cookies.

I once had one of those gleaming, slick, leather wallet with the unblemished surface in my early teens (It was only later that i found out that the leather was synthetic… doh teens). I loved how sleek it looked, and how it caught the light. I was totally infatuated with the wallet, till one fine day when it got its first scratch.
It was not a bad scratch, just a light score across the surface of the wallet. But i felt as if my perfect wallet has been disfigured for life, and vowed to take better care it. But of course, as they always do, accidents happen. I remember dying a little inside each time my wallet met its next scar.

It has been a long long time since that incident of course, but i have learnt my lesson and my subsequent wallets were always the dull textured, practical, albeit boring type. I guess that’s part of growing up isnt it?
But enough about wallets, lets talk about cookies,
These cookies started out as a roll and cut butter cookies. That is you roll the cookie dough out and use a cookie cutter to cut out each individual cookies.
And when you do that, you tend to get cookie scraps.
I dont know about you, but i like to bake these cookie scraps. 
My cookie scraps look like the polynesian islands.

And these are the actual cookies, before hair and make up.
If you are the type who likes your chocolate cookies with a pronounced chocolate flavour, these are definitely for you. There is a high content of cocoa powder in this recipe, so you might want to use a higher grade cocoa powder for these.

But what i really liked about these cookies is how effortless the dough handling is. It was an agreeable dough, it rolled well and cut well without being too soft and sticky.
From my experience, co-operative cookie dough usually results in bad cookies. The high flour content which makes rolling a child’s play can never match the butter-full dough which threatens to melt on you with the slightest touch from the warmth of your hands. But these cookie dough was a bit different. Instead of relying on flour, the dough had milk powder listed as one of its ingredients. That’s quite a smart way to overcome dough stickiness and introduce a milky flavour at the same time. But having said that, the cocoa powder still remained the dominant flavour in these cookies. I can barely trace any form of milky taste.

Oh, in case you were wondering, those white lines are made of white chocolate.
So if sleek, glossy, chocolatey cookies are your thing, here goes:
Sleek, Glossy Chocolate Coated Cookies
Taken from a free insert on an Indonesian Magazine Saji
100 gr Butter
75 gr Icing Sugar
1/4 tsp Salt
1 Egg Yolk
100 gr Cake Flour
25 gr Cornflour
25 gr Milk Powder
30 gr Cocoa Powder
1/4 tsp Baking Powder
Enough Dark Chocolate (to coat)
Enough White Chocolate (to pipe)
1. Beat Butter, icing sugar and salt till light and fluffy. Add in egg yolk, beat to combine
2. Sift in the flour, cornflour, milk powder, cocoa powder, and baking powder. Beat till just combined
3. Gather dough into a flat disc and refrigerate for at least 30 minutes
4. Roll your cookies to about 1/2 cm in height, and using a cookie cutter, cut them to shape.
5. Bake at 150 degree Celcius on a pre-greased and pre-lined baking sheet for abt 25 mins or till they are cooked
6. Drop chocolate into the melted dark chocolate, wait till set, then decorate as you wish with the white chocolate.
Chocolate Caramel Cream Pie
Let’s face it. I am not good with chilled desserts. There is just something about “Refrigerate until filling is chilled and firm” that i can’t seem to abide. I am terribly when it comes to that part of the recipe, constantly snooping into the refrigerator and poking my nosey finger into the dessert to see if it is “firm”.

And this is just one of those desserts.
A silken chocolate pie.

I guess i only have myself to blame. I could have the most elegant looking slice of pie, prim and proper with the neatest cut. But instead i got this slipshod.
But just as Joe is sloppily delicious, so is this pie.

Being used to chocolate pies with rich chocolate ganache filling, this pie was new to me.
For one, the filling was light and super soft.
It was like a cross between a pudding and a custard. The texture of the filling was silken and smooth. If you are familiar with the Asian silken tofu, this is it, but slightly softer and less set. Eating this pie is like eating a cookies (the crust) dipped in soft serve ice cream (filling), hmm, that does sound good, doesnt it?
And as if that wasn’t enough, this pie has got another trick up its sleeves, because over the satiny, barely set custard, was a generous dollop of caramel infused whipped cream

With its pallid colour, i know i am probably not convincing anyone of its caramell-y goodness. I guess that’s what happens when you pour a liliputan bowl of caramel into a sea of whipped cream, and moreover, my caramel was a strong amber colour.
But trust me, while the whipped cream was laxing in colour, it did make up in flavour. The caramel taste was definitely tasteable and frankly speaking i wouldn’t have this any other way. A strong caramel whipped cream would probably overshadow the chocolate filling.

So there you have it, soft, creamy chocolate filling topped with pale but delicious caramel whipped cream.
But what about the crust?
Well… this is akward, but really, the crust was just like a hamburger box to a hamburger. It served the pie well by walling up the wonderful content, but i really wouldn’t miss this crust if the filling was served on a bowl instead.

So if you have chocolate pie on your craving list, but have chocolate on your “say no to” diet list, this is definitely for you. With only 110 grams of chocolate and a couple of egg yolks, this pie is definitely less evil than its ganachey , full-on chocolate counterpart (Not that i don’t love them though)!
Chocolate-Caramel Cream Pie
Taken from Martha Stewart
Ingredients
- All-purpose flour, for surface
- Chocolate Pate Sucree
- 1/2 cup sugar
- 1/4 cup cornstarch
- 3/4 teaspoon salt
- 2 1/2 cups whole milk
- 4 ounces bittersweet chocolate (preferably 61 percent to 70 percent cacao), finely chopped
- 4 large egg yolks
- 1 teaspoon pure vanilla extract
- Caramel Whipped Cream
- 1 thick block bittersweet chocolate, room temperature, for garnish
Directions
- On a lightly floured work surface, roll pate sucree to 1/8-inch thickness. Fit into a 9-inch pie dish. Trim edges, leaving a 1-inch overhang. Tuck overhang under dough so edges are flush with rim, and crimp edges. Lightly prick bottom of dough with a fork. Refrigerate for 30 minutes.
- Preheat oven to 350 degrees. Line dough with parchment, and fill with pie weights or dried beans. Bake until edges begin to look dry, 20 to 22 minutes. Carefully remove weights and parchment. Bake until crust is darker around edges and bottom looks dry, 10 to 12 minutes. Let cool completely on a wire rack. (Chocolate crust can be stored overnight.)
- Whisk together sugar, cornstarch, and salt in a small bowl. Heat milk and chocolate in a medium saucepan over medium-high heat, stirring occasionally, until chocolate melts.
- Whisk 1 cup hot milk mixture into sugar mixture until smooth. Whisk milk-sugar mixture into the remaining milk mixture in the saucepan. Cook over medium heat, stirring constantly, until bubbling and thick, 4 to 5 minutes total (about 2 minutes after it comes to a boil).
- Whisk yolks in a medium bowl until combined. Pour in milk mixture in a slow, steady stream, whisking until completely incorporated. Return mixture to saucepan. Cook over medium heat, stirring constantly, until it just begins to bubble, 1 to 2 minutes.
- Remove from heat, and stir in vanilla. Let custard cool in saucepan on a wire rack, whisking occasionally, for about 10 minutes.
- Pour custard into chocolate crust. Press plastic wrap directly on surface of custard. Refrigerate until custard filling is chilled and firm, at least 4 hours (or overnight).
- Spread caramel whipped cream over pie. Using a vegetable peeler, scrape chocolate block at a 45-degree angle to make a small mound of shavings, and sprinkle over whipped cream. Serve immediately, or refrigerate and serve within 2 hours.
Taken from Martha Stewart
Ingredients
Directions
Cook’s Note
The caramel mixture must be very cold before the whipped cream is folded in. Otherwise, the whipped cream will collapse.
In-built Hot Dogs
So while the most common way of eating a hot dog is to take a hot dog bun, slice it in the middle, stuff it with the hot dog and pile and/or squirt your favourite sauces and relishes, i decided to plant the sausages in the dough.

That makes convenient eating doesn’t it?
You can just pick one up as you walk out the door.
But of course having said that, there is also the drawback of not having the full fledged hotdog, and the obligated fresh tomatoes and lettuce. Because while i managed to incorporate the sausages into the dough and sent it to bake, i dont think i can do like wise with the fresh vegetables. Not unless i want a vegetable slushie in my hot dog anyways.
So, while it is tempting to just forget the greens (or red) altogether, i decided to serve in on the side instead.

With the hope of whoever is getting a plate of this would not just pick up the hot dog and leave the rest uneaten.
This is the third yeasted bread i made with the help of the bread softeners, and like the previous two, these buns were also cotton soft. However, there is a slight deviation from the first recipe with this. This recipe had more water, and lesser fat content, and instead of using a combination of AP and bread flour, this recipe called for 100 percent bread flour.
Due to the high water content, this was a wet wet dough, and it sticks to any and every surfaces. And like a cane to every naughty child, it’s good to come armed with a scrapper to handle this bugger.

The resultant buns from this recipe was also rather different. Although they both share the same level of softness, the pores on this buns are more structured and less fine. As such, each pore pocket is able to house more air, creating a bun that was more aerated, and thus fluffier.

Okays, sorry to bore with all the boring scientific details, let’s go back to hot dogs.
I drew a circle of tomato sauce and a sprinkle of dried mixed herbs to garnish these hot dogs, and was really surprised by how those few specks of herbs was able to knock me giddy with the most aromatic scents as i first opened the oven door to retrieve the dogs.
And of course, a dip of the mandatory tomato sauce (i ran out of mustard) doesnt hurt either!

Soft Bread Dough
(Adapted From Roti Modern)
Ingredients A
1 kg Bread Flour
15 gr Instant Yeast
Ingredients B
30 gr Milk Powder
200 gr Sugar
12 gr Salt
10 gr Bread Softener
Ingredients C
125 gr Egg
80 ml Evaporated Milk
460 ml Iced Water
Ingredients D
50 gr Butter
50 gr Margarine
50 gr ButterSub (A butter subtitue)
1. With the mixer on low speed, mix ingredients A together, add ingredients B and C, continue beating till they are well combined
2. Add ingredients D gradually, and beat till it gets tacky and elastic
*note I hand kneaded this
3. Leave the dough to proof till it doubles in size (+- 40 mins)
4. Punch the dough down, and scale them to 50 grams each. Let the scaled buns rest for 5 mins
5. Roll the scaled dough like a rope, and twirl it around each sausage and let rest for a second proof till they double in size (+- 60 mins)
6. Brush the surfaces with evaporated milk and sent it to bake at 180 degree Celcius or till they get a nice golden tan
Chocolate Cupbread
So while everyone needs no introduction to the universally celebrated cupcakes, i shall present cupbreads!

Here in Indonesia, these breads are known as “bloeder”, or sometimes spelt as “bluder”. And I am guessing, from its name, it is probably western influenced. These breads are very much like French Brioche, without small head of a dough on top of it.

Similar to the brioche, the bloeders is very high in both butter and egg content, they are indeed very rich and tender crumbed. I don’t even think you need to chew on these. Besides butter and egg, these bread are also very high in sugar content, which makes it pleasantly sweet tasting even when eaten on its own. But having said that, still, i have decided to fill them up with a generous chunk of milk chocolate. Because really, since i am already eating something sinfully delicious, why not go all the way? LOL

The proofing time for this bread takes a wee bit longer than usual. I suspect it might be because of all that butter and sugar, which might dampen the yeast activities. The total proofing time for this bread was about three hours, and in my tropical weather, that’s considered very, very long.
The dough for these bloeders are also quite different from the dough i am used to. Being high in butter content, these breads are very slimy. My hands kept sliding off the dough as i tried to knead it. Sealing the chocolate chunks within the dough was also not easy with the grease coating all over the dough.

As for the texture of the final product, these breads are so fluffy that you tear a huge chunk off these bread, thinking you will get full after a few mouthful, but in reality, being voluminous looking because of air, these bites just dissolve into nothingness.And you risk looking like a glutton when u reach for your second piece.
I also think i might have overbaked this dough as it turned out quite dry and crusty at the sides, and i must definitely keep closer watch over these next time!

Chocolate Filled Cup Breads
Recipe from an Indonesian cookbook “Roti sisir & Roti Sobek” by Lanny Soechan
15 egg yolks
250 gr granulated sugar
1 kg bread flour
20 gr instant yeast
50 gr milk powder
300 ml fresh milk
250 gr butter
1 tbs salt
some chocolate chunks
some evaporated milk
some chocolate chips
1. Beat egg yolks and sugar till it thickens and turns pale yellow
2. Combine flour, yeast, and milk powder. Add in the egg yolk mixture gradually and stir till well combined.
3. Add in the fresh milk, salt, and butter. Knead till elastic
4. Leave to proof till double in size
5. Punch down dough, cut and weigh each dough to be about 60 gr. Wrap the chocolate chunks within each dough and drop them into papercups. Let it proof a second time till double in size.
6. Brush the surfaces with evaporated milk and sprinkle some chocolate chips.
7. Bake at 160 degree celcius till the surfaces turn a nice golden brown.
Lemon Bundt Cake
I am quite the oddball in the family. As a kid, my popsicles are always in alternating shades of red (strawberry) and orange. This is a deviation from the family’s standard of dark brown , chocolate popsicles.
I caved in once, and conformed to the norm, and immediately regretted my decision as i took my first bite. I was missing the bright, refreshing, and tangy flavours of my fruit based pops! And from then on, i’ve nevered wandered, and always stood tall and proud with my vibrant coloured treat admist its dull coloured counterparts.
So fast forward to present day, one of my favourite things to do in baking is to zest lemon peel. I love inhaling the citrus smell of that squirt of fresh juice as i pressed my zester against the skin of the lemon. Juicing lemon juice is pretty fun too. I lean my weight against the juicer to exert the maximum pressure to wring out every last drop of lemon juice.

And that brings about today’s choice of baking, the lemon bundt cake.
And whilst the cake baked away in the oven, i settled myself with a morning warm lemon tea 🙂

And when it comes to bundt cake, i know exactly where to seek my recipe from. The food librarian with her series of “ I like Big Bundts” has a very comprehensive library when it comes to bundts. The original recipe (from Martha Stewart) called for Meyer Lemons. I’ve never seen a Meyer Lemon in Jakarta before, so regular ones will have to do for this.

Ah, the glaze, the citrus flavours of the bundt cake came mainly from the glaze. The cake batter only had lemon zest in it while the glaze had both lemon zest and juice. As you would have guessed, the glaze was both sweet and tangy, and would totally zest your mornings into fanci-ness. 
And of course the mandatory circus work of pouring glaze and taking pictures with my favourite two hands, which leads to some unevenes in the division of glaze across the whole cake surface

I am cutting myself a slice from the part of the cake with MORE glaze of course, and shall save the slices with the trickly glaze to the dieters.

The cake was baked to a perfect golden brown, texture wise, it is rather dense, and not fluffy soft. I think i might have overbaked it, cause the edges became quite crispy and cookie like. And i think i enjoyed picking at these crisp crumbs more than i did the cake!

A cup of lemon tea and a slice of lemon cake for a Friday breakfast!
(Recipe taken from Martha Stewart)
Ingredients
Makes 2 loaves
I made 1/2 the recipe and baked it in 10-cup Bundt cake pan.
Ingredients
- FOR THE CAKE
- 1 1/2 cups (3 sticks) unsalted butter, room temperature, plus more for pans
- 4 cups sifted cake flour, plus more for pans
- 1 teaspoon salt
- 4 teaspoons baking powder
- 2 3/4 cups sugar
- 8 eggs, room temperature
- 1 cup milk, room temperature
- 2 teaspoons pure vanilla extract
- Zest of 1 Meyer lemon
- FOR THE GLAZE
- Zest of 1 Meyer lemon
- 2 3/4 cups confectioners’ sugar, plus more if needed
- 1/4 cup fresh Meyer lemon juice
- Preheat the oven to 325 degrees. Butter and flour two 9-by-5-by-3-inch loaf pans and set aside.
- Sift the flour with the salt and baking powder two times and set aside.
- With an electric mixer, cream the butter until fluffy. Add the sugar gradually, beating until light and fluffy.
- Add the eggs, one at a time, beating well after each addition. Add the flour mixture to the butter mixture, alternating with the milk and vanilla. Stir only until thoroughly blended. Gently fold in the zest.
- Pour batter into the prepared pans and level tops with an offset spatula. Bake for about 1 1/2 hours, until a cake tester comes out clean. Let the cake cool in the pan about 10 minutes; then remove to a wire rack to cool thoroughly.
- Make the glaze: In a medium bowl, whisk all glaze ingredients to combine. If necessary, add additional confectioners’ sugar to desired consistency.
- Pour glaze on top of cakes and serve.
Samoas Scones
If you think that scones are just tasteless, dry, breakfast pastries, you got something coming at you today.

Meet the Samoa Scone- a spin off from the Samoas Cookies

Inspired by the Samoas Cookies, these scones are dipped in chocolate, topped with caramel and coconut, and drizzled with more chocolate.

These scones are first baked at a moderately high temperature to get that beautiful golden crust outside, while the insides remain moist, soft and crumbly.
To facilitate that, the scones are brushed with melted butter and sprinkled with coarse sugar which caramelises quickly.

Off the oven, the scones are dipped in melted chocolate.
After which, coconut and caramel are spooned over their tops.

And to top it off, more drizzled chocolate over the caramel. YUMM!

Take a bite into these scones, and you will first experience the chewy caramel. You might need to battle a slight bit with the sugar threads as you pull the scones away from your lips.

Beneath that chewy, stringy caramel, we arrive at a soft pastry so subtly sweetened so as not to overwhelm you with a sugar high. The scone is downplayed to allow you to truly savour the smokey, butterscotch flavour within that caramel.

Your journey with the bite ends with a soft “cluck” of the chocolate base, and now you get to taste them altogether as your mouth works on that blissful combination.

So, take the journey, and give these blissful scones a try!
(Taken from BakingBites)
3 cups all purpose flour
1/2 cup sugar
2 tsp baking powder
1/4 tsp salt
1/2 cup butter, chilled and cut into pieces
3/4 – 1 cup milk
6-oz semisweet chocolate, chopped
1 cup prepared caramel sauce (store bought or use recipe below)
3/4 cup shredded coconut
Preheat oven to 400F. Line a baking sheet with parchment paper.
In a large bowl, combine flour, sugar, baking powder and salt. Add in chilled butter and cut it into the flour mixture until no pieces larger than a pea remain visible (this can be done in a food processor).
Add in 3/4 cup milk and stir to combine. Gradually add in remaining 1/4 cup milk until dough comes together into a ball.
Divide dough in half. Working with one piece at a time, turn dough out onto a lightly floured surface and flatten into a disc about 1/2-inch thick. Cut into quarters and place on baking sheet. Repeat with second piece of dough.
Bake for 16-20 minutes, until scones are a light golden brown. Cool on a wire rack.
Melt the chocolate in a small bowl. Use a small knife or spatula to spread a thin layer onto the bottom of each scone. Place coated scones on a cool baking sheet lined with a piece of wax or parchment paper to set up.
Combine caramel and shredded coconut in a small bowl. Spread about 3 tbsp of the caramel and coconut mixture onto each scone and drizzle with remaining melted chocolate. Allow chocolate drizzle to set for at least 30 minutes before serving.
Makes 8 scones.
Homemade Caramel Sauce
1/2 cup sugar
1/3 cup light corn syrup
1/4 cup water
1/8 tsp salt
7 tbsp heavy cream
1/2 tsp vanilla
In a medium saucepan, combine sugar, corn syrup, water and salt. Bring to a boil over medium heat and cook until syrup turns dark gold. Working carefully, stir in cream and vanilla. Caramel will start to steam and harden when you add the cream – continue to cook over medium heat, stirring constantly, until caramel is smooth. Transfer caramel to a refrigerator-safe container and cool. Store in the refrigerator until ready to use.
Note: You may have extra caramel sauce if you use it for the scones, so feel free to use it as a topping for ice cream, etc.
A baking addict who loves to give away all her baked products to willing (or unwilling) recipients to make room for more baking. i would love to hear from you! Email me at twilightzky@hotmail.com
Flickr Photos


Foodgawker

Paperblog

Yummy

