Archive
Candy Crush Saga Cake
Pretty sure this logo needs no further introduction..

This is to encourage those who are obnoxiously “stuck” in certain levels. Do not be disheartened!

Also, to those who do not participate in candy crush activities, i ask for tolerance towards all those pesky “CANDY CRUSH SAGA requests. Do have sympathy to your fellow facebookers who are pulling at their hair trying to “level up”.

Cheers!
Happy Idul Adha
This cake is made to honor the cows to be slaughtered tomorrow.
And to wish all my Muslim Friends Happy Idul Adha.


Happy Holidays everyone!
Minion Birthday Cake
Just a short post, to flaunt my cake.
There are flaws in this cake. The straps of the goggles were falling off. Parts of the fondant was wrinkled.
But i choose to ignore them all and reach for a nearby banana.
seriously, the song was stuck to my head as i was creating this
“ba ba ba.. ba ba nana, BANANAAAH, Potato- naaahh”

Happy Birthday to my nephew Brian who just turned 4!

I hope you liked the cake auntie made for you!

And I dont know how Gru creates his minions. But here’s how i created mine:

Popay!!!
Nigella’s Caramel Croissant Pudding
What strikes me the most about Nigella Lawson is her beauty.
It’s almost a pity that she is hosting a cooking show instead of starring in a blockbuster movie. What a waste of pretty face, me thinks.
After watching numerous episodes of her show, I’ve come to conclude that Nigella’s style of cooking comes with a careless wanton. She is not very rigid on her measurements. It’s always a “drizzle of this” or a “handful of that”. That doesn’t sit well with me. My sense of estimation is tragically useless.
Thankfully, someone was able to convert her recipes into teaspoons, tablespoons and cups. Precise instructions are my bedrock. Without it, I am just a piece of wood drifting about cluelessly in the world of culinary.
So the recipe I’ve chosen for this month’s cook like a star , organised by Bake for Happy Kids, Joyce from Kitchen Flavours and Anuja from Simple Baking – is Nigella’s Caramel croissant pudding.


What made this pudding stand out is the use of croissant instead of the common stale bread. This made a very soft, melt-in-your-mouth pudding texture which you barely have to chew.
So, grab a spoon and dig in!

Recipe taken from Food Network.
Caramel Croissant Pudding
2 stale croissants
1/2 cup sugar
2 tablespoons water
1/2 cup heavy cream
2 tablespoons bourbon
1/2 cup whole milk
2 eggs, beaten
Directions
Preheat the oven to 350 degrees F.
Tear the croissants into pieces and put in a small gratin dish; I use a cast iron oval with a capacity of about 500ml/ 2 cups for this.
Put the sugar and water into a saucepan, and swirl around to help dissolve the sugar before putting the saucepan on the hob over medium to high heat. Caramelize the sugar and water mixture by letting it bubble away until it all turns a deep amber colour; this will take 3 to 5 minutes. Keep looking but don’t be too timid.
Take the pan off the heat and add the cream – ignoring all spluttering – followed by the bourbon and milk. Whisk to mix, then still whisking add the beaten eggs. Pour this quickly over the croissants and leave to steep for 10 minutes.
Place in the preheated oven for 20 minutes and prepare to swoon.
Caitlyn’s Sugar Free Cupcakes with Avocado Frosting
I know, i know, majority of you would probably feel repulsed by yet another sugar free, gluten free baby food.
But i feel the need to post this recipe, namely because it’s a recipe I’ve developed myself.
After rounds and rounds of trial error, I’ve finally came up with a cake recipe i really loved.
A cake recipe that’s subtly sweet and soft as can be.
Considering that this is an entirely sugar free (refined/unrefined, synthetic/natural), this is quite a breakthrough. No stevia, no xylitol, or any of that fancy sweeteners was used here.
The goodness came from ripe bananas.

Working with my sugar free constraints, I also wanted to come up with a frosting that’s equally healthy for these cupcakes. For days, I find myself sometimes staring into blank space. I just couldn’t think of something that’s naturally sweet and is thick enough to pipe.
Then the idea hit me. avocadoes! At first I was skeptical, I didnt know whether blended avocadoes would be too watery. I also thought that avocadoes would be too tasteless as a frosting. That’s when i decided to drop in some medjool dates in. And boy, did it work like a charm! and most importanly, baby Caitlyn loves it!
Sugar Free, Gluten Free Chiffon cake with Avocado Date Frosting
Makes 3 of the above star shaped cupcakes
15 grams rice flour
5 grams sago flour
1 organic egg yolk
8 grams olive oil
11 grams raw almond milk
60 grams banana, mashed
1 organic egg white
Preheat oven to 170 degree celcius.
In a bowl, mix the yolk, raw almond milk, bananas, and olive oil together. Sift in the flours.
Beat the egg whites till stiff peaks.
Fold the egg whites into the banana mixture.
Pour into mold and bake till golden brown (+- 20 to 25 minutes)
Avocado Frosting
1 avocado
1 medjool date
With a blender, blend the avocado and the date together.
Using a piping bag, pipe onto cupcakes.
Durian Pancakes
This dish is definitely not for the faint of heart.
Neither is it for the faint of nose.

I was folding the durian filling into this pancakes when i noticed the onset of a headache.
I thought i was imagining it. But then the hired help made a passing remark (she literally walked passed me and made the remark) “the smell of durian is making me dizzy”.
Geez, i didnt even know HOW that could be possible.

Nevertheless, headache or not, i still scarfed down three of these.
Strangely enough, eating these didn’t give me a headache.
So go figure!
PS: I am entering this to July’s aspiring baker

The theme for this month is : Tropical Spiky Month
hosted by Charmaine of MiMi Bakery House.
Thanks Charmaine for hosting!
Durian Pancake
250 gram all purpose flour
3 eggs
500 ml coconut milk (freshly squeezed)
pinch of salt
Whisk the eggs and coconut milk together. Add in the salt.
Slowly pour the coconut milk mixture into the flour
Cook it on a nonstick pan. I used about one spoon ladle for each layer of pancake.
Durian filling:
Durian flesh (+- 220 grams)
Whipping cream (70 grams)
whip the cream till soft peaks. Add the durian flesh and mix till combined
Spoon the durian flesh onto the durian pancakes and fold it like an envelope.
Happy Birthday Baby Caitlyn!
On this date last year, I was making breakfast for your dad when i experienced a bout of intense stomach contractions that made me grip the kitchen counter.
“Is this it?”, I thought to myself panicking. I glanced at my unpacked “maternity” luggage a few feet away from the kitchen door. I’m not due until two weeks later.
“Let’s not panic”, I thought to myself. First time mothers usually take up to 15 hours to birth their child, i soothed myself , remembering my doctor’s words.

I finished scrambling my eggs of a breakfast, and fetched my list of “to brings” that the hospital gave me.
I scanned the list. Another wave of panic attack came over me. “Breast pump”, i whispered aloud. I cursed myself repeatedly for stalling in buying one. A vision of my sister who successfully breastfed her kids till they were two years old each came into my mind. ” You need breast pump. It is very, very,VERY important”.

I pushed that out of my mind, I wondered if I could actually purchase breastpump while IN labor. I went into the shower, and spent a good 15 minutes not doing anything. Just standing under the warm running water (Green activists can hate me for wasting water, but please bear with the panic stricken mother-to-be).
The warm water felt comforting. The contractions didn’t reappear. I composed myself. Maybe it’s just a false alarm. I got dressed and got ready for work, vowing to buy breastpumps later that evening.

On the way to work, another wave of strong contractions made me close my eyes and wince in surrender. I dialled the hospital’s number and made an appointment to see the doctor. It was the smartest thing I’ve ever done, because 14 hours later, a slimy screaming baby was pulled out of me.

“Happy Birthday Baby Caitlyn”. May you be blessed with a wealth of health and love.Mommy can’t even begin to describe how much she loves you.
PS: this is a two tiered cake. The first tier is a sugar free cake for Caitlyn, the second layer is just an average sponge cake for adults.
Sugar Free Sponge Cake with Pear Jam:
For a 10 cm cake
1 egg yolk
2 egg whites
35 ml pear concentrate (made by simmering 105 ml of pear juice till it reduced to third)
15 grams olive oil
25 grams AP flour
5 grams cornflour
Boil olive oil with pear concentrate till the mixture steams. Set aside to warm
Add in egg yolk to the olive oil mixture. Slowly stir in the AP and cornflour.
Beat egg whites till soft peaks. Fold into the flour mixture.
Bake at 170 degree till cooked (+-15 minutes )
Slice the cake halfway, spread the sugar free pear jam and sandwich it with the top layer.
Sugar Free Pear Jam
50ml of homemade pear concentrate (made by simmering 150 ml of pear juice till it reduced to a third)
1/2 tsp arrowroot starch, dissolved in a bit of water.
Stir the arrowroot starch into the pear concentrate.
Simmer till thick and bubbly
Set aside to cool
I am entering this post into the Slightly Indulgent Tuesdays, organized by Amy simplysugarandglutenfree. Slightly Indulgent Tuesdays is a very delightful weekly linky which aims at sharing gluten and sugar free recipes. While this recipe is not gluten free, it is still a very healthful sugar free recipe 😉
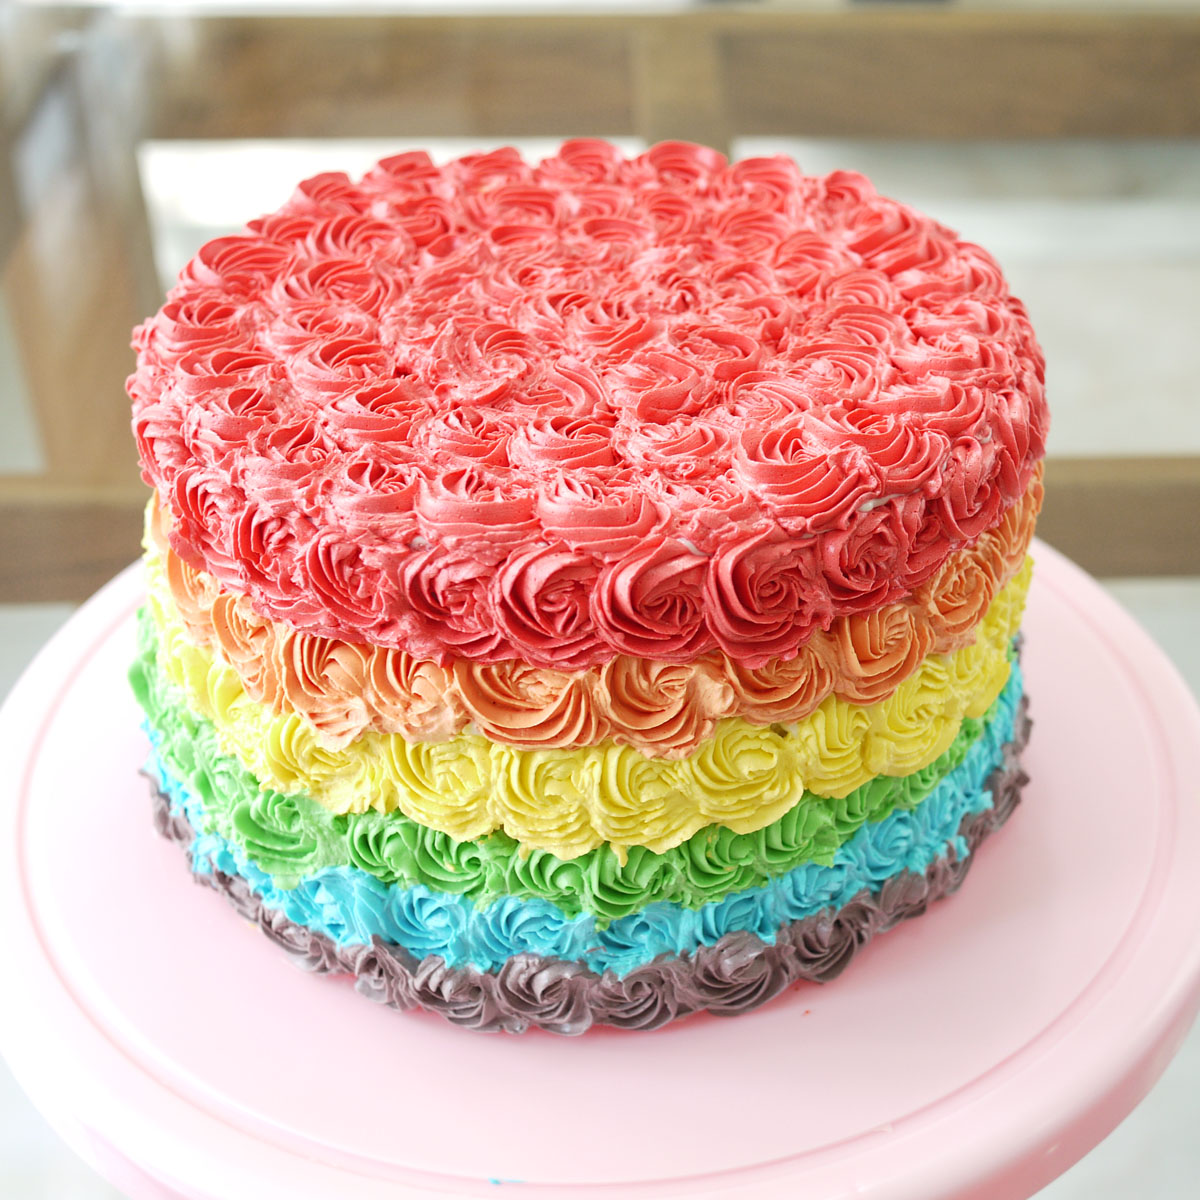
Rainbow Cake
I know, I know, rainbow cakes are ‘so yesterday’…
But truthfully, even at its rage, where every baker, every cake shops, and every blog was speckled with at least one ‘rainbow’ item. I wasn’t tempted at the very least to make one. Mostly because of the amount of work involved. And maybe because of the amount of food coloring that went into it.
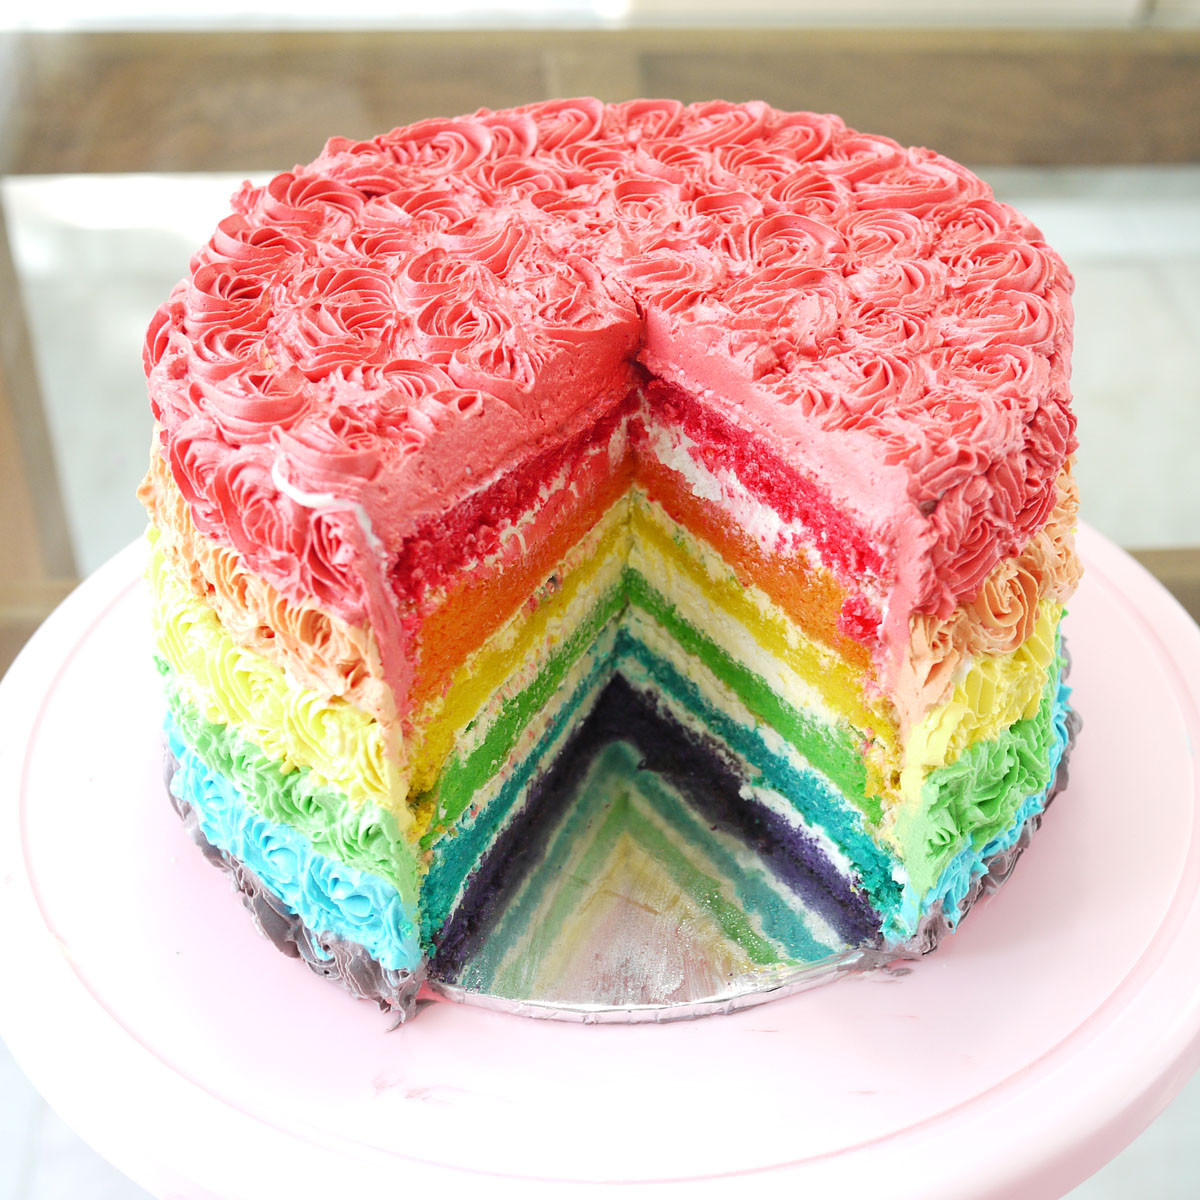
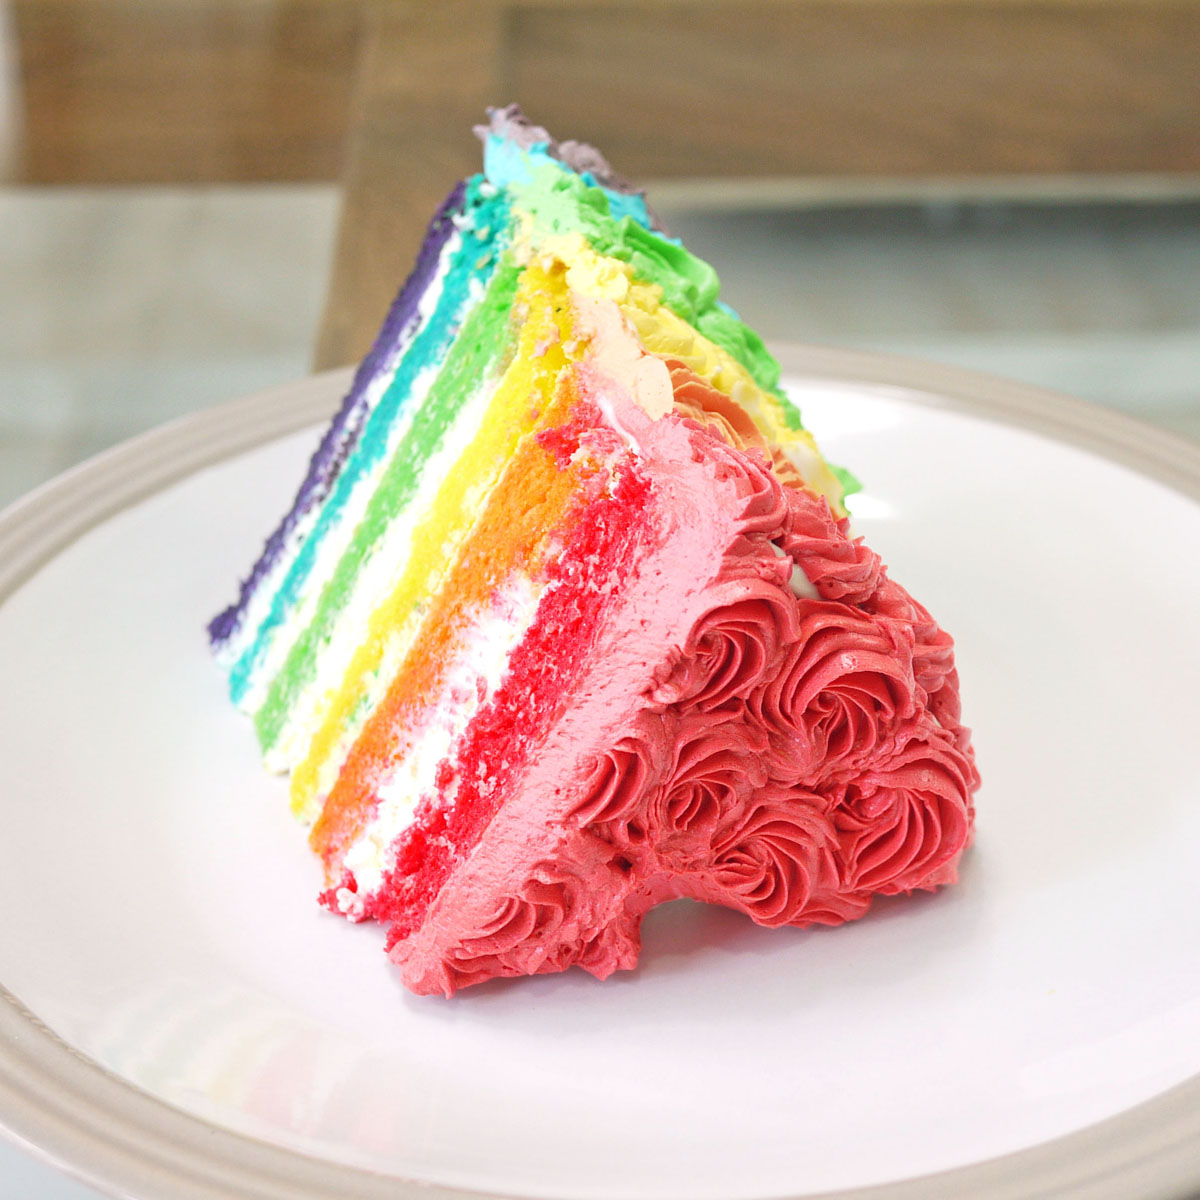
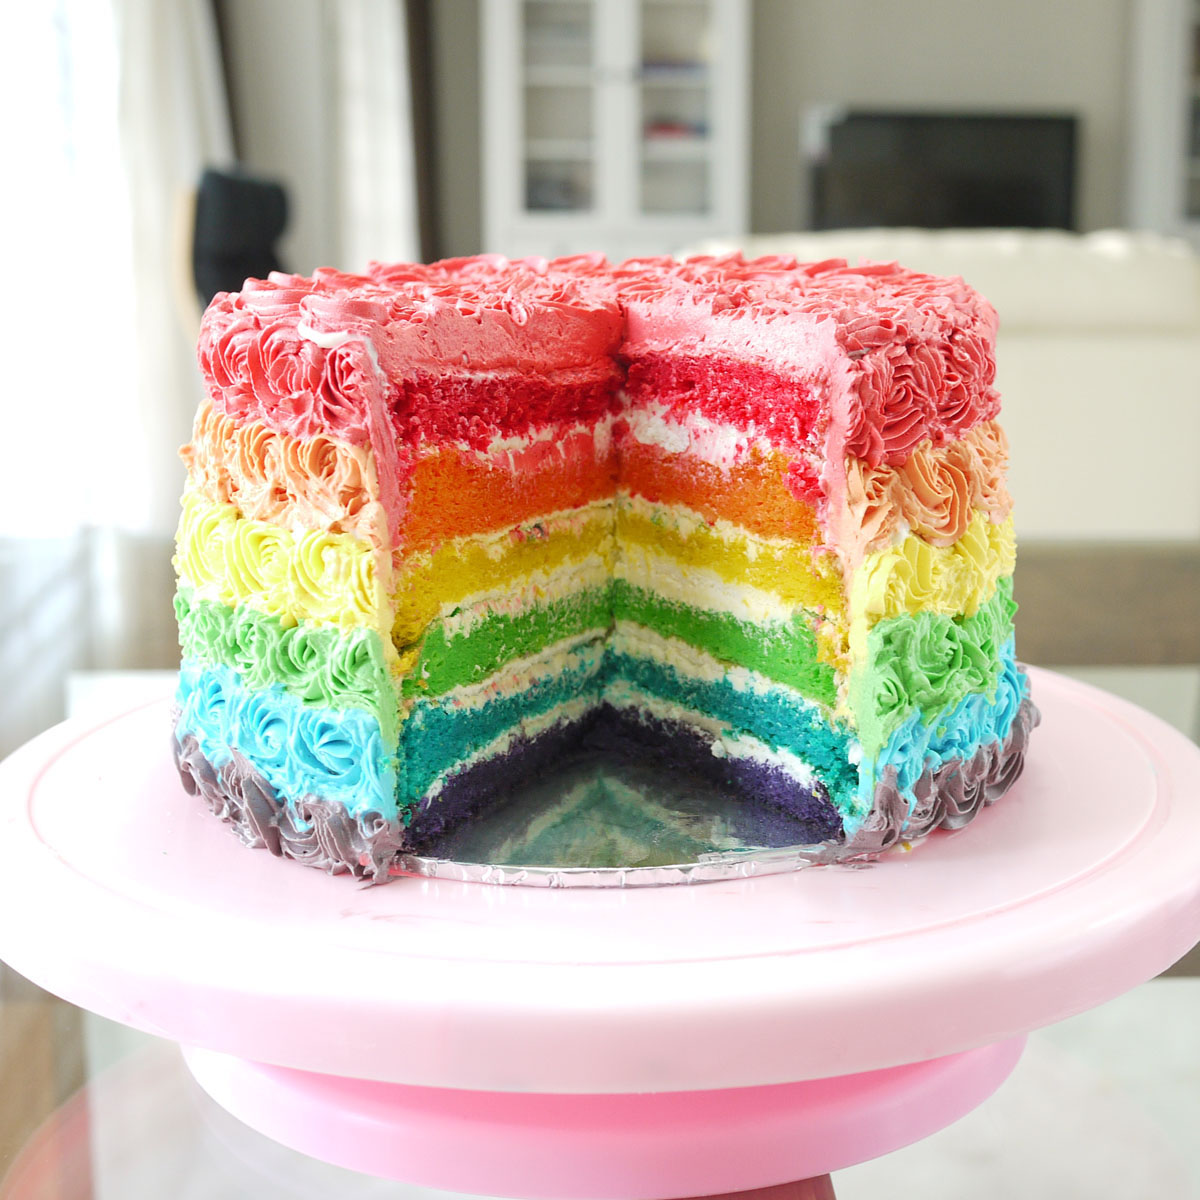
Even now, as i sit typing this, the one slice of cake that i cut for the photos remain untouched.
So why make rainbow cake you ask?
Well you see, a close relative of mine has just opened up a cafe. She wanted rainbow cake on the menu and I was to experiment with a few recipes and decorating options.

The cake had to be pretty enough to sit on her display chiller. So I decided to pipe rainbow roses around and on the cake.

It’s a lot of work, a lot of piping bags, and a lot of bowls. But i came up with a good solution on how to minimize them. First, I tinted a good amount of buttercream YELLOW. I took my first pipping bag, and piped yellow roses on where it should be. Then i divided ALL yellow buttercream into two. Onto one bowl of my yellow buttercream, and added a few drops of red to make ORANGE. In a way, you can say that i am recycling my yellow buttercream to make orange. And when i am done with my orange roses, i added even more red coloring to make my RED buttercream.
To the second batch of yellow butter, I added drops of blue to make GREEN buttercream. Leftover green buttercream were added with more blue coloring to make BLUE buttercream. And when i am done, I took leftover RED buttercream, mix with BLUE buttercream and my final color, which is PURPLE buttercream.
Which pretty much means that instead of ending up with all 6 colors of buttercream, I was left with only leftover purple buttercream.
Geez, I hope i dont confuse you.
Whatever the case, I hope my relative’s pastry chef has the patience of a Saint. Because if making this rainbow cake daily was one of the job descriptions, I would tender my resignation.
Rainbow Cake Recipe:
Taken from NCC Rainbows Week
SPONGE CAKE
by Hera
A:
16 egg yolks
8 egg whites
200 gram sugar
B:
160 gram AP flour
20 gr milk powder
20 gr cornflour
C
200 gr butter,melted
Red, Yellow, Orange, Blue, Green, Purple colorings
How To:
1) Beat eggs and sugar till ribbon stage
2) Sift ingredients B into a bowl. Slowly fold ingredients B onto the whisked eggs.
3) Fold in the melted butter.
4) Divide batter into 6, and add colorings into each one of them.
5) Pour each of the colored batter onto a tin measuring 20 cm in diameter.
7) Bake for 18-20 minute @ 175 °C or till cakes are fully cooked (You can do a skewer test here)
8) When the cake layers are cool, layer each cake with the cream cheese frosting
Frosting Cream Cheese:
Bahan:
350 ml Whipping cream
250 gr Cream Cheese
110 gr icing75 gr butter unsalted
Cara:
Whip the whipping cream, set aside in the refrigerator.
Beat Cream Cheese, butter n sugar
Add Whipped cream into the cream cheese mixture and beat till well mixed.
For the buttercream frosting, i used Martha Stewart’s Swiss meringue buttercream.
Recipe can be found here
Happy Father’s Day
Having a baby automatically adds three extra celebrations to your household. There’s the baby’s birthday, which is due next month. There is Mother’s day, which was spent unceremoniously in the mall, cause Mr. Crustabakes didn’t have a clue it was Mother’s day. And there is Father’s day.

I am thrilled to have these three additional celebrations. I baked a cake for the occasion because I didn’t want to let the opportunity to celebrate ( and bake a cake) slide.
This was truly a “play it by the ear” cake. No planning was made for the cake. I just visualized Mr Crustabakes’ face and kind of go with the flow. While the eyes, nose and pink cheeks were inspired by Mr. Pringles. The blue collared shirt, spiky hair, and the day old beard are signature of Mr. Crustabakes.
Happy Father’s day, Tong!
In case you were wondering, it’s a two tiered red velvet cake with cream cheese frosting, Both tier were full fondant, with crushed oreo for “beard”
For the red velvet cake recipe:
Taken from Oprah.Com
- 2 1/4 cups sifted cake flour (not self-rising)
- 1/4 cup Dutch-process cocoa powder
- 1/2 tsp. salt
- 8 Tbsp. (1 stick) unsalted butter , at room temperature
- 1 1/2 cups sugar
- 2 large eggs , at room temperature
- 2 Tbsp. liquid red food coloring
- 1 tsp. vanilla extract | Get the recipe!
- 1 cup buttermilk , at room temperature
- 2 tsp. distilled white vinegar
- 1 tsp. baking soda
- 2 packages (8 ounces apiece) cream cheese , at room temperature
- 8 Tbsp. (1 stick) unsalted butter , at room temperature
- 2 1/2 cups confectioners’ sugar , sifted
- 1 tsp. vanilla extract | Get the recipe!
- Pinch of salt
Sift flour, cocoa, and salt into a bowl.
In stand mixer with paddle attachment, beat butter at low speed until creamy. Add sugar; blend on medium speed, scraping bowl occasionally, until fluffy, about 3 minutes. Add eggs 1 at a time, mixing well after each. Scrape bowl; add food coloring and vanilla. On low speed, beat in flour mixture in thirds, alternating with buttermilk, beginning and ending with flour mixture. In small bowl, stir together vinegar and baking soda. Stir into batter. Divide batter between prepared pans; spread evenly. Bake until a toothpick inserted in center comes out clean, 25 to 30 minutes. Cool in pans 10 minutes. Run a knife around edges and turn layers out onto racks. Remove paper and flip cakes; cool completely. Freeze for 30 minutes.
To make frosting: In stand mixer with paddle attachment, beat cream cheese and butter at medium speed until smooth, about 1 minute. Add sugar, vanilla, and salt. Blend on low speed for 30 seconds; beat on medium-high until fluffy.
To assemble: Cut layers in half horizontally with a serrated knife. Place 1 layer, cut side up, on a serving plate; spread with 1/2 cup frosting. Repeat twice. Add last layer, top side up. Ice cake thinly with 3/4 cup frosting to crumb-coat. Refrigerate 20 minutes; finish frosting.
Sourdough Chocolate Chip Muffins
Please bear with me as i yet again put up another sourdough recipe.
This time, i used my sourdough discard to make chocolate chip muffins.

The sourdough here acts as an acidic base for the baking soda, which made the muffins get an extra “oomph” while rising in the oven.

As always with muffins, i was extra generous with my chocolate chips. I loved picking the chips with my fingers when i eat my muffins.

Taste wise, i couldnt really taste the sour twang of the sourdough starter. Neither did Mr.Crustabakes… I know this because he didn’t complain. You see, Mr. Crustabakes isn’t a big fan of sourdough related items. He thinks they are stinky and rotting. Little did he know that he just scarfed a whole muffin of sourdough. Ha!
Sourdough chocolate chips muffins
Yields about 8 muffins
Adapted from Sourdoughhome.com
- 1 C “discarded” sourdough starter
- 1 C All Purpose flour (sift flour prior to measuring)
- 1 egg
- 1 tsp vanilla
- 1/4 tsp salt
- 1/4 C oil
- 1/2 C sugar
- 1 tsp baking soda
- ~1/2 C chocolate chips
Preheat oven to 425F.
Combine dry ingredients in small bowl. Stir in chocolate chips. Combine wet ingredients in medium bowl. Add dry ingredients to wet ones.
Line your muffin tins with cupcake wrappers. Mix the wet and dry ingredients quickly and spoon into your muffin cups.
Bake at 425 for about 20 minutes.
Sugar Free Raisin Banana Bread
Lots of cakes out there claim to be sugar free.
But they are laden with synthetic sugar.
I’ve seen cakes that claim to be refined sugar free.
But they are laden with a whole party of unrefined sugar.
This cake however is wholly Sugar Free.
It relies wholly on bananas and raisins to its sweetness.

Perfect for my 10 month old baby Crusta.
Yup, she is still not allowed sugar. Refined, or not refined.
My poor baby.
So till you hit your 12 month mark,
and are finally allowed a moderate amount of sugar
here is something to tide you over.

Sugar Free Banana Bread with Raisins
Makes 2 large muffins
20 grams organic raisins, chopped
40 grams boiling water
40 grams whole wheat flour
12 grams All purpose flour
1/4 tsp organic/natural baking powder
28 grams olive oil
125 grams (about 1) banana
1 egg yolk
Pour the boiling water onto the chopped raisins, set aside for half hour
preheat oven to 180 degree celcius, Grease and line the muffin tins.
Sift whole wheat, all purpose flour with the baking powder.
Drain the raisins, reserving the liquid.
Put the olive oil, banana and 12 grams of the steeped raisin water in a food processor. Process till smooth.
Pour the processed banana mixture onto the flour mixture and mix till well combined.
Add the chopped raisins and pour the batter onto awaiting muffin tins.
Steamed Strawberry Cupcake
As mentioned in my previous post, i am attempting to employ my gas stove more instead of my power draining oven.
This cupcake here, is a strawberry fanta flavoured steamed cupcake.

As with butter cakes, the surface of this cake is supposed to “break open”, indicating that the cake has fully risen.
And if you are wondering what the black stuff on it is, they were shredded chocolate.
I love how the strawberry fanta imparts the pretty pink colour.
Not to mention a slightly strawberry flavour.
Fanta Steamed Cupcakes
2 eggs
200 grams sugar
275 grams AP flour
1/4 tsp salt
1/2 tsp baking powder
175ml Fanta
50 grams thick coconut milk
Some shredded chocolate
Sift flour, baking powder, and salt into a bowl, set aside
Beat eggs till pale and fluffy (about 10 mins)
Fold in the sifted flour alternately with the fanta and coconut milk
Pour onto cupcake molds which have been prelined.
Sprinkle chocolate over the cupcakes
Lower cupcakes into a pre-heated steamer, and heat with high heat for about 10 minutes.
Another type of cheesecake
This cake…
I don’t even know how to title it.
It has cream cheese in it.
It has white chocolate,
It has butter.
Yet it’s not exactly a cheesecake,
nor is it a buttercake,
and definitely not a blondie.

Oh, and did i mention that it was steamed, not baked?

But if i were to have a go at this cake,
I would say this is a cake between a sponge and a butter cake.
It’s light and soft, yet it’s “bulky”.
It’s sweet, but not sponge-cake sweet.
Its rich, but not buttery cake rich.
Oh well, whatever the case, i think it’s a pretty good cake, considering that it’s steamed.
Which brings me to another point.
Admist rising electrical bills (Having a baby really jacks up your bills!), and a full force electrical oven which drains 2200 watts each time i fire it, I decided that i should steam more often and bake less.

So here it is!
Steamed cheesecake with white chocolate
Taken from Cake Kukus (Sedap)
(Makes 5 cupcake size)
38 grams cream cheese (double boiled till melted)
4 egg yolks
2 egg whites
63 grams sugar
1/8 tsp salt
63 gram AP flour
10 gram milk powder
1/4 tsp baking powder
50 grams butter, melted
38 grams white chocolate (melted with butter)
Beat eggs, sugar and salt till light and fluffy. Add melted cream cheese, mix till well combined.
Fold in flour, milk powder and baking powder
Add melted butter and white chocolate slowly, and fold till evenly mixed
Pour into cupcake tins that have been lined with greased baking paper.
Steam for 30 minutes or till cooked.
Indonesian Layered Cake
I’ve recently joined a facebook group called the “Indonesian Foodblogger”
Like most groups you see on the internet, this group aims to bring together Indonesian foodbloggers around the world. It is a place where you can share or question anything food related.
To further engange its members, the Indonesian Foodblogger (IFDB) puts forward a challenge each month. And for the month of May, the theme is “layered cake”.

However, there is a catch.
The challenge does not accept cakes that are baked, and then LAYERED with buttercream, ganache and the likes.
It accepts cakes which are layered WHILE they (the cake) is cooking..
Which pretty much means you gotta stand around, fiddling your thumbs while you pour your cake batter and watch it cook layer by layer. It involves a great deal of time.
So, i set aside an evening for it.
I carried baby Crustabakes on my hip as i started weighing my ingredients.It’s crazy, but I have developed some kind of superpower whereby i can balance baby Crustabakes on my left hip and still be completely functional with my right arm.
Like a good trade off, this cake is fairly simple to execute. A time consuming, but minimal labor kinda cake.
All you need is a simple whisk, and a lot of bowls.
Three bowls, for the three different colours on the cake.

I’ve chosen pink and green for this cake.
Because those are the colours stated in the recipe.
Also because those were the only food colorings i had at home. Yes, unfortunately, i used food coloring for this cake.
I may be functional with my right arm, but i am not THAT functional to be pounding at leaves or fruits to get natural food dye.

So off i go, steaming this cake, layer by layer.
8 minutes per layer.
Alternating the layers between white, green, then pink and repeating the sequence over and over again till the batter gets used up.It took a total of about 2 hours.
By the end of it, i had put baby C to sleep, took a shower, brushed my teeth and got ready for bed.
All while cooking a cake.
Talk about multi-tasking!
Lapis Beras
Loosely translated from 52 Resep Kue Berlapis
1.5 Litres coconut milk, squeezed from 2 heads of coconuts
3 blades of pandan leaves
1 tsp salt
300 gram rice flour
85 gram sago flour
300 grams granulated sugar
6 drops green food coloring
6 drops red food coloring
1. Bring to boil coconut milk, pandan leaves and salt, all the while stirring. Strain, and discard the pandan leaves. Set aside to cool.
2. Sift the rice flour, sago flour and the sugar.Slowly whisk warm (not hot) coconut milk into the flour mixture.
3. Divide the batter into 3 bowls. Drop green food coloring into one bowl. Drop red food coloring into another bowl and leave the third one white.
4.Pour 100 ml of white batter onto a greased square tin (18cm x 18cm x 7 cm). Steam for 8 minutes.
5. Pour 100 ml of green batter over the white batter, steam for 8 minutes
6. Pour 100 ml of red batter over the white batter, steam for 8 minutes.
7. Repeat the sequence of white, green and red, till all the batter gets used up.
8. For the last layer, steam for a final 30 minutes. Let cool before serving.
My very first Fondant Cake
The reason why you’ve never seen a full fledged fondant cake on Crustabakes, is because i have a mortal fear of fondant.
I’ve heard all about it being sticky, and uncooperative to work with.
It cracks, it sweats, it tears, and the list of troubles goes on and on.
I’ve also never cared about its taste.
And the fact that everyone just tears out the decorative fondant after they’ve sung the birthday song and blown the candles didn’t help either. Imagine, all those endless hours shaping the fondant defunct in just a split second.
But something spurred me.
Baby Crustabake’s first birthday.
Her birthday is just in a little over more than two months.
And I would love to make something “passable” to celebrate that special day.
So today, i start practicing.
My very first full fledged fondant cake.
A simple cake with a bow of pastel colors.
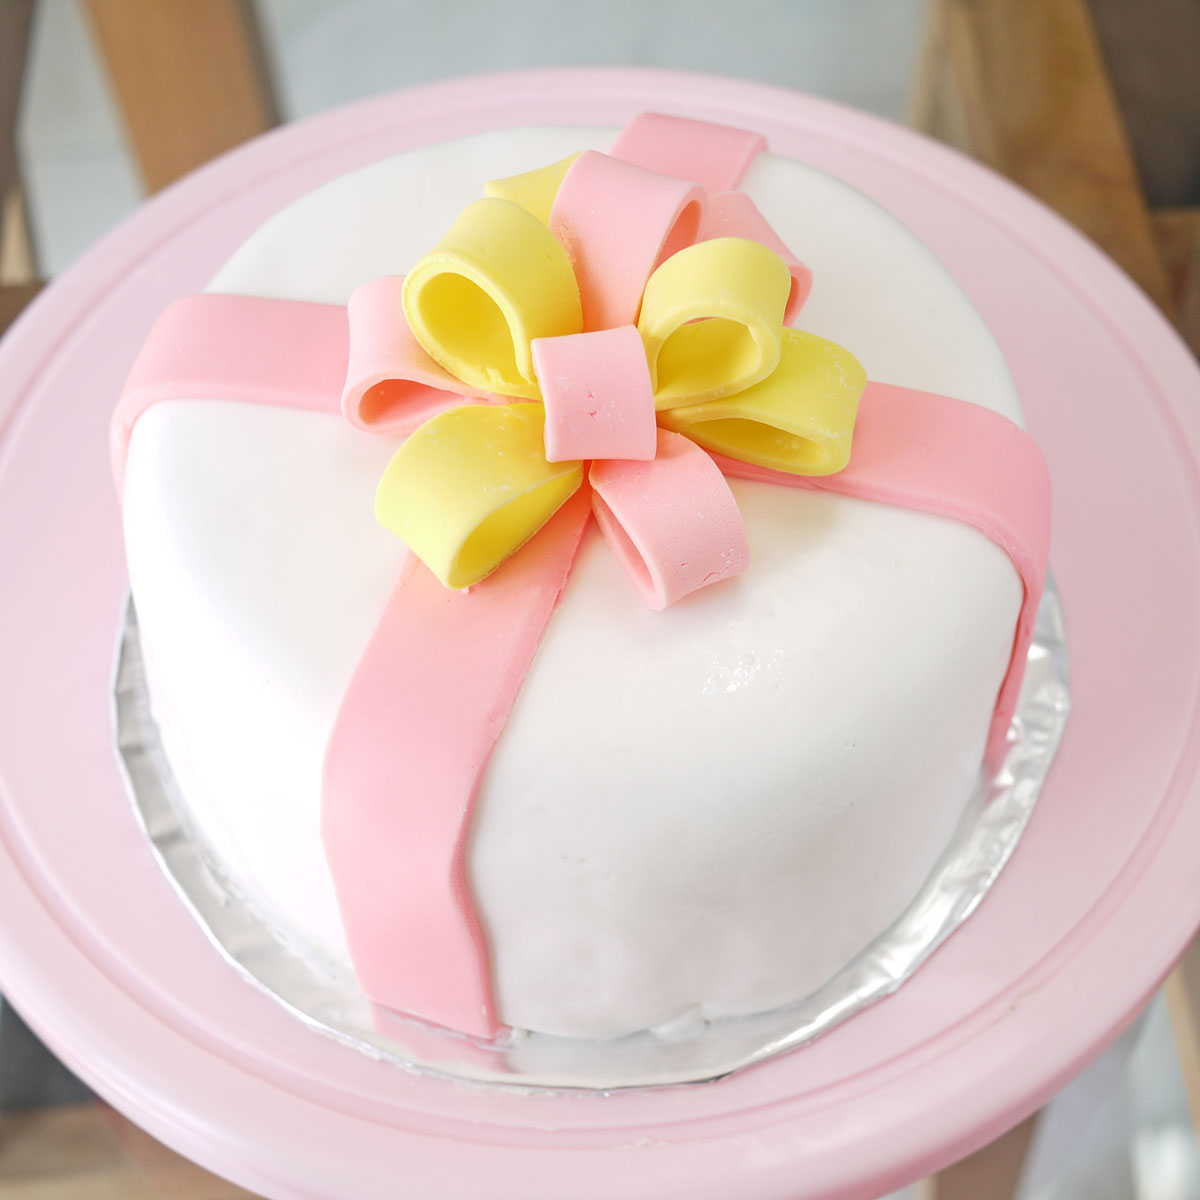
The fondant did sweat, and it has fine “wrinkles”
I need to troubleshoot on that. It’s really a long, arduous journey ahead.
Me vs fondant.
Gluten Free, Sugar Free, Banana Chiffon Cake
Before you click this window shut due to its unappetizing title, let me just say that this was purely experimental.
I wanted to know whether i could beat egg whites to its “soft peak” stage (as required in chiffon making), without the use of sugar.
And if the egg white was successfully beaten till soft peaks, would it stay that way during the baking time in the oven? Would it aerate my chiffon the way it should when it is accompanied by its sugar sidekick.
So, to put it shortly,
Is sugar indispensable in chiffon making?
The answer is,
Nope!
And i’ve got proof,

Here’s a banana chiffon cake, made completely without sugar. It rose VERY well,in fact i must say, it rose better than some of the sugared chiffons i made.

So, to everyone out there who are opting the sugar-free ( to whom i offer the utmost respect and admiration ), and gluten free life
and to baby Crustabakes,
This gluten free, sugar free, chiffon cake is dedicated to you!
PS: this cake does not taste as horrible as i would have thought! In fact it’s so light, i managed to scarf down both cakes in one serving.
Sugar Free, Gluten Free Banana Chiffon Cake:
Makes 2 Cupcake size (Sorry about that, told you it was experimental)
15 gram rice flour
5 gram corn starch
5 gram oil
30 gram overripe bananas (mashed)
1 egg white
1 egg yolk
Sift the flour and the starch together.
In another bowl, mix oil and mashed bananas
Dump flour and starch onto the banana bowl, add egg yolk and mix till well combined
Beat the egg white till soft peaks (without sugar it wont be glossy, but it’s ok, it will still work)
Slowly fold in egg white to the egg yolk batter
Pour onto two cupcake cases,
Bake at 170 degree celcius for 30 mins or till fully cooked.
Minnie Mouse Themed Cake
My sister texted me :
“Can you make a birthday cake for my friend?”
“She’s a very girly kind of girl”
“She likes pink”
“And Minnie Mouse”
Wokeh sista, considered it,
“done”
“done”
“done”
and, “done”!

So, dear a friend of my sister, whoever you are, I hope you like the cake i made for you!
Pigs chillin in Mud Cake
So i have seen quite a few versions of this cake dotting the food blogsphere. While i have no clue to the imaginative genius who came up with it, i must say that it’s absolutely adorable and cute.
And i absolutely have to make it.
So off we go with my version. 🙂


oink !
9 Layer Cake
So I have been baking too many cheesecakes.
No one complained, but I decided to give my oven a break and work the stove once in a while.
So, here i go, returning to my south east asian roots, with a steamed 9 layer cake.
Why 9 layers u ask?
Well, I am sure there must be some pretty interesting story behind it.
I tried googling, expecting to be mesmerized by some folk story explaining the layers of the cake. But nothing came up.
So i guess no one would get all tight up about the fact that my cake only had 8 layers.(OOps!).
After all, 8 is considered a lucky number amongst us, Chinese.
So here goes
This cake is mildly sweet. It relies more on the richness of the coconut milk for taste. The texture of this cake is springy (think mochi). And like mochi, it is rather sticky too.
The texture of the cake makes it possible for us to peel it layer by layer before popping it into our mouths.
Which is what I used to do as a kid.
Or as an adult.

I’ve used daun suji for the green colour batter of this cake. As for the red, i had to rely on red color food dye as i didnt believe beet juice would have given such a vibrant red.
9 Layer Cake
Adapted from Nasi Lemak Lover
400ml water
70g coarse sugar (I would increase this next time as i found the cake not sweet enough)
5 pandan leaves, knotted
400ml coconut milk ( squeezed from one shredded coconut)
180g rice flour
120g tapioca flour
Daun Suji water (achieved by pounding daun suji with water and then straining it)
Method
1. Simmer water with pandan leaves for about 5 minutes, add sugar. Stir in the coconut milk
2. Add in rice flour and tapioca flour, stir to mix well. Strain the batter.
3. Grease a 7″ steam pan with a little oil. Place the pan in a steamer and steam until hot.
4. Divide batter into 2 portions.
5. Add the daun suji water into one of the portions, leaving the other portion white.
6. Take 126 grams of the white batter, and add a few drops of red coloring
5. Pour 1st layer with green batter into steam pan, and steam for 5mins over medium heat.
6. Pour 2nd layer with white batter into steam pan, and steam for 5mins.
7. Repeat until all 7 layers set. End the layer with the red batter
Another Cheesy Post
After the Oreo Cheesecake and the Strawberry Swirl Cheesecake earlier this year, you might think that i am done with cheesecake for now. After all, it’s only the beginning of March.
But nope, i went ahead and baked two more cheesecake. Even though it’s only the beginning of March.
So that makes it four cheesecakes in less than three months.
I am such an over-achiever sometimes.
So, let’s review my achievements shall we?

First up,
The good old plain cheesecake with fruit toppings.

Oh, so you noticed the “Happy Birthday” sign!;)
Yup, this cake is made for my dearest, dearest friend, Jeffy.
She was my bridesmaid the day i got married.
She woke up at the ungodly hour of 3.30 A.M that day.
She broke her back picking after my crazy train of a wedding gown.
She held my bouquet, wiped my sweat, fetched me water and food.

Yes, i owed this cake to her.
So, Happy Birthday Jeff!
xoxo.
Okayyyss. so there goes one, let’s move on to the other.
The Coffee Chocolate Cheesecake

uh-huh, uh-huh. It’s cheesecake again, with coffee and chocolate this time.

\And topped with chocolate rubbles.

“Why did you make another cheesecake?” you ask?
Well, no particular reason.
I just wanted a coffee cheesecake with chocolate rubbles on it.
Geez. what a cheesy post. Sorry guys, you see It’s 5.47am, and i just fed my daughter. I am going back to bed now (PS: no judging. it’s Saturday!!). nite nite peeps!
Recipe taken from Use Real Butter
Abbey’s Infamous Cheesecake
crust
2 cups / 180g plain cookies
4 oz butter, melted
2 tbsp / 24g sugar
1 tsp vanilla extract
plain cheesecake
24 oz cream cheese, room temperature
1 cup / 210g sugar
3 large eggs
1 cup / 8 oz heavy cream
1 tbsp lemon juice
1 tbsp vanilla extract (or the innards of a vanilla bean)
1 tbsp liqueur, optional, but choose what will work well with your cheesecake
chocolate espresso cheesecake
24 oz. cream cheese, room temperature
1 cup / 210g sugar
3 large eggs
1 cup / 8 oz. heavy cream
4.5 oz. semi-sweet chocolate, melted
1 tbsp espresso powder
1 tbsp boiling water
1 tbsp vanilla extract (or the innards of a vanilla bean)
1 tbsp Kahlua or coffee liqueur
Preheat oven to 350°F. Begin to boil a large pot of water for the water bath. Mix together the crust ingredients and press into your preferred pan.
Set crust aside. Combine cream cheese and sugar in the bowl of a stand-mixer (or in a large bowl if using a hand-mixer) and cream together until smooth. Add eggs, one at a time, fully incorporating each before adding the next. Make sure to scrape down the bowl in between each egg. Add heavy cream, vanilla, lemon juice, and alcohol and blend until smooth and creamy.[For chocolate-espresso: combine boiling water with espresso powder. Add cream, chocolate, espresso, vanilla, and Kahlua to the cream cheese batter and mix until smooth and creamy.]
Pour batter into prepared crust and tap the pan on the counter a few times to bring all air bubbles to the surface
Place pan into a larger pan and pour boiling water into the larger pan until halfway up the side of the cheesecake pan. If cheesecake pan is not airtight, cover bottom securely with foil before adding water. Bake 45 to 55 minuteuntil it is almost done – this can be hard to judge, but you’re looking for the cake to hold together, but still have a lot of jiggle to it in the center. You don’t want it to be completely firm at this stage. Close the oven door, turn the heat off, and let rest in the cooling oven for one hour. This lets the cake finish cooking and cool down gently enough so that it won’t crack on the top. After one hour, remove cheesecake from oven and lift carefully out of water bath. Let it finish cooling on the counter, and then cover and put in the fridge to chill. Once fully chilled, unmold and serve.
Strawberry Swirl Cheesecake

This cake would have been the perfect Valentine’s day Cake. But Valentine’s day this year didn’t fall on a weekend. It fell on a Thursday.
I couldn’t make a cheesecake on a weekday.
Not with the long baking hour involved.
So, I thought I would get my act together in the weekend (dates 16-17 Feb) to make this post Valentine day cake.
But nope, I waited another week. And made this cake today (23 Feb).
So here goes my post-post Valentine Day Cake.

Hope everyone had a blast celebrating it.
Recipe taken from Use Real Butter
Abbey’s Infamous Cheesecake
crust
2 cups / 180g oreo cookies without the filling
4 oz butter, melted
2 tbsp / 24g sugar
1 tsp vanilla extract
strawberry swirl cheesecake
24 oz cream cheese, room temperature
1 cup / 210g sugar
3 large eggs
1 cup / 8 oz heavy cream
1 tbsp lemon juice
1 tbsp vanilla extract (or the innards of a vanilla bean)
1 tbsp Grand Marnier
1 cup strawberries, puréed
2 tbsps sugar
Preheat oven to 350°F. Begin to boil a large pot of water for the water bath. Mix together the crust ingredients and press into your preferred pan.
Set crust aside. Combine cream cheese and sugar in the bowl of a stand-mixer (or in a large bowl if using a hand-mixer) and cream together until smooth. Add eggs, one at a time, fully incorporating each before adding the next. Make sure to scrape down the bowl in between each egg. Add heavy cream, vanilla, lemon juice, and alcohol and blend until smooth and creamy.
Pour batter into prepared crust and tap the pan on the counter a few times to bring all air bubbles to the surface
For strawberry swirl: mix the sugar and the strawberry purée together then top the cheesecake batter with the mixture and create the swirl design by running a toothpick through the surface.
Place pan into a larger pan and pour boiling water into the larger pan until halfway up the side of the cheesecake pan. If cheesecake pan is not airtight, cover bottom securely with foil before adding water. Bake 45 to 55 minuteuntil it is almost done – this can be hard to judge, but you’re looking for the cake to hold together, but still have a lot of jiggle to it in the center. You don’t want it to be completely firm at this stage. Close the oven door, turn the heat off, and let rest in the cooling oven for one hour. This lets the cake finish cooking and cool down gently enough so that it won’t crack on the top. After one hour, remove cheesecake from oven and lift carefully out of water bath. Let it finish cooling on the counter, and then cover and put in the fridge to chill. Once fully chilled, unmold and serve.
Happy Birthday Sis!
It feels G-R-E-A-T to be back to normal life. The great flood has made me appreciate things i have taken for granted in my life. Little things like clean running water, electricity, and the internet.
Water rose up to my knees in my home during the flood. Electricity was cut off. Our water tanks were contaminated with filthy flood water.
I evacuated my home on day#2 of the flood. Water level stayed stagnant for up to a week. And i know of some people and friends who didn’t evacuate their homes and stayed in their water logged homes for the entire week. I declare them as heroes.
Anyway, enough of my ramblings, Here is what i have for you today.
A pink Ombre Cake.

A cake with piped roses of colours that gradually get darker.
Or so it was supposed to be.
Halfway pipping, i realized that i probably had too much white. Another layer of pink would have been nice.
Oh, in case you were wondering what the “happy birthday” was for, it’s for my sister.
Happy Birthday Sis!
Ombre Cake
Taken from Sajian Sedap
Recipe in Indonesian
Bahan-bahan/bumbu-bumbu:
15 kuning telur
9 putih telur
225 gram gula pasir halus
1/4 sendok teh garam
1/2 sendok makan emulsifier (sp/tbm)
185 gram tepung terigu protein rendah
30 gram maizena
40 gram susu bubuk
3/4 sendok teh baking powder
150 gram mentega tawar, lelehkan
75 gram white cooking chocolate, lelehkan
Pewarna Ungu
Bahan Filling:
200 gram cream cheese
100 gram mentega tawar dingin
50 gram gula tepung
175 gram white cooking chocolate, lelehkan
125 gram krim kocok
Bahan Olesan:
250 gram butter cream putih
75 gram butter cream biarkan putih
75 gram butter cream, tambahkan 3 tetes pewarna ungu 3 tetes, aduk rata
75 gram butter cream, tambahkan 7 tetes pewarna ungu
75 gram butter cream, tambahkan 15 tetes pewarna ungu
75 gram butter cream, tambahkan 1/8 sendok teh pewarna ungu
Cara membuat:
- Kocok kuning telur sampai kental. Sisihkan.
- Kocok putih telur dan garam sampai setengah mengembang. Tambahkan gula pasir halus sedikit-sedikit sambil dikocok sampai mengembang.
- Masukkan kocokan kuning telur dan emulsifier. Kocok hingga mengembang kembali.
- Tambahkan tepung terigu, susu bubuk, maizena, dan baking powder sambil diayak dan diaduk rata.
- Masukkan margarin leleh dan white cooking chocolate leleh sedikit-sedikit sambil diaduk perlahan.
- Bagi adonan 5 bagian. Adonan 1 ditambahkan 1/2 sendok makan pewarna ungu. Adonan 2 ditambahkan 3/4 sendok teh pewarna ungu. Adonan 3 ditambahkan 1/8 sendok teh pewarna ungu. Adonan 4 ditambahkan 15 tetes pewarna ungu. Adonan 5 biarkan putih.
- Tuang masing-masing adonan ke dalam loyang bulat diameter 20 cm tinggi 3 cm yang dioles margarin dan dialas kertas roti.
- Oven dengan api bawah suhu 190 derajat Celsius 20 menit sampai matang.
- Filling, campur cream cheese dan mentega tawar. Kocok hingga lembut. Tambahkan gula tepung dan white cooking chocolate leleh. Kocok rata. Masukkan krim sedikit-sedikit sambil dikocok perlahan. Aduk rata.
- Ambil selembar cake. Oleskan filling. Tumpuk dengan cake lainnya. Lakukan hal yang sama sampai habis dengan urutan warna yang paling gelap di bagian bawah.
- Olesan, kocok butter cream sampai lembut.
- Bagi 6 bagian adonan. Satu bagian biarkan putih. Sisanya ditambahkan pewarna ungu dengan warna bergradasi seperti warna cake.
- Tutup seluruh permukaan cake dengan butter cream putih. Semprotkan warna yang paling gelap di bagian paling bawah, bergradasi dengan warna paling muda di atasnya. (Kn)
Drowning sorrows in Oreo Cheesecake
I am writing this post from a very sad sad place.
Here’s what it looks like

I am sure news of the great Jakarta Flood has reached international news. Trust me, it’s happening and it’s real.
I was supposed to go to work in the morning and have friends over for dinner tonight. I even baked a cheesecake for it.
That didn’t happen.
Yup, i am flooded in.
Oh wait,
work and dinner didn’t happen.
Cheesecake did.

So while i wait for things to get back to normal.
I’ll just keep calm and eat a cheesecake.
Recipe taken from Use Real Butter
Abbey’s Infamous Cheesecake
crust
2 cups / 180g oreo cookies without the filling
4 oz butter, melted
2 tbsp / 24g sugar
1 tsp vanilla extract
plain cheesecake
24 oz cream cheese, room temperature
1 cup / 210g sugar
3 large eggs
1 cup / 8 oz heavy cream
1 tbsp lemon juice
1 tbsp vanilla extract (or the innards of a vanilla bean)
1 tbsp liqueur, optional, but choose what will work well with your cheesecake
Preheat oven to 350°F. Begin to boil a large pot of water for the water bath. Mix together the crust ingredients and press into your preferred pan.
Set crust aside. Combine cream cheese and sugar in the bowl of a stand-mixer (or in a large bowl if using a hand-mixer) and cream together until smooth. Add eggs, one at a time, fully incorporating each before adding the next. Make sure to scrape down the bowl in between each egg. Add heavy cream, vanilla, lemon juice, and alcohol and blend until smooth and creamy.
Pour batter into prepared crust and tap the pan on the counter a few times to bring all air bubbles to the surface
Place pan into a larger pan and pour boiling water into the larger pan until halfway up the side of the cheesecake pan. If cheesecake pan is not airtight, cover bottom securely with foil before adding water. Bake 45 to 55 minuteuntil it is almost done – this can be hard to judge, but you’re looking for the cake to hold together, but still have a lot of jiggle to it in the center. You don’t want it to be completely firm at this stage. Close the oven door, turn the heat off, and let rest in the cooling oven for one hour. This lets the cake finish cooking and cool down gently enough so that it won’t crack on the top. After one hour, remove cheesecake from oven and lift carefully out of water bath. Let it finish cooling on the counter, and then cover and put in the fridge to chill. Once fully chilled, unmold and serve.
*note: I added crushed oreos into the batter before baking.
Kue Lapis Legit
I have always shy-ed away from making kue lapis legit simply because there’s just too much on the line.
This cake is not only labour intensive, but it is also time AND capital intensive.
Why do I say so ?
The lapis legit, or the rich layer cake, is made by baking each layer individually. This means that you have to stand in front of your oven and top your baking tin with new cake batter each time the previous layer gets cooked.
It also means that you can’t pop it into the oven and run to feed your baby. You can however, bring the baby to the oven and hope she doesn’t get too cranky from hunger when her mom is hawking over the oven for her layers to bake.
Capital intensive, because it involves lots of butter and egg yolks. A 20 x 20 cm sized cake can use up to 40 egg yolks! Talk about “eggspensive”!
But when the Aspiring Bakers announced their 27th theme as Through Thick and Thin – Kue Lapis Classics. I decided to jump on the bandwagon because I know that if i let this chance slip, i might never never attempt to bake kue lapis !
So let’s take a stroll through my adventure.

Or should i call it my misadventure?
As you can see, this is not a great looking lapis legit.
1.The layers are uneven and the cake is reallly shorrttt..
I guess i only have myself to blame. I halved a recipe i found on the net thinking that i would compensate by using a smaller baking tin. Well, the tin wasn’t that small. I should have used 75% of the recipe instead.
2.The surface is all crinkly.
Can anyone help me troubleshoot this? My only guess is that i have my oven turned up too high.

Nevertheless, a lapis legit IS a lapis legit. I mean with that much amount of butter and egg yolks, i don’t think it can ever taste bad. This cake is really sinfully rich and delicious despite it’s appearance.
I would definitely try making this cake again, this time with more batter and lower temperature. Wish me luck !
This post is submitted to Aspiring Bakers #27 – Through Thick and Thin – Kue Lapis Classics. Do head over to Sweet Samsations to learn about it and join the layerings!
Kue Lapis Legit
by Fatmah Bahalwan
recipe HERE
Christmas Tree Waffles
I wish I could say this is my bright idea. but it wasn’t. I saw this on Pinterest a while ago, but somehow couldn’t find the link back to the person who came up with this.

But at least, i managed to replicate it.
I used pandan flavoured waffles for this.
And topped it off with a starfruit.
Happy Christmas everybuddy!

Pandan Waffles
Recipe taken from Cuisine Paradise
Ingredients:
125g All-purpose Plain Flour
50g Caster Sugar
1.5 Teaspoon Cornflour
1/4 Teaspoon Salt
1/2 Teaspoon Baking Soda
1 Teaspoon Baking Powder
1 Egg, yolk and white separate
100ml Coconut Milk
80ml Drinking Water
1/2 – 3/4 Teaspoon Pandan Paste
30ml Salad/Vegetable Oil
1. In a mixing bowl, whisk in coconut milk, pandan water(pandan paste mix with 80ml drinking water), oil and egg yolk till well-combined.
2. Using another bowl, sieve in all dry ingredients such as flour, sugar, salt, baking powder, baking soda and cornflour.
3. Next using a whisk, stir in wet ingredients into the flour mixtures till the batter is slightly lumpy and thick.(do not over mix at this stage)
4. Whisk Egg White with pinch of cream of tartar on medium speed using electric whisk till stiff peaks.(done is about 3 – 5 minutes. To test overturn the bowl and the white should remains without falling)
5. Gently fold white into the flour better till incorporate.
6. Preheat waffle iron and ladle 1 to 1.5 scoop(depending on the size of the scoop) of batter onto hot waffle iron. Cook according to the machine instruction manual until golden brown.
7. Serve hot with honey, jam, kaya, chocolate and etc.
Christmas is here! (almost)
So i had a mini pre-christmas gathering yesterday. It was for a party of 10.
I would have loved to cook and bake myself silly. But i decided to abandon that over-ambitious idea. I decided it was almost impossible to be running back and forth from kitchen to baby’s room while food was cooking, or burning on the stove.
So i decided to bake. I decided it was less of a fire hazard for things to be baking in the oven rather than cooking on an open flame..
So here’s what we had.
1. A log cake

I have no inkling to the relationship between Christmas and log cakes. Why do people bake log cakes at Christmas?
I would have googled it, but really, i am too stoned right now to do anything productive.
Nevertheless, i followed cue. So, there was a log cake for my party.
2. Rudolph and Frosty

Now,at least, i know about these. Rudolph, Santa’s red nosed reindeer. And of course Frosty, the snowman.
While these are not the best looking pictures around, and i am seriously contemplating not putting any post about them up. I am glad i did it. Cause I’m sure, it will be something i would love to look at down the road =)
Mango Yogurt Muffins
Let’s welcome the Mango Season with these mango Yogurt muffins!

Mango Yogurt muffin*makes 12 muffins
Taken from Nasi Lemak Lover
(printable recipe)
125g unsalted butter
150g cake flour
110g sugar
200g chopped fresh mango
100g yogurt (natural flavour)
2 eggs (medium)
1tsp baking powder
1/2tsp baking soda
1/4tsp salt
1. Beat butter, salt and sugar till pale and creamy.
2. Add egg one at a time, mix well.
3. Sift in flour, baking powder and baking soda, add in yogurt, combine well
4. Add in chopped mango, and lightly mix well.
5. Spoon batter into a muffin pan, sprinkle some chopped mango on top.
6. Bake at preheated oven 180c for 25mins or till golden brown.
Chocolate Chocolate Chocolate Chip Muffins
Chocolate Chocolate Chocolate Chip Muffins.
Who could resist a muffin with a name like that?

One moment, I was in bed reading a blog post off the Food Librarian,

And the next thing i knew, I was in the kitchen taking butter out of my fridge.
Chocolate Chocolate Chocolate Chip Muffins
From: Joy the Baker Cookbook (Via the Food Librarian)
1/2 cup (1 stick) butter
5 ounces semisweet chocolate, coarsely chopped (I used Nestle semi-sweet chocolate chips)
2 cups all-purpose flour
1 teaspoon baking powder
1 teaspoon baking soda
1/2 teaspoon salt
1 teaspoon vanilla extract (or 1 teaspoon instant espresso powder)
1/2 cup packed brown sugar
2 large eggs
2/3 cup buttermilk
1 cup (6 ounces) semi-sweet chocolate chunks (I used Nestle semi-sweet chocolate chips)
1/2 cup white chocolate chips (I used 96 grams of Nestle white chocolate chips)
Preheat oven to 350 degrees. Prep a muffin pan. Joy’s recipe says it yields 12 muffins, but I must have made mine a bit smaller and got 16 muffins.
Create a double boiler (place some water in a saucepan and bring to a simmer) and place the butter (chopped into about 8 pieces) and 5 ounces of chocolate into a heatproof bowl over the simmering water. Don’t let the bowl touch the water. Melt the butter and chocolate together, stirring together. Once melted, remove and set aside to cool a bit while you mix the rest of the ingredients.
In a medium bowl, whisk together the dry ingredients: flour, baking powder, soda, salt.
Whisk the brown sugar into the chocolate mixture. Follow with the eggs, buttermilk, vanilla. Add the flour mixture all at once and fold together. Don’t overmix. Add the chocolate chunks.
Dish into muffin tin. Bake for 18-20 minutes – until a toothpick comes out clean. Remove from pan after 5 minutes and place muffins on wire rack to cool completely.
When the muffins are cool (or as long as you can wait), melt the white chocolate like you did the semi-sweet chocolate. Note that white chocolate melts at a lower temperature. Once melted, have fun drizzling it over the muffins.
Dorayaki
My curiosity for the Dorayaki started from years upon years of reading the Doraemon comics. Growing up, i had volumes of the comics strewn all over my house, be it in the living room, kitchen, dining room, etc.

To me, they provided mini reliefs from mundane everyday tasks. I could just conveniently pick them up while waiting for the commercial to be over on the TV. Or while waiting for my food to heat up in the microwave.

If you are familiar with the comics. you would know of Doraemon’s love affair with Dorayaki. Having a dorayaki in your hands is like a golden ticket. Because you can pretty much bribe Doraemon to cater to your whims and fancy with the dorayaki.
 While in the Crustabakes household dorayakis dont have that kind of influential power, it does have the power to fill our bellies andkickstart our mornings with its sugar rush!
Taken from Just One Cookbook
(I halved the recipe)
- 2 eggs
- 70g sugar
- 1 Tbsp. honey
- 80g all-purpose flour
- 1/2 tsp. baking powder
- 1 Tbsp. water
- Some Sweetened Red bean Paste
Instructions:
- In a large bowl, combine eggs, sugar, and honey and whisk well until the mixture gets fluffy.
- Sift flour and baking powder into the bowl and mix. Keep in the fridge to rest for 15 minutes.
- Stir in ½ Tbsp of water at a time to get the right consistency. It should be a little bit thicker than pancake batter. If the batter is too thin, Dorayaki buns will be too flat and not fluffy.
- Heat a large non-stick frying pan on medium-low to medium heat. Dip the paper towel in oil and coat the bottom of the pan with the oil. The pan should be slightly oiled but shouldn’t be visible. That’s the secret to get nice texture on the surface of Dorayaki. With a ladle, drop the batter from 1 foot above the pan to create 3 inch diameter “pancake”. When you see the surface of batter starts to bubble, flip over and cook the other side. Transfer to a plate and cover up with damp towel to prevent from drying. Continue making pancakes.
- Make sandwich with red bean paste. Put more red bean paste in the center so the shape of Dorayaki will be curved (middle part should be higher). Quickly wrap them with saran wrap until you ready to serve.
Chocolate Sheet Cake & Sour Cream Chocolate Frosting
I have never been one to abide the mise en place (everything in place) rule when it comes to baking. For me, it’s just a matter of jotting down the list of ingredients on odd pieces of scrap paper, then making a mad dash for the kitchen to get started.

So it is no surprise that I only discovered that this chocolate sheet cake recipe was eggless when my arms were elbow deep in chocolate cake batter.
I was somewhat disappointed.
I love eggs.
They are almost always a part of whatever i am baking. In fact, i was doubtful that any baking could be done without eggs.

But hey, I might be old, but i am no old dog. And with all the vegan movements around, I am definitely open to new tricks.
So here I am, with my first eggless chocolate cake.

And my skepticism towards anything eggless evaporated.
Because this turned out to be moist, soft, flavorful and oh-so chocolatey!

And i suppose i could have made this vegan and all.
But i just have this natural flair to mess things up.
I used sour cream for the chocolate frosting.
I’m sorry.

But i am not regretting.
Because never would i have expected that something so good could come out of just chopped up chocolate and sour cream (U read it right, just these two ingredients!)
These two ingredients that infuse and firm up so well that frosting was a piece of cake!
Not to mention absolutely delicious!
I am glad for the new tricks I learnt today. I guess somehow being a slop, and not following the rules have its own plus points!
Old-Fashioned Chocolate Cake Sour Cream Chocolate Frosting
Taken from Hungrymouse (with adjustments)
3 cups flour
2 cups sugar
1/2 cup unsweetened cocoa powder
2 tsp. baking soda
1 tsp. salt
3/4 cup olive oil or canola oil
2 Tbls. white vinegar
2 tsp. vanilla extract
2 cups water
spray oil to grease the pan
*I used 2 pans sized 8×8
Directions
Lightly spray both baking pans with oil and line the bottom with parchment paper. Preheat your oven to 350 degrees.
Whisk the dry ingredients (flour, sugar, cocoa powder, baking soda, and salt in a large mixing bowl).
In another bowl, mix the wet ingredients together (oil, vinegar, vanilla, water).
Slowly , pour the wet ingredients to the dry ingredients, (bit by bit to avoid clumps) whisking till just combined. Do not overmix as you might toughen the cake.
Divide batters into prepared pans, and bake for 35 to 40 minutes or till the cake springs back when lightly pressed.
Set aside to cool.
Once cooled, take one piece of the cake, spread the chocolate frosting.
Top with the other cake, and frost all around.
For Dercorations:
Grate some white chocolate, and place a couple of maraschino cherries. VOILA!
Sour Cream Chocolate Frosting Directions
10 0z. chopped chocolate
1 C sour cream
Directions:
Double boil the chocolate to melt.
Tip the sour cream into melted chocolate and watch magic appears ! (Frosting immediately becomes thick and frost-able!)
And now cakes aside, its postcards time again.
More of my favourite vintages! 🙂

A White Bread vintage ad from Angel again! THANK YOU SO VERY MUCH! *love love love vintage ad esp when it’s related to baking*!!

Another vintage from Magnolia in Canada 🙂

And a last postcard depicting life in Austria between the years of 1905- 1910 of a little girl with a horoscope newspaper salesman from Pelra. How lovely!
Nutella Bottomed Cake
I made a boo-boo with this one.

Instead of having a Nutella Swirl Cake, I ended up with a Nutella BOTTOMED cake.

Seemed like all the Nutella sank while baking.
I could only think of one reason for this. Homemade Nutella (Yes!I made Nutella from scratch!)
My homemade Nutella was probably denser than the commercial ones as i have decided to altogether skip a “drizzle hot milk to thin” instruction on the recipe.
I guess the cake batter wasn’t able to put up with all that weight and gave way as the homemade Nutella made its royal descent to the bottom of the pan.

But waitt!! Please don’t give up on it yet!
Although this cake is not picture perfect, i didn’t say it wasn’t delicious. Because it damn well is!
The Nutella formed a very thick, fudgy texture when baked.
It’s like eating a butter cake, with fudge topping.

Just that the fudge TOPPING, happened to be fudge BOTTOMS.
Really, It’s just a matter of the order of the two layers.
No biggie!
Nutella-Swirl Pound Cake
- Contributed by Lauren Chattman
Ingredients
- 1 1/2 cups all-purpose flour, plus more for dusting
- 4 large eggs, at room temperature
- 2 teaspoons pure vanilla extract
- 3/4 teaspoon baking powder
- 1/4 teaspoon salt
- 2 sticks unsalted butter, softened
- 1 1/4 cups sugar
- One 13-ounce jar Nutella
- Preheat the oven to 325°. Lightly grease and flour a 9-by-5-inch loaf pan, tapping out any excess flour. In a glass measuring cup, lightly beat the eggs with the vanilla. In a medium bowl, whisk the 1 1/2 cups of flour with the baking powder and salt.
- In a large bowl, using a handheld mixer, beat the butter with the sugar at medium-high speed until fluffy, about 3 minutes. With the mixer at medium-low speed, gradually beat in the egg mixture until fully incorporated. Add the flour mixture in 3 batches, beating at low speed between additions until just incorporated. Continue to beat for 30 seconds longer.
- Spread one-third of the batter in the prepared pan, then spread half of the Nutella on top. Repeat with another third of the batter and the remaining Nutella. Top with the remaining batter. Lightly swirl the Nutella into the batter with a butter knife. Do not overmix.
- Bake the cake for about 1 hour and 15 minutes, until a toothpick inserted in the center comes out clean. Let the cake cool in the pan for 15 minutes. Invert the cake onto a wire rack, turn it right side up and let cool completely, about 2 hours. Cut the cake into slices and serve.
Swiss Roll With Mixed Berry Jam
Beside the New Year’s Day, we Chinese also celebrate another occasion known as the Lunar New Year. The exact date for this celebration is not fixed.
I haven’t got the slightest clue how or what the date calculation is based upon, but it usually lapses from the conventional new year just by a couple of weeks.This year, the Chinese New Year was observed on 22 January 2012.
Which means on top of Christmas and New Year, our holiday season is somewhat extended. Of course, this also means the holiday bulge from the festive eating usually lingers a while longer with us.
Anyways,
Back to Chinese New Year.
It is a common practice for families and friends to send hampers of foodstuff amongst each other during this season. It’s almost like gift exchanging at Christmas.
Usually wrapped in transparent decorative plastic, we are able to see through into the goodies and treats that lay inside each hamper. As a kid, I used to gawk at the goodies neatly assembled within, and however tempted, I never dared to rip any one open without the consent of my parents.
My eyes would “lock” on the items that suited my fancy, and when the day came for the hamper to be unwrapped, I would go straight for these items.
So fast forward to twenty years later, I was visiting my parents’ home this January for Chinese New Year when my eyes locked on fancy jar of jam within a hamper that they had received.
A tall jar of “All natural”, “100% fruit”, “no sugar added” jam.

And like so many years, i still couldn’t bring myself to help myself to it without first asking for permission. Feeling like the kid i was years and years ago, i expressed my longing toward the said jam. And my parents, being the generous souls that they are (bless them!) pushed the entire basket of treats my way, and proclaimed me as its new owner.
I reached home that night, grabbed a spoon from the kitchen and did a taste test. I thought it tasted pretty good. I reversed the spoon, and using its handle (No double dipping!) scooped a tiny amount and popped it into the husband’s mouth.
And what other people valued “no sugar added”, he considered “sour”.
And the “100% fruit”?, he dismissed as “gritty with all the berry seeds”.
Convinced that it was a bad jar of jam, I chucked it to the side door shelf of the refrigerator, where it took up residence for the next one month.
Finally this morning, i decided to act upon it.
I baked a cottony, soft, chiffon swiss roll, and spread the controversial jam into it.

Good enough to eat on its own, the jam was just supplemental. And if you were as fussy as the husband, you could do exactly what he did and scrape away all the jam and worked just on the cake.

I brought the Swiss roll to work. And it seemed like the good and mature people at work were kinder to the jam.

No one made any unfavourable remark.
Because in all fairness, the jam is NOT bad at all,

It’s just that i happen to live with a man with a rather under-developed, child-like palate.
Chiffon Swiss Roll with Mixed Berry Jam
* Recipe to follow
Yam Chiffon Cake
Here i am, dusting off the layers of dirt that has piled on this old, deserted blog.
If anyone is still reading this blog, i am sorry for the long leave of absence.
Anyways, here is me trying to make up for lost time..
Let’s get things rolling, because time’s a wasting!
Today, i made a Yam flavored Chiffon cake.

Soft, fluffy, sponge like cake, artificially flavored (whoops!) with yam paste.
Yes, yes, i should have known better than to use something artificial. But It’s been such a long time since i baked something, and i figured i shouldn’t be to ambitious.
Yam paste is actually this thick liquid that has both the yam flavor as well as its unmistakable rich shade of purple. All i did was just to tip a couple of drops of it into the batter, and voila, instant yamm-iness!

There’s the cake in its mold.

And, there is the cake out of the mold…

As you can see, i am not exactly an expert at unmolding cakes. I pretty much skinned the gorgeous golden brown top layer off this cake (Hence the brush, needed to dust off all the crumb deluge).

Love the pastel purple shade. It makes me feel all princess-y ! 🙂
Yam Chiffon Cake
Ingredients:
115 grams cake flour
25 grams sugar
75ml coconut milk (again, i used the instant one)
60 grams oil
About 5 drops of magical yam paste
5 egg yolks
7 egg whites
1/4 tsp salt
1/2 tsp cream of tartar
100 grams sugar
Directions:
1. Sift the cake flour. Add the sugar. Whisk them together.
2. In another bowl, mix the coconut milk, oil and the magical yam paste together.
3. Slowly, stir the mixture into the flour mix. Add the egg yolks and combine. Set aside.
4. In yet another bowl, beat egg whites, salt and cream of tartar till foamy. Slowly add the sugar, beat till the egg whites form stiff but not dry peaks.
5. Gently fold the egg whites into the flour mixture
6. Pour mixture into an ungreased tube pan (my pan measures to be 20 cm on top, 15.5 cm bottom, height 10 cm).
7. Bake in a preheated oven at 160 degree Celcius (not F) for 55 minutes. Immediately invert baked cake still in pan to cool before unmolding.
Oreo and Cherries on a Birthday Cake
With just a few moments to spare, we sat in front of the TV, enjoying our last minutes of freedom.
Soon enough, we’ll need to drive to our respective work places where the happy animated figures on the TV will be replaced by some sad sad lifeless figures on the computer screen.
“It’s my sister’s birthday today” he casually said.
“Whaaaaa…” I protested.
You see, over the years, it has been customary for me to bake birthday cakes for the various family members. It seemed i was about to break this tradition with such a late notice.
“Well, shouldn’t we at least have dinner to celebrate? ” I continued,
“No we cant, we have dinner with David tonight.”
“….Whaaaa?.. Who is David?!?!!”
You can probably sense that i was growing indignant at how little i was informed on “current affairs”.
“David is a friend who stopped by from Singapore for a visit.” He continued. “You could maybe bake my sister a cake. We’ll have dinner together tomorrow… Anyways, I’m late”.
The door slammed.
So between work, and dinner with “David”, I didnt really have the time to shop for baking and decorative ingredients.
I furiously yanked open the kitchen cabinets.
A stale box of rice krispies, a box of Saltine, and two rolls of Oreo.
I went to the fridge, hoping I had some fresh fruits but all i had was a half bitten, dry starfruit with the unmistakable teeth marks on it.
I didn’t have time to go through the drawers in the fridge, but i was almost certain i had maraschino cherries hidden within its depths.
I put on my shoes, thinking hard. I gotta pull this off somehow.

And i think sorta did.
Well, it’s not exactly the best looking cake on earth.

But at least, the tradition wasn’t broken.

Everyone enjoyed the cake, and my faith in having at least two rolls of oreos in the house at any point in time was restored.
Happy Birthday Dear Sis-In-Law!
Blackberry Japanese Cheesecake
After making the Brownie Swirl Cheesecake, i had just under half a cup of cream cheese left in my fridge.
91 grams to be exact.It was pretty unnerving and I was really really itching to rid of it, but there aren’t many recipes that call for such a scant amount of cream cheese.
Then I remember the Japanese Cheesecake.

Unlike the western cheesecake, the Japanese cheesecake usually involve minimal amount of cream cheese. In fact, from the way it was made, and from its light and fluffy texture, this cake is closer to a chiffon cake rather than a cheesecake.

The Japanese cheesecake is usually subtly sweet, and rely on some kind of sweet jam for it sweetness.
I’ve used blackberry jam on this.
U can of course use other jams, (strawberry jams being most common).

Oh, you do want to be gentle when slicing into this cake. I really suggest in using a sawing motion with a serrated knife. Yes, this cake is THAT soft and delicate.
Japanese Cheesecake
I took the recipe from an Indonesian cookbook (50 Resep Cheesecake Variatif)
100 gr cream cheese (i only used 91 grams)
25 gr unsalted butter
50 gr heavy cream
1/2 tsp lemon zest
1/2 tsp juice of a lemon
40 gr cake flour
50 gr egg yolk
100 gr egg whites
1/8 tsp salt
1/4 tsp cream of tartar
50 gr sugar
Directions:
1. double boil cream cheese till it is soft, smooth and not lumpy. Add the butter and heavy cream. Mix well.Add the lemon zest and lemon juice.
2. Sift flour into the cream cheese mixture. Mix till combined. Add egg yolks gradually. Set aside
3. With an electric mixer, whisk egg whites with salt, cream of tartar. Gradually add the sugar, and beat till peaks form.
4. Fold in egg whites mixture to cream cheese mixture.
5. Pour into a baking tin ( my pan was 18cm x 18 cm x7). Put the baking tin into a larger tin and spoon in about 2 TBS of water into the larger tin to create a water bath.
6. Bake in a preheated oven at 350 for 50 minutes or till cooked
Midnight Black Sponge Cake
This cake is so dark that you would mistake it as a brownie.

Except it wasnt a brownie, it’s a sponge cake, made from the pack of black glutinous rice flour that was bought wrongly. I made a chiffon cake from that flour before. It was soft, fluffy and the flour imparted an unmistakable aromatic scent into the cake.
I wanted to do something different with the flour today. So, i decided on a sponge cake.

Just based on its color, it’s apparent that this cake is very rich in flavor. The aromatic glutinous black flour scent literally hit me smack in the face as i pulled open the oven door.
The scent hit me one more time as i took my first bite. I could feel it working up my nose. It was as though i were inhaling the cake instead of eating it.
Taste wise, the cake was pretty good too. With just the right amount of sugar, the sweetness of this cake was subtle, without overpowering the wonderful smell from the cake.

I would love to give this cake an A and continue to rave on about it. Unfortunately, it is the texture of this cake that fell short. The cake felt rough on my tongue. Gritty almost.I suspect it’s because of the lack of liquid in the cake batter. There wasn’t water, or milk in the recipe. There was only oil.
Oh well, i guess you cant win them all!
* Note: I won’t be providing the recipe for this as i dont think it really made the cut.
Junior Brownie Swirl Cheesecake
It seems like i have savoury posts on my blog more than ever.
Today, i return to the familiar grounds of cakes and cookie land with this Brownie Swirl Cheesecake.

This cheesecake sits on top of a brownie crust, and has chocolate swirls on it.

And if u were wondering what those squares of brownies at the bottom of the cake are, they are brownie bites.
The brownie bites were baked from the same brownie base batter. But they were baked in a separate pan. This brownie batch is then cut into 1 inch cubes and arranged at the base of the cake (on top of the brownie base) before the cheesecake mixture gets poured in.

I hope i didnt confuse you.
But read the recipe, then you will get what i mean.
Making these brownie bites is a bit more of a work.
But it also means more brownies in the cheesecake.

There is a crack in my cheesecake.
I am not letting it get to me.
Instead, i blitzed a few oreo cookies and made a ring around the cake to sort of divert the attention away from the crack.

The recipe called for walnuts to make that ring. But since the cake is already yellowish brown in hue, i thought the black oreo cookies would stand out more rather than the walnuts.
Plus, i didnt have any walnuts anyways.
Junior Brownie Swirl Cheesecake
Recipe taken from Suite 101
For the brownie crust and brownie bites:
- 8 ounces bittersweet
- or semisweet chocolate
- 1 cup (2 sticks) unsalted butter
- 11/2 cups all-purpose flour
- 1 teaspoon salt
- 6 extra-large eggs
- 2 cups sugar
- 1 tablespoon pure vanilla extract
For the Cheesecake:
- three 8-ounce packages
- cream cheese (use only full fat),
- at room temperature
- 11/3 cups sugar
- 3 tablespoons cornstarch
- 1 tablespoon pure vanilla extract
- 2 extra-large eggs
- 2/3 cup heavy or whipping cream, plus 1 tablespoon for brushing
- 2 ounces bittersweet
- or semisweet chocolate
- 1 cup coarsely chopped walnuts
How To Make A Cheesecake:
- Preheat the oven to 350°F. Generously butter the bottom and sides of a 9-inch springform pan and an 8-inch square baking pan. Line the baking pan (but not the springform) with parchment or waxed paper, leaving a 1-inch overhang over the sides. Wrap the outside of the springform with aluminum foil, covering the bottom and extending all the way up the sides.
- To make the brownies, melt the chocolate (page 23) with the butter and let cool. In a small bowl, combine the flour and salt. In a large bowl, beat the eggs with an electric mixer on high until light yellow and thick, about 3 minutes. With the mixer still running, gradually add the sugar, then the chocolate mixture and vanilla. Reduce the speed to low and blend in the flour mixture just until it disappears.
- Spread 2 cups of the batter in the springform to make the crust and the rest in the baking pan. Bake just until set around the sides, about 10 minutes for the crust and 25 minutes for the baking pan. (The centers will be slightly soft.) Let cool on a wire rack for 1 hour. Leave the brownie crust in the springform. Lift the brownies out of the square pan onto a plate, using the paper hanging over the sides as handles. Cover both the crust and the square of brownies with plastic wrap and refrigerate overnight.
- Cut the square of brownies with a serrated knife into 1-inch squares and set aside. Put one package of the cream cheese, 1/3 cup of the sugar, and the cornstarch in a large bowl. Beat with an electric mixer on low until creamy, about 3 minutes, scraping down the bowl several times. Blend in the remaining cream cheese, one package at a time, scraping down the bowl after each one. Increase the mixer speed to medium and beat in the remaining 1 cup sugar, then the vanilla. Blend in the eggs, one at a time, beating well after adding each one. Beat in the 2/3 cup of cream just until completely blended. Don’t overmix! Transfer 1 cup of the batter to a small bowl and set aside for the chocolate swirls.
- Cover the chocolate brownie crust in the pan with small brownie bites (12 to 16), covering as much of the crust as possible. Use only one layer of brownie bites in order to leave plenty of room for the cheesecake batter. (Eat the rest of the brownies!) Gently spoon the white batter over the brownie bites.
- Now make the chocolate swirls. Melt the chocolate (page 23) and stir into the reserved white batter until completely blended. Using a teaspoon, drop the chocolate batter on top of the white batter, pushing it down slightly as you go. Using a thin, pointed knife, cut through the batter a few times in a swirling “figure 8” design, just until chocolate swirls appear.
- Place the cake in a large shallow pan containing hot water that comes about 1 inch up the sides of the springform. Bake until the edges are light golden brown and the top of the cake has golden and dark chocolate swirls, about 11/4 hours. Remove the cake from the water bath, transfer to a wire rack, and let cool for 2 hours (just walk away—don’t move it). Leave the cake in the pan, cover loosely with plastic wrap, and refrigerate until completely cold, at least 4 hours or preferably overnight.
- To serve, release and remove the sides of the springform, leaving the cake on the bottom of the pan. Place on a cake plate. Brush the remaining 1 tablespoon cream in a 1-inch border around the top edge of the cake (this helps keep the nuts in place). Sprinkle the walnuts over the cream, pressing the nuts down gently, making a 1-inch border around the top outside edge. Refrigerate until ready to serve. Slice with a sharp straight-edge knife, not a serrated one. Cover leftover cake and refrigerate or freeze up to 1 month.
- Makes one 9-inch cheesecake, about 3 inches high.
Read more at Suite101: Junior’s Brownie Swirl Cheesecake Recipe: Junior’s Cheesecake Cookbook Chocolate Fudge Brownie Cheesecake | Suite101.com http://donna-diegel.suite101.com/juniors-brownie-swirl-cheesecake-recipe-a76551#ixzz1b1FafxMG
Black and White Glutinous Rice Flour
Truth be told, i had no intention to make this chiffon cake at all.

It all started when i was too lazy to head to the grocery store to buy some WHITE glutinous rice flour. And i happened to know that a friend was going to do her groceries anyway. I decided to take advantage of the situation, and asked her if she could pick it up for me.
Being a doll that she is, she came back with my glutinous rice flour.
But the black one, instead of the white.
I suppose, i could have gone to the grocery store and asked for an exchange.
But like what i said, i was too lazy to go to the grocery store.

So i made this black glutinous rice flour chiffon cake instead.
This chiffon cake is really popular in the Asian countries. It is soft, airy with bits of aromatic grits from the black flour.
That saved me a trip for the exchange.
But i still needed my white glutinous rice flour.

Because i wanted to make this.
This chinese dessert is known as tang yuan. They are balls of white glutinous rice dumpling boiled in a sugar syrup infused with ginger.
You can fill these dumplings as you want. But the popular ones revolve around red bean paste, ground peanut and black sesame paste.
I decided with the black sesame paste for this.

Black sesame seeds <not the afore mentioned black glutinous rice flour>, were toasted and ground, mixed with sugar and butter to form this filling.
While encasing the filling with the dumpling dough, you might want to make sure that the surface is smooth and is crack free, or they will burst open while cooking.

Hmm, black specks of deliciously messy, ground sesame against white dough balls…
Black Glutinous Rice Flour Chiffon Cake
Taken from Ancoo Journal
4 Egg yolks
20g Sugar
1/4 tsp Salt
50g Coconut cream (Kara brand)
2 tbsp Corn oil
30g Plain flour
55g Black Glutinous rice flour
1/4 tsp DA Baking powder
4 Egg whites
1/4 tsp Cream of tartar
50g Sugar
Method:
Sift plain flour, black glutinous rice flour and DA baking powder together and set aside.
Whisk egg yolks, salt and sugar together until sugar dissolved.
Mix corn oil and coconut together till combined and add to the egg yolks mixture, mix well and add flour ingredients into it and stir batter until smooth.
Whisk egg whites and cream of tartar till frothy. Gradually add in the 50g sugar and whisk till peak form.
Lower speed and slowly pour the egg yolks mixture into it. Stop machine and use a rubber spatula to fold mixture until well combined.
Pour batter into two mini moulds.
Bake at preheated oven at 160C for 25 mins and 150C for another 15 minutes.
Then switch temperature to lower grill and bake chiffon cake for another 5 minutes.
Remove chiffon cake from oven, invert mould onto table.
Allow the cake to cool completely before removing the cake from the mould.
Taken from Rasa Malaysia
Ingredients:
8 oz. glutinous rice (sticky rice) flour
180 ml water (3/4 cup water)
1/4 cup black sesame seeds
1/4 cup sugar
1/2 stick unsalted butter (1/4 cup or 4 tablespoons)
Ginger Syrup (姜茶):
5 cups water (reduced to 4 cups after boiling)
1 cup sugar
4 oz. old ginger (skin peeled and then lightly pounded with the flat side of a cleaver)
1/2 teaspoon sweet osmanthus (optional)
2 screwpine leaves or pandan leaves (tie them into a knot, optional)
Method:
Lightly toast the black sesame seeds over medium fire until you smell the aroma of the black sesame seeds. Please take note that the sesame seeds will start popping when they are heated, so use your lid to cover. Don’t burn the black sesame seeds; transfer them out and let cool as soon as they smell aromatic.
Use a mini food processor to grind the black sesame seeds until they become fine. Transfer the ground black sesame into a wok, add sugar and butter and stir well to form a thick paste. If they are too dry, add more butter. Dish out and let cool in the fridge. (This will make the filling easier.)
In a big bowl, mix the glutinous rice flour with water until it forms a smooth paste and no longer sticks to your hands. Divide it equally into 16-20 balls (depends how you like the size, the bigger the size, the easier it is to do the filling). Flatten each ball in your palm, and then use a pair of chopsticks to pick up some black sesame paste and lay it in the middle of the flatten ball. Fold the edge to seal the dumpling. Lightly roll it into a ball shape using both palms, very gently and delicately. Set aside.
Prepare the ginger syrup by boiling the water. Add the ginger and screwpine/pandan leaves (optional) into the water and boil for 10-15 minutes with medium heat. Add sugar and sweet osmanthus and boil for another 5 minutes. Lower heat to simmer and reduce to about 4 cups of water. Add more sugar to taste if you like.
Heat up another pot of boiling water. Drop the dumplings into the hot boiling water. As soon as they float to the top, transfer them out and into the ginger syrup. Turn off heat and serve the black sesame dumplings in a bowl immediately.
Star Studded, Caramel Walnut Cupcakes
It’s been a while since i made cupcakes, so i thought why not?
I havent really found a vanilla cupcake recipe that i really really would fall back upon, but if my memory served me right, the Magnolia Bakery’s one wasnt too bad.
So using that as the cupcake, i have topped one with some homemade caramel and walnuts,
I havent really mastered the arts of caramel making, so i wont be posting the recipe.
This recipe seemed pretty runny when i frosted, but then again, it was also still warm. It did kinda thicken up after some time.

As for the walnuts, they were just toasted for a bit in the oven. I wanted to make candied walnuts, but got too lazy to go about doing it.
This next cupcake is for the little niece,

A star studded cupcake for the little star.
She wiped out the star gummies on this cupcake. And the frosting.
The cupcake was pinched, crumbled and squeezed. I dont think she ate any of it. LOL

All packed up and ready to go !
Taken from foodnetwork.com
Ingredients
Cupcakes:
- 1 1/2 cups self-rising flour
- 1 1/4 cups all-purpose flour
- 1 cup (2 sticks) unsalted butter, softened
- 2 cups sugar
- 4 large eggs, at room temperature
- 1 cup milk
- 1 teaspoon vanilla extract
Icing:
- Vanilla Buttercream, recipe follows
Directions
Preheat oven to 350 degrees F.
Line 2 (1/2 cup-12 capacity) muffin tins with cupcake papers.
In a small bowl, combine the flours. Set aside.
In a large bowl, on the medium speed of an electric mixer, cream the butter until smooth. Add the sugar gradually and beat until fluffy, about 3 minutes. Add the eggs, 1 at a time, beating well after each addition. Add the dry ingredients in 3 parts, alternating with the milk and vanilla. With each addition, beat until the ingredients are incorporated but do not over beat. Using a rubber spatula, scrape down the batter in the bowl to make sure the ingredients are well blended. Carefully spoon the batter into the cupcake liners, filling them about 3/4 full. Bake for 20 to 25 minutes, or until a cake tester inserted into the center of the cupcake comes out clean.
Cool the cupcakes in tins for 15 minutes. Remove from the tins and cool completely on a wire rack before icing.
Chicken Bacon Sandwich, Homemade Fries, and Strawberry Sponge Cake
As the title says,
Chicken Bacon Sandwich,
Homemade Fries
And Strawberry Spongecake.
That sounded a lot for breakfast doesn’t it?
It seems like i might go overboard with my breakfast menus at times.
I think i might be just a lil bit obsessed.
Nevertheless, obsessed or not, lets get started shall we?

So we were eating out the other night, and ordered one half of a roasted chicken. And though the chicken was not dry, it was pretty bland and lacked flavour. So instead of trying to finish the chicken, we packed it in a doggie bag.
The doggie bag went into the fridge when we got home, and i scoured the internet for ways to somehow salvage the poor chicken.
Of course, it seems like Martha Stewart knows the answer to everything.
She came up with the idea of shredding the chicken and re sautee-ing it in bacon fats. Yes! what better ways to add flavour than add bacon fats!
So i first pan fried the bacon, and using the leftover grease from it, i dumped the shredded chicken in. And for good measure, a pinch of salt, and a dash of pepper. 🙂
As for the fries,

I made this fries from scratch. Like from the real potatotes.
Well, the truth behind these fries is that a new toy i just bought. A mandolin to be exact. The kind that allows you to shred, cut, slice, grate etc, etc..
I was reading the instruction manual and saw the settings for shoestring fries. And what do u know, i do happen to have potatoes in my kitchen! So there it is!
But of course, being a newbie in cooking, i did a lil bit of research before embarking on this french fries-ing.
It seems like the trick to getting your fries to crisp up is to first soak in in cold water to get rid of the starch on the surface, and fry it TWICE.
I found this instruction from the food network website. And i guess it did work, and the browning of the fries was quite even. On the other hand, this method is not totally foolproof as after sometime, the fries did get soggy like all fries would.
And for dessert, it was a sponge cake sandwiching leftover strawberry preserve and with a dollop of pastry cream on the top.

Just another shot for the record,

I am officially full.
Chicken Bacon Sandwich
Adapted from Martha Stewart.com
Ingredients
- 2 slices bacon
- 1/3 cup shredded rotisserie chicken
- coarse salt and ground pepper
- 1 tablespoon mayonnaise
- 1 garlic clove, minced
- 2 slices Batard *
*Note: I dipped the batard in a mixture of eggs and milk and pan fried (french toast style) it to soften
Directions
- In a small skillet, cook bacon over medium until crisp, 10 minutes. With tongs, transfer bacon to paper towels to drain. Add chicken to skillet and stir to coat with drippings. Season with salt and pepper. In a small bowl, mix together mayonnaise and garlic; season with salt and pepper. Spread mayonnaise on batard and layer with chicken, then the bacon. Top with the other slice of batard.
*Note: I didnt exactly bothered with the measuring of the temperature of the hot oil. I went by whatever instincts i had.
Taken from Foodnetwork.com
Ingredients
- 4 large russet or kinnebec potatoes, peeled and cut into 1/4 by 1/4-inch thick batons
- 2 quarts peanut oil
- Salt and pepper
Directions
Rinse cut potatoes in a large bowl with lots of cold running water until water becomes clear. Cover with water by 1-inch and cover with ice. Refrigerate at least 30 minutes and up to 2 days.
In a 5-quart pot or Dutch oven fitted with a candy or deep-frying thermometer, (or in an electric deep fryer), heat oil over medium-low heat until the thermometer registers 325 degrees F. Make sure that you have at least 3 inches of space between the top of the oil and the top of the pan, as fries will bubble up when they are added.
Drain ice water from cut fries and wrap potato pieces in a clean dishcloth or tea towel and thoroughly pat dry. Increase the heat to medium-high and add fries, a handful at a time, to the hot oil. Fry, stirring occasionally, until potatoes are soft and limp and begin to turn a blond color, about 6 to 8 minutes. Using a skimmer or a slotted spoon, carefully remove fries from the oil and set aside to drain on paper towels. Let rest for at least 10 minutes or up to 2 hours.
When ready to serve the French fries, reheat the oil to 350 degrees F. Transfer the blanched potatoes to the hot oil and fry again, stirring frequently, until golden brown and puffed, about 1 minute. Transfer to paper lined platter and sprinkle with salt and pepper, to taste. Serve immediately.
Coffee Crumb Cake with Lemon Cheesecake Filling
I sometimes feel that butter cakes are rather plain and boring. And they are seldom their worth in calories ( we all know how much butter that goes into them, hence the name).
Sure, you can use very high quality butter to make them extra fragrant and delectable. But instead of doing that today, i have decided to use the extra money i would have spent on more expensive butter and bought some cream cheese instead.

Two slices of butter cake sandwiching a cream cheese filling.
🙂

And of course we have to mention the crumb toppings.
Crumbly crumb toppings made of butter, flour and brown sugar.

Boring buttercake no more!
Let’s DigIn!
Buttery Cream Cheese Coffee Cake
Recipe taken from Kitchen Lab
CAKE
1 cup (225g) butter (no substitutes)
1 cup caster sugar
2 eggs
1/4 cup sour cream (I used crème fraiche)
2 cups flour
2 teaspoons baking powder
1/2 teaspoon salt
FILLING
2 (8 oz or 250g each) packages cream cheese, softened
1 egg yolk
1 cup caster sugar
1 teaspoon vanilla
TOPPING
1/4 cup light brown sugar
1/2 cup flour
1/4 cup butter
Set oven to 350F (175C) with oven rack set to second-lowest position. Grease a 13 x 9-inch (or an 11 x 7-inch, baking time will need to be increased slightly). Cream butter with sugar (about 3-4 minutes), add in eggs and sour cream or crème fraiche; beat well (about another 3 minutes). In a bowl, sift together flour, baking powder and salt.Add the flour mixture to the creamed mixture; beat well until combined (batter will be thick). Spread more than half of the batter in the prepared baking pan. In another bowl, cream together all filling ingredients, then carefully spread over the cake batter. Spoon the remaining cake batter over the top of the cheese mixture. Mix all topping ingredients, pinching together with fingers until the consistency is like crumbs, and sprinkle over the top. Bake for about 50-55 minutes or until middle feels set and not jiggly.
Black Bottomed Ovaltine Banana Bread
I bookmarked this Black Bottomed Banana Bread when i was searching for a banana bread recipe to use up my last batch of mottling bananas.

I wanted to make this badly. But i couldn’t.
I was lacking the one ingredient that gave this banana bread its unique black bottom.
Ovaltine.

Banana Bread and Ovaltine,
Are you sold on this yet?
I know i am.

In fact i am so sold on this bread that i am thinking of ovaltin-izing the whole cake instead of just its bottom the next time i make this.
Just saying. 🙂
Black Bottomed Ovaltine Banana Bread from Meals.com
Cracked Sponge Cake and a Recovery Plan.
I baked a sponge cake today.
And it cracked.
It’s not even a cheesecake,
yet it had the cheek to split so deep right down its middle.
The cake looked as if an earthquake went through it.

Then i remember my pack of strawberries, frozen in time in my freezer.
And an idea hit me like a tornado.

Of course!
Making a strawberry jam out of strawberries.
Then flooding it over the cake.
A disaster recovered,

And a cake survived.
PS: I wont be posting the cracked cake recipe today as i don’t quite think that it is a recipe i would recommend to anyone.
Mottling Bananas and Frozen Fruits
I had a pack of strawberries in my refrigerator a few days ago. They were firm and fresh.
Besides eating them fresh alongside breakfast, lunch, dinner, and the occassional few i popped into my mouth each time i opened the fridge (That’s A LOT of strawberries judging at how often i visit the fridge btw), i had no other agendas planned for my strawberries.
I knew the window to use up these fresh strawberries was closing in on me. And before i know it, I would be feeding my trashcan with white, mossed strawberries in total remorse.
So i searched online for a strawberry recipe that would knock the socks off everyone while knocking out the chances of the impending fleece attack. But nothing screamed out at me. Nothing even whispered to me.
I chucked the strawberries into the freezer in resignation.

A few days later, i had the exact same problem.
This time, with another fruit.
Mottling bananas complete with its army of fruit flies.
Like the strawberries, i threw the bananas into the freezer, feeling incredibly grateful of this magical box where i was able to put aside my problems.
A couple days later, I bought another bunch of bananas and was faced with more of that mottling banana problem. Geez, when will i ever learn?
I yanked open the freezer door, and felt deeply unsettled with my growing frozen fruit forest AND the black speckled bananas in my hands.
I had to do something fast.
In fact, i had to do a COUPLE of things fast.
First I tackled the problem in my hands (literally).
A banana cake for my fully ripened bananas,

In case you havent already known, a banana cake is like the perfect docking place for all aging bananas.

A banana cake wouldn’t discriminate against how far along your bananas have gone.
In fact, the more spotty, freckled, and speckled your bananas are, the more precious your banana cake is because it will only get sweeter.

I’ve topped my banana cake with a bit of leftover chocolate fudge from a chocolate fudge cake i made earlier.
I dont think anyone minded. 🙂
Next up, i tackled the jungle of fruits i had in my freezer.
I heard that using frozen fruits, bananas especially, create the thickest shakes as you dispense with putting in ice cubes.

I decided to give it a whirl. In my food processor. Because i dont quite yet own a blender.
And you don’t really need a recipe for this.
I just went by feel.
A frozen banana, a handful of strawberries, and a splash of yoghurt.

PS: Pls ignore the advertorial texts on my cup. It’s a free cup from a local milk company.I havent gotten down to unpacking my usual props of plates and cups.
PPS: The strawberries at the sides are frozebitten, not fleeced with white moss. 🙂
Best Banana Cake from Dorie Greenspan Taken from Sugar and Spice
Strawberry Banana Smoothie
1 large frozen Banana
a handful of frozen strawberries
A splash of strawberry yoghurt
Icing sugar, to taste
1. Chop up the frozen bananas, strawberries.
2. Add sugar to taste
3. Add a splash of yoghurt
4. Whirl in your food processor till smooth and smoothie like
Bes
Chocolate Fudge Cake
I needed to thank my dressmaker today.
The lady who designed my gown.
She put up with every of my whims and fancy,
and tailored with the most lovely and beautiful gown.

Photo courtesy of Edward Suhadi
See the beads on the chest?
I painstakingly chose each and everyone of them. Because somehow, i have developed this super- visual abilities. I was able to spot how some beads are larger than the others. Or how some beads have more shine to them.
I didn’t even care that the beads come from the same box
or that they are from same manufacturer.
Thank God, the patient lady designer put up with me.
She even put out her palms to collect my chosen beads, and incorporated it to the gown.
She really really deserves a cake.

If you read my previous post, you probably knew that i am still getting to know my new kitchen. Without the familiarity, i was almost afraid to bake something sensitive.
With all the beaten eggs, a sponge cake is sensitive in this point in time. I decided to forgo that and opted for the more stable chocolate butter cake.

I also knew that i wouldnt be able to refrigerate this before passing it to Patient Lady Designer. Because with the newer, smaller kitchen, was the new, even smaller refrigerator.
So unless i wanna excavate my refrigerator from its everyday residents of eggs, milk, fruits, and Reese’s PB cups just to make room for it, i needed a plan B.
Plan B was chocolate fudge, which is most perfectly malleable at room temperature.
Here’s what i did:

Dollop.

Drop another layer of cake, and dollop some more!

Smooth and frost,

Arrange a few decorational strawberries
Oh, and unless you are planning to keep this for more than a couple of days, i wouldnt really recommend refrigerating it as the fudge will harden up.
I am really hoping that Patient Lady Designer polishes this off before it had the chance to make that trip to the chiller!
Recipe:
Apple Cherry Butter Cake
You can put a cherry on pretty much everything.
On a sundae,
on a milkshake,
in your cocktail,
in your cookies,
or for this instance, on a cake.

Don’t they just prettify ?
I have apple juice in this cake. And cherries both ON the cake and IN the cake.

Well, at least that was the intention. To have bits of cherries throughout the cake. But it seems like the Maraschinos had other plans. They all decided to go south to the bottom of the cake.

I patted the cherries dry before folding it into the batter. I sprinkled them with flour too. But neither seemed to work. I guess it must have been the batter which wasnt thick enough.
Anyways no point beating yourself about for sunken cherries. It just means you gotta dig deeper to get the good stuffs.

Or you can distract people by cutting the cake into fancy shapes, and of course, top it off with yet another cherry!
Lemon Cherry Cake
200 gr butter
125 gr caster sugar
4 eggs
200 gr AP flour
30 gr cornflour
15 gr milk powder
2 tsp baking powder
75 ml apple juice
100 gr maraschino cherries
1. Sift the AP, cornflour, milk powder and baking powder into a bowl.
2. Beat butter and sugar till light and fluffy. Add the eggs gradually, making sure that each is incorporated before adding the next one.
3. Add the flour mixture alternately with the apple juice.
4. Fold in the diced cherries.
5. Pour into a pregreased and prelined 22 x 22 x4 cm baking tin.
6. Bake at 180 degree celcius for 30 minutes or till it gets cooked.
Sunken Chocolate Cake
Oh no. It can’t be.
This blog hasn’t seen chocolate in weeks!
A rectification of the situation is in order. A quick one preferably, cause even under such dire situations, i still need to get to the office by 9 am.
Okay 9.30 if the boss ain’t around.

Or maybe 9.45 since i needed to make a grand entrance with this cake.
This mysteriously dark, luxurious, rich chocolatey cake.

It started off as a cake, baked in a springform pan.
This cake has seen greater heights when it was still baking in the oven. It reached the brim of the springform.

But take it out of the warm oven, and it starts to sink. That’s the thing with fallen cake, they are supposed to look like crap. But i am kind of liking how this cake turned out. It is charming in its own way. Curvaceous and waisted. Sexy isnt it?

Slice into it and you see a dark, bold and intensely chocolatey cake. I didn’t even have to taste it to know how chocolatey it was. The scent that hit me as i was slicing the cake gave me hints.
Texture wise, it is soft and sponge-like. It’s actually like a super soft sponge cake, but with a taste as rich as a brownie.

It’s like nothing i’ve ever tasted before. You really gotta try this to know what i am talking about!
Recipe from Happy Home Baking
Lemon Cupcakes with Pastry Cream and Raspberry Curd
I think the local Indonesian confectioner’s sugar is not as finely grained as the rest of the world out there. Because each time i made the American Buttercream, which only involved beating the butter and sugar together, it comes out gritty.
My favourite buttercream to date is the Meringue buttercream. Sure, it is dreary and tiresome as it involves heating and beating egg whites before you add the butter in, but it’s really worth the effort in my case.
But what’s most frustrating is when i laboured over the said buttercream, fastidiously pipped them over the cupcakes,only to have them scrapped aside.

Because that’s what always happens around this health conscious household.
Ditto for frostings which involve whipped cream.

So i have decided to go on the safe road and used pastry cream for today’s cupcake frosting. If they had no qualms eating it as fillings for my Boston Cream Donuts, this pastry cream is pretty much insured from getting the brush off.
Using Martha Stewart’s pastry cream recipe, this pastry cream doesn’t even contain butter. And considering that i am using it as a frosting, this is as good as it gets. I dont think you can get any healthier than that.
Or any more boring.
So i’ve decided to jazz it up a bit.
And started off with a lemon cupcake.
With an apple corer, i decided to take a bit of the middle off,

And piped a perimeter of the pastry cream around it. A note when cooking this pastry cream though. To get that pippable consistency, i cooked the pastry cream way more than what the recipe suggested. At the end of the cooking, you should get a thick, gloopy mixture that sits (and not dissolve) when you let it fall back into your pan from your spoon.

Then i filled up the cavity I created from the apple corer with raspberry curd.
Raspberry curd. Sure, it might have a bit of butter, but definitely way lesser compared to a full fledged buttercream.
Besides, raspberries are fruits. They fall into the bottom of the food pyramid, which mandates that everyone eats more of. Which is why i created the cavity in the first place. And made sure that i filled it all the way up.

Lemon Cupcakes, pastry cream and raspberry curd.

That’s like sunshine on mah plate!
Of course, if for some reasons, you happen to squeeze waaaaay too many lemons for your cupcakes and have waaaaay more lemon juice sparing around, you could also make these lemon curd versions.

Like so!
Lemon Cupcakes with Pastry Cream and Raspberry (or Lemon) Curd
Lemon Cupcakes from Dash of Sass
For the cake:
2 1/2 cups cake flour
2 teaspoons baking powder
1/2 teaspoon baking soda
1/2 teaspoon salt
1 cup (2 sticks) butter, room temperature
1 1/2 cups sugar
2 whole eggs
3 egg yolks
2 teaspoons vanilla extract
3 teaspoons lemon zest
1/4 cup fresh lemon juice
1/2 cup sour cream
Directions:
– Preheat oven to 350 degrees. Butter and flour two muffin pans or line with paper liners. Set prepared pan aside.
– In a medium-sized bowl, stir together the flour, baking powder, baking soda and salt. Set aside.
– In the bowl of an electric mixer, beat butter on medium speed until smooth and creamy. Add sugar. Beat until light and fluffy, approximately 3 minutes.
– Beat in the whole eggs and egg yolks, one at a time, beating until fully combined before adding the next one. Wipe down the sides of the bowl between each addition.
– Once all eggs and yolks are combined, add the vanilla and lemon zest. Stir to combine.
– Add the lemon juice. Mix on low speed to combine.
– With the mixer still on low, mix in the dry ingredients in three separate additions. Between each addition of dry ingredients, add half of the sour cream. Wipe down the sides of the bowl between additions. Stir until fully combined.
– Fill each prepared muffin tin 1/2 way with lemon cake batter. Bake for 18 to 20 minutes, or until a toothpick inserted in the cake comes out clean. Rotate the pans halfway through to ensure even baking.
– Remove cupcakes to a wire cooling rack. Let cool to room temperature before serving.
Pastry Cream from Martha Stewart
Raspberry Curd from Annie’s eats
For the raspberry curd:
8 tbsp. unsalted butter
1 pint ripe raspberries or 1 12-oz. package frozen raspberries, thawed
5 large egg yolks, lightly beaten
3/4 cup sugar
Pinch of salt
2-3 tsp. fresh lemon juice
To make the raspberry curd, melt the butter in a large saucepan over medium heat. Add the raspberries, egg yolks, sugar and salt, and cook, mashing the berries. Stir frequently at first and then constantly at the end, until thickened, about 10 minutes. Pour the mixture through a coarse strainer set over a bowl, pressing hard on the solids to extract as much liquid as possible. Cool to room temperature; the curd will continue to thicken as it cools. Stir in lemon juice to taste. Cover and refrigerate until ready to serve.
Lemon Curd from Martha Stewart
Lemon Curd, Pastry Cream Cake
So i opened up the refrigerator this morning.
It looked like someone is hosting a tupperware home party in there.
Plastic containers and tubs were swarming my refrigerator shelves and door. All of which containing an array of leftovers from all my baking stints. Most of them were actually frostings. Cookie frostings, buttercream, jam, caramel.. you name it.
A spring cleaning is definitely in order.
And today, spring cleaning starts with the tubs marked “pastry cream 02/06/11” and “lemon curd 27/05/11”.

And came out with this.
The lemon curd, pastry cream cake. A yellow cake sandwiching pastry cream and topped with lemon curd.
For the cake, i have used Rose Levy Berenbaum’s Favourite Sour Cream Yellow Cake which gave me the chance to use up “egg yolk 04/06/11”
Using only egg yolks without the whites, the cake came out deliciously rich and moist. But it was also tender. Mine came out a bit too tender and crumbly. I think i might have underbeaten it.

Nevertheless, this cake still played a very good host to the layer of lemon curd and buttercream. In fact, this is somewhat like your boston cream pie. With the lemon instead of the chocolate on top of course.
What i really loved about this cake is the slight tang from the lemon curd against the sweet pastry cream. It’s bright and refreshing. And the cake provided just enough matter to make it more substantial and not too pudding-like.

And best of all, no one has to know that they are really leftovers!
Cranberry Pistachio Cupcakes
While the average person tries to spend as minimal time in the grocery store, i am one of those weirdos who loves to walk through each aisle leisurely. I dawdle, i deliberate, and i drive my supermarket companion (whoever is unfortunate enough to be with me ) nuts at my unprogressive rate.
It was during one of these trips that i spotted this Pistachio instant pudding mix from Jell-o.
I grabbed one knowing exactly what i wanted it for.

A pistachio cream cheese frosting from my Cream Cheese Jelly Berry Pie. The original recipe was for filling a pie, but the texture was so thick and the taste so creamy that i decided that it would work as a frosting too.

But as an insurance, i did omit out the liquid (milk) in the recipe. I wanted this frosting to be really thick and full flavoured.

And since i was going fancy with the frosting, i didn’t one plain vanilla for the cupcakes. So i took an orange cupcake recipe but subbed the orange juice in it for cranberry juice.
Cranberry Cupcakes with Pistachio Cream Cheese anyone?
It didnt work out so well though, i couldn’t taste the cranberry flavours for one bit. I suggest on using cranberry extracts for this.

Having said that, the real star here is the frosting. Really, it could have been just be a piece of stale bread underneath and it will still taste delicious!
Cranberry Cupcakes:
2 eggs
1 stick unsalted butter
1 cup granulated sugar
1/2 tsp pure vanilla extract
2 cups sifted cake flour
2 tsp baking powder
1/4 tsp salt
1/2 cup milk
1/4 cup orange juice
- Preheat the oven to 190°C (375°F). Line your cupcake pans.
- Beat butter with sugar until light and fluffy.
- Add in the eggs one at a time, then add the vanilla.
- Sift the flour with the baking powder and salt. Mix well.
- Combine the milk with the cranberry juice.
- Pour one third flour mixture into the butter mixture, then half of the milk mixture. Repeat ending with the flour mixture. Mix well.
- Spoon batter evenly among cupcake liners.
- Bake in the oven for 20-25 minutes or until a cake tester comes out clean. Cool before frosting.
Pistachio Cream Cheese Frosting
1 Can (14 ounces) sweetened condensed milk
1 package (8 ounces) cream cheese
1/4 c cold milk
1 Package (3.4 ounces) Pistachio Instant pudding mix
- In a large bowl, beat sweetened condensed milk, cream cheese, and pudding mix for 1 minute.
- Spread over cooled cupcakes.
- Sprinkle chopped pistaschio and dried cranberries over to prettify!
Chocolate Chip Cake with Caramel Glaze
Something is not quite right when the props around the food you take photos with receive more comments than the actual food itself. And lately that has been the case with the friends i hang out with.
The flowers i so often include in my pictures are by far the biggest attention hoggers. My florist of a friend for example was always commenting on the flowers, and never the food. The rest of them were happier commenting on the cups, plates, cutlery i used.
I guess i must have done a poor job on arranging the set-up to make sure that the spotlight is on the food. Or that the props i used were too much of a distraction. But whatever the case, today, i shall try going propless,

with this oatmeal chocolate chip cake, with caramel glaze.
The original recipe for the chocolate chip cake didn’t ask for the caramel glaze, but without the glaze AND without the props, the pictures turned out so dull and dreary.

No one will grant a second glance at it and see for themselves what a soft, moist, chocolate chip cake this was. That would be a shame.
Plus, i am sure no one would mind the caramel glaze for one bit.

Yum yum. Beautiful golden, and semi molten caramel.

A little seasalt to further bring out the caramel. That will kick this up a notch.
Oh, did i mention that this cake is healthy too? It’s got oatmeal, whole-wheat flour. With such a high fiber content, that bit of caramel over it is totally justified.

Now now, while this post have been fun without the props, i think i still prefer my pictures to have all its “supporting actors” in the background. I will definitely try to tone it down a bit and hopefully everyone’s attention won’t be sidetracked in time to come!
Oatmeal Chocolate chip Cake
Recipe from Haverecipes-willcook
Click HERE
Caramel Glaze*
* You can use melted Caramel Candies, or make your own using the recipe HERE
Green Tea Cupcakes with Red Bean Paste

I know i shouldn’t be mentioning words like “boils” in a food blog, but this cupcake really looks like it has boils all over it.
Well, it wasn’t supposed to be like that. 
Before i go any further, lemme just put your minds at ease and clarify that the “boils” were rounded red bean paste and the cupcakes, are green tea cupcakes.
Green tea and red bean- another classic combination.
But the real reason why i baked these today was because i wanted to finish my tub of expiring yogurt which I know for a fact will cook to the most moist and delicious cupcakes.
Plus, the pictures didn’t show anything wart-like.
Because I was just supposed to pinch the red bean paste and drop it into the batter, NOT make rounded balls. What a pair of overzealous, idle fingers i’ve got this morning!
Green Tea Yogurt Cupcakes
A
120 gr butter
60 gr icing sugar
50 gr unflavoured yogurt
B
135 gr plain flour
1 tsp baking powder
1 tbs green tea powder
C
100 gr red bean paste filling
1. Beat butter and sugar of ingredient A until smooth. Add eggs in slowly and then yogurt. Mix well. Next mix in ingredient B.
2. Add in ingredints C, mix well. Spoon into paper cups, three quarters of the way up. Arrange on a baking tray. Bake in a preheated oven at 150 degree celcius for 20 – 25 minutes. Cool on a wire rack.
Caramel Drenched Chocolate Loaf
U know that pot of gold beneath the rainbow?
I think i may just have found it.

My very pot of molten golden caramel.
And like all basic commodity, you can pretty much apply it in anyway you fancy.

Like on a bed of lusciously dark, and almost black gold.

The good people at Wall street term “black gold” as anything ranging from coal, oil, or even coffee.
They must have unintentionally missed out on chocolate. What a shame.
But for us bakers, chocolate might be worth more than their weight in gold.

And with this lush chocolate cake topped with molten, sweet golden caramel.
I think we have hit a double gold mine here!

Caramel drenched Double Chocolate Loaf
Recipe taken from How sweet it is
Click HERE for recipe
Coffee Cream Brownies
Here in Crustabakes, we tend to get a little over-indulgent.
Take these brownies for instance.

They are pretty much delicious as they are. Chewy, fudgy, and moist.
But we just had to go the extra mile,

And spread some coffee flavoured buttercream. YUM!
Then, we like to go further and push the limits,
with this poured on chocolate ganache.

Chocolate brownies with coffee frostings and chocolate ganache. Can you really say no to that?

Coffee Cream Brownies
(Taken from Brownies & bars from Taste of home )
1/2 C butter
3 Ounces chopped Chocolate
2 eggs
1 C sugar
1 tsp Vanilla extract
2/3 C All purpose Flour
1/4 tsp Baking Soda
Filling:
1 TBS whipping cream
1 tsp instant coffee granules
2 tbs butter, softened
1 C confectioner’s sugar
Glaze:
1 C ( 6 ounces ) semi sweet chocolate chips
1/3 C heavy whipping cream
1. In a microwave, melt butter and chocolate. Stir until smooth. Cool slightly. In a small bowl, beat the eggs, sugar and vanilla. Stir in chocolate mixture. Combine flour and baking soda, gradually add to the chocolate mixture.
2. Spread into a greased 8 inch square baking pan. Bake at 350 for 25-30 minutes or until a toothpick inserted near the centre comes out clean. Cool on a wire rack.
3. For the filling, combine cream and coffee granules in a small bowl. Stir until the coffee is dissolved. In a small bowl, cream butter and confectioners sugar until light and fluffy. Beat in coffee mixture, spread over brownies.
4. In a small saucepan, combine chips and cream. Cook and stir over low heat until chocolate is melted and mixture is thickened. Cool slightly. Carefully spread over filling. Let stand for 30 minutes or until glaze is set. Cut into squares. Store in refrigerator.
This post has been submitted to
Aspiring Bakers #7 – Chocolate Delight (May 2011) hosted by DG from Tested and Tasted
Cranberry Almond Yoghurt Cupcakes
These might not be the prettiest cupcakes around,

But please, don’t let their modest appearance deceive you. For these are one of the most delicious cupcakes i have ever tasted.
I was quite surprised myself at how much i loved these cupcakes. Then i took a closer look at the recipe, and understood why the cupcakes turned out so great.

It’s quite a brilliant recipe me thinks.
For one instead of using regular sugar, these cupcakes call for icing sugar to be beaten with the butter.This results in a cake texture with the tightest crumbs and finest texture.

See what i mean?
Also, instead of regular milk, the recipe also call for yoghurt. And we all know how yoghurt always makes cakes so much more moist and soft. Plus i think the acidity in the yoghurt might have reacted better with the baking powder to result in a better rise in these cupcakes.
Of course, all these deductions are just shallow observations from a home-baker and i might be gravelly wrong. I have never been professionally trained in baking and am no expert when it comes to how ingredients react with each other.

But i think i might have eaten enough cupcakes to know that these are good!!
Cranberry Almond Yoghurt Cupcakes
(Recipe from Cupcakes by Coco Kong)
110 gr butter
80 gr icing sugar
1 egg
50 gr unflavoured yoghurt
30 gr almond powder
120 gr plain flour
1 tsp baking powder
50 gr dried cranberries, chopped
1. Beat butter and sugar till smooth. Add egg in slowly before adding in the yoghurt.
2. In another bowl, sift flour, baking powder and almond powder together. Stir flour mixture into the butter mixture. Add in cranberries
3. Spoon batter into paper lined cupcake tins till they are three quarters full.
4. Bake at 150 degree celcius for 20-25 minutes, or till they are cooked.
Tres Leches Cake
I am such a bad bad daughter. I didn’t even know that today was mother’s day until late last night. Between that and having just came back from my Singapore vacation, there was no way i could have whipped up a fancy cake to celebrate the occasion.
Nevertheless, i make do.

With this Tres Leches cake, or in English, The three milk cake. Three different types of milk that is.
Due to religious beliefs, my mom is a vegetarian. While she doesn’t eat meat, she does take in animal products like milk, cheese and even eggs. So i’ve decided to milk (no pun intended) on that with this cake.
Besides, Three milk cake, doesnt it sound enticing?

So we start off with a chiffon cake. But unlike most chiffon cakes, this cake has no oil.
NO oil? I know i know, you must be ready to condemn this cake with its predictable dry and rough texture from the lack of fats, but trust me it’s for a good cause.
But on the way to goodness, we have to first take plunges,

Plunges with a fork that is. This is to ensure even distribution in the goodness.
Next, the goodness

See, i told you there is no need to worry. Because that dry desert of a cake is about to be inundated with a mixture of condensed milk, evaporated milk, and heavy cream.

Oh, and I’ve also added my own homemade vanilla extract into the milk mixture, just because i dont see why not.
And, make sure you get to all parts of the cakes, the edges especially where it’s the driest.

… Don’t be shy with the pouring. I poured mine till i had a pool of milk mixture around the cake.
While the suggested frosting for this was whipped cream, i had some leftover pastry cream.

I decided to use that instead.

Yummmm, can you see how much of the milk the cake has soaked up?
Milky, moist, pudding-like cake.
And yet it still cuts well!

Have a happy Moo-ther’s Day everyone!
Tres Leches Cake, from Pioneer Woman
Recipe HERE
Very Vanilla One Bowl Cake
This would be one of the times where “less is more”. A simple Vanilla cake dusted with icing sugar

Using custard powder as one of its ingredients, this cake is very deeply scented with vanilla. Of course, a heavy dose of my homemade vanilla extract doesnt hurt.

This cake turned out rich,moist, and quite chewy. It’s like a cross between a blondie and a butter cake. While i would have preferred this to be more light and fluffy, I liked the gorgeous rich yellow the colour of this cake turned out. It totally epitomizes the widely used boxed “yellow cake” mix. And making this cake is almost as easy as the mix.
But what i am loving most about this cake is still the strong vanilla flavour in this.

Quite possibly the best scent around!
Recipe from My Diverse Kitchen : Very Vanilla One Bowl Yellow Cake
New York Cheesecake
I gotta say, baking a cheesecake is like a training ground for your patience skills. Not only does it take a long time to bake, it also needs to be refrigerated (preferably overnight).
That’s not exactly easy for me. I am one who restlessly jabs at the elevator button when it doesnt arrive in 2.2 second despite being fully aware that the action is wholly useless.

For this cheesecake however, i battled my demons and victored.
I have heard of the many pittfalls making a cheesecake involve. One of the more common one is the cracked surfaces. I was quite convinced that my cheese cake was going to have Harry Potter’s lightning scar across its surface that i had a backup plan. I made more of the cookie graham cracker base than what was required in the recipe and had every intention to sprinkle it over whatever scars the cheesecake cracked for me.

Like so.
But turned out, i didnt need it! At least for this time

Look ma! No cracks! 🙂
So i learnt that to prevent your cheesecake from breaking up on the surface, you have to leave the cheesecake in the oven for hours after it is done baking to ensure that it cools slowly.
A cheesecake which has been left to cool rapidly will crack up (no pun intended) under the pressure.
There is also the issue on under or overcooked cheesecake

An undercooked cheesecake will probably not set, while an overcooked cheesecake would be tough and dry.
I think my cheesecake did ok. It sliced well without being too tough. It was also dreamily creamy and smooth. I guess it’s a beginner’s luck!
But as a general rule of thumb, u want to bake your cheesecake just till the surface jiggles slightly when you shake the pan. It will further set as it cools and firm up when refrigerated.

I have taken the repressed pastry chef’s recipe for this. I think the success of this cheesecake is because of her failproof recipe.
So here is to NYC and its cheesecakes!
This post has been submitted to Aspiring Baker #6: Say Cheese, hosted by Jean of needmorenoms. Thanks for hosting Jean!
Zebra Cake
Zebra cakes are very much like the more commonly seen swirled cake. In both cases, two toned batters, usually chocolate and vanilla meet, mingle, and became best friends.

The only difference between the zebra and the swirled cake, is in how the two best friends hooked up.
In swirled cakes, the two batters meet spontaneously. They interact carelessly with each other, creating a swirly effect that was haphazard and unpredictable. The resultant effect is no less pretty than the zebra cake, that is of course considering the swirler is not me competent enough for the job.

The pattern in the zebra on the other hand, is more structured. The batters are poured alternately in specific amounts to get that orderly, systematic zebra-ish pattern. The kind of methodical operation that is not exactly in my blood. Geez, my own handwriting is barely legible.
Anyways, back to the cake,
To check for done-ness,

Ah, good ole’ skewer test. Where would we be without it?

Whistling clean, just the way i like it 🙂
You couldn’t imagine how excited i was to slice through this cake. This is one of the incidents where the real thing couldn’t quite compare to the spoof. I dont remember being this excited to see the authentic zebra horse on my first trip to the zoo.

Moment of truth time.
Honestly, i wasn’t very much impressed. This is definitely one of the prettiest zebras in the stable. Too much black, too little white. Too little spacing between the black and white. Plus the swirls are kinda squiggly.

Oh wells, let me claim the customary “A” for the effort at the very least.

So let’s get horsing around!
(Taken from AJ’s Cooking Secrets)
Ingredients
4 large eggs, at room temperature
1 cup (8 oz / 250 g) granulated sugar
1 cup (8 fl oz / 250 ml) milk, at room temperature
1 cup (8 fl oz / 250 ml) oil (corn, vegetable or canola)
2 cups (10 oz / 300 g) all-purpose flour
1/3 teaspoon vanilla powder
1 tablespoon baking powder
2 tablespoons dark cocoa powder
Directions
1. Preheat the oven to 350F (180C).
2. In a large mixing bowl, combine eggs and sugar. Using a hand-held electric mixer or wire whisk beat until the mixture is creamy and light in color
3. Add milk and oil, and continue beating until well blended.
4. In a separate bowl, combine and mix flour, vanilla powder and baking powder. Gradually add the flour mixture to the wet ingredients and beat just until the batter is smooth and the dry ingredients are
thoroughly incorporated. (DO NOT OVERBEAT to prevent air pockets from forming in the batter.
5. Divide the mixture into 2 equal portions. Keep one portion plain. Add cocoa powder into another and mix well.
6. Lightly grease the pan with oil. If you don’t have non-stick baking pan, grease whatever pan you have then line it with parchment paper (baking paper).
7. The most important part is assembling the cake batter in a baking pan. This is what you do. Scoop 3 heaped tablespoons of plain batter (you can also use a ladle that would hold 3 tablespoons) into the middle of the baking pan. Then scoop 3 tablespoons of cocoa batter and pour it in the center on top of the plain batter. IMPORTANT! Do not stop and wait until the previous batter spreads – KEEP GOING! Do not spread the batter or tilt the pan to distribute the mixture. It will spread by itself and fill the pan gradually. Continue alternating the batters until you finish them.
8. Bake in the oven for about 40 minutes. Do not open the oven door at least the first 20 minutes or the cake will shrink and will not rise. To check if the cake is ready, insert a toothpick into the center. It should come out clean when ready. Remove from the oven. Immediately run a small thin knife around the inside of the pan to loosen the cake, then invert the cake onto a cooking rack. Turn the cake back over and let cool. You can sprinkle the top of the cake with some powdered (confectioner’s) sugar or leave it plain.
Happy Birthday Cousin!
It’s cousin Irien’s birthday a couple of days ago!
And ideally, I would have loved baking, frosting and decorating a no expense spared, collosal cake with all the works. A monster sized cake just as big as her heart.
But cousin Irien is so tiny! Barely into her twenties, she could be the dictionary illustration of “fashionably thin”. She could be a pea sharing a pod with Nicole Richie, and boy would they rock that pod.
So i crossed that big collosal cake idea, and went for something small.

Inspired by Grace of La Mia Vita Dolce, these are called the Hot Fudge Sundae Cupcakes. But i strayed away from her recipe and settled on something i was familiar with. I guess i was not comfortable with experimenting with a new recipe when the stake (the birthday) is high.
So i started with baking cupcakes. A certain moist, and delicious chocolate cupcake

to which i piped on a white chocolate ganache frosting

And, dont worry, there is no need to go digging out your fancy pipping tips for this. In fact, i just loaded up my pipping bag sans any tip.

Because it will be covered with a good drizzle of melted chocolate. YUMMM..*licks spoon.

Some fancy coloured sprinkles,

And of course a cherry on top to officiate the Sundae look.

Taa-Daaah!
That was easy peasy wasn’t it?

I’ve said it once, and i will say it again.
“Happy Birthday Cousin, may you stay eternally pixie cute, and be abundantly showered with love!”
The Best Chocolate Sheet Cake. Ever.
(Taken from Pioneer Woman)
Ingredients
- FOR THE CUPCAKES: (Makes about 12)
- 2 cups Flour
- 2 cups Sugar
- ¼ teaspoons Salt
- 4 Tablespoons (heaping) Cocoa
- 2 sticks Butter
- 1 cup Boiling Water
- ½ cups Buttermilk
- 2 whole Beaten Eggs
- 1 teaspoon Baking Soda
- 1 teaspoon Vanilla
Preparation Instructions
In a mixing bowl, combine flour, sugar, and salt.
In a saucepan, melt butter. Add cocoa. Stir together.
Add boiling water, allow mixture to boil for 30 seconds, then turn off heat. Pour over flour mixture, and stir lightly to cool.
In a measuring cup, pour the buttermilk and add beaten eggs, baking soda, and vanilla. Stir buttermilk mixture into butter/chocolate mixture. Pour into cupcake lined tins and bake at 350-degrees for 15 minutes.
For the White Chocolate Ganache
200 gr White Chocolate, chopped
200 gr Whipping Cream
1. Double boil white chocolate till it fully melts, set aside to cool slightly
2. Whip the whipping cream to soft peaks. Drizzle in the cooled melted white chocolate, and whip to firm peaks (You want this to be of pipe-able consistency)
For Decorations:
Some melted chocolate
Some Fancypants sprinkles
Some maraschino cherries
Lemon Bundt Cake
I am quite the oddball in the family. As a kid, my popsicles are always in alternating shades of red (strawberry) and orange. This is a deviation from the family’s standard of dark brown , chocolate popsicles.
I caved in once, and conformed to the norm, and immediately regretted my decision as i took my first bite. I was missing the bright, refreshing, and tangy flavours of my fruit based pops! And from then on, i’ve nevered wandered, and always stood tall and proud with my vibrant coloured treat admist its dull coloured counterparts.
So fast forward to present day, one of my favourite things to do in baking is to zest lemon peel. I love inhaling the citrus smell of that squirt of fresh juice as i pressed my zester against the skin of the lemon. Juicing lemon juice is pretty fun too. I lean my weight against the juicer to exert the maximum pressure to wring out every last drop of lemon juice.

And that brings about today’s choice of baking, the lemon bundt cake.
And whilst the cake baked away in the oven, i settled myself with a morning warm lemon tea 🙂

And when it comes to bundt cake, i know exactly where to seek my recipe from. The food librarian with her series of “ I like Big Bundts” has a very comprehensive library when it comes to bundts. The original recipe (from Martha Stewart) called for Meyer Lemons. I’ve never seen a Meyer Lemon in Jakarta before, so regular ones will have to do for this.

Ah, the glaze, the citrus flavours of the bundt cake came mainly from the glaze. The cake batter only had lemon zest in it while the glaze had both lemon zest and juice. As you would have guessed, the glaze was both sweet and tangy, and would totally zest your mornings into fanci-ness. 
And of course the mandatory circus work of pouring glaze and taking pictures with my favourite two hands, which leads to some unevenes in the division of glaze across the whole cake surface

I am cutting myself a slice from the part of the cake with MORE glaze of course, and shall save the slices with the trickly glaze to the dieters.

The cake was baked to a perfect golden brown, texture wise, it is rather dense, and not fluffy soft. I think i might have overbaked it, cause the edges became quite crispy and cookie like. And i think i enjoyed picking at these crisp crumbs more than i did the cake!

A cup of lemon tea and a slice of lemon cake for a Friday breakfast!
(Recipe taken from Martha Stewart)
Ingredients
Makes 2 loaves
I made 1/2 the recipe and baked it in 10-cup Bundt cake pan.
Ingredients
- FOR THE CAKE
- 1 1/2 cups (3 sticks) unsalted butter, room temperature, plus more for pans
- 4 cups sifted cake flour, plus more for pans
- 1 teaspoon salt
- 4 teaspoons baking powder
- 2 3/4 cups sugar
- 8 eggs, room temperature
- 1 cup milk, room temperature
- 2 teaspoons pure vanilla extract
- Zest of 1 Meyer lemon
- FOR THE GLAZE
- Zest of 1 Meyer lemon
- 2 3/4 cups confectioners’ sugar, plus more if needed
- 1/4 cup fresh Meyer lemon juice
- Preheat the oven to 325 degrees. Butter and flour two 9-by-5-by-3-inch loaf pans and set aside.
- Sift the flour with the salt and baking powder two times and set aside.
- With an electric mixer, cream the butter until fluffy. Add the sugar gradually, beating until light and fluffy.
- Add the eggs, one at a time, beating well after each addition. Add the flour mixture to the butter mixture, alternating with the milk and vanilla. Stir only until thoroughly blended. Gently fold in the zest.
- Pour batter into the prepared pans and level tops with an offset spatula. Bake for about 1 1/2 hours, until a cake tester comes out clean. Let the cake cool in the pan about 10 minutes; then remove to a wire rack to cool thoroughly.
- Make the glaze: In a medium bowl, whisk all glaze ingredients to combine. If necessary, add additional confectioners’ sugar to desired consistency.
- Pour glaze on top of cakes and serve.
Ding Dongs, and Devil Dogs
Apparently these chocolate cake sandwiching white buttercream are called Devil Dogs.

I don’t know how how the name came about, but as the pioneer woman mentioned, these are typically Ding-Dongs, without the chocolate coating.
Let’s go step by step on these
First up, we bake a chocolate sheet cake. And i must say, this cake is really moist and veerrryyyy delicious.

To which we cut squares from, to make each individual dog. You will be getting quite a few scraps from this. That’s okay, i am sure you know what to do with them. For me, i eat them to give me the energy to finish the rest of this task.

Next we squeeze a bit of frosting on each square,

Like so,
then, a second square of chocolate cake goes up

A second, mini squirt of buttercream

And a final glace cherry to top it off.

And before i go on, the buttercream here is not your average swiss, italian, or american buttercream. Instead of using egg whites, this buttercream uses a bit of cooked flour. * Recipe follows.
Making buttercream this way is a bit new for me, and taste and texture wise, it deserves a double thumbs up !

The Best Chocolate Sheet Cake. Ever.
(Taken from Pioneer Woman)
Ingredients
- FOR THE CAKE:
- 2 cups Flour
- 2 cups Sugar
- ¼ teaspoons Salt
- 4 Tablespoons (heaping) Cocoa
- 2 sticks Butter
- 1 cup Boiling Water
- ½ cups Buttermilk
- 2 whole Beaten Eggs
- 1 teaspoon Baking Soda
- 1 teaspoon Vanilla
- _____
- FOR FROSTING:
- ½ cups Finely Chopped Pecans
- 1-¾ stick Butter
- 4 Tablespoons (heaping) Cocoa
- 6 Tablespoons Milk
- 1 teaspoon Vanilla
- 1 pound (minus 1/2 Cup) Powdered Sugar
Preparation Instructions
In a mixing bowl, combine flour, sugar, and salt.
In a saucepan, melt butter. Add cocoa. Stir together.
Add boiling water, allow mixture to boil for 30 seconds, then turn off heat. Pour over flour mixture, and stir lightly to cool.
In a measuring cup, pour the buttermilk and add beaten eggs, baking soda, and vanilla. Stir buttermilk mixture into butter/chocolate mixture. Pour into sheet cake pan and bake at 350-degrees for 20 minutes.
While cake is baking, make the icing. Chop pecans finely. Melt butter in a saucepan. Add cocoa, stir to combine, then turn off heat. Add the milk, vanilla, and powdered sugar. Stir together. Add the pecans, stir together, and pour over warm cake.
Cut into squares, eat, and totally wig out over the fact that you’ve just made the best chocolate sheet cake. Ever.
That’s the Best Frosting I’ve Ever Had
Ingredients
- 5 Tablespoons Flour
- 1 cup Milk
- 1 teaspoon Vanilla
- 1 cup Butter
- 1 cup Granulated Sugar (not Powdered Sugar!)
Preparation Instructions
Bake your favorite chocolate cake and let it cool.
In a small saucepan, whisk flour into milk and heat, stirring constantly, until it thickens. You want it to be very thick, thicker than cake mix, more like a brownie mix is. Remove from heat and let it cool to room temperature. (If I’m in a hurry, I place the saucepan over ice in the sink for about 10 minutes or so until the mixture cools.) It must be completely cool before you use it in the next step. Stir in vanilla.
While the mixture is cooling, cream the butter and sugar together until light and fluffy. You don’t want any sugar graininess left. Then add the completely cooled milk/flour/vanilla mixture and beat the living daylights out of it. If it looks separated, you haven’t beaten it enough! Beat it until it all combines and resembles whipped cream.
Grab a spoon and taste this wonderful goodness. If there is any left after your taste test, spread it on a cooled chocolate cake.
Cut yourself a piece and put it on a pretty plate. Grab a fork and prepare to experience the most divine pairing you can imagine. This frosting on chocolate cake is to die for. Sure, the recipe sounds strange — it has flour in it — but it’s sublime. Try it, you’ll see. You’ll love it so much you won’t go back.
Mini Brown Sugar Muffins with Coffee Glaze
I have always had the impression that muffins in general are practical breakfast items. Unlike their petite counterpart, Miss Cupcake with her fancy dress-ups, muffins are effortless, and they are also ready in no time at all.
But sometimes, practicality can be boring. Yet, with the time constraints imposed on the everyday morning rush, practicality is indispensable.
So u can pretty much imagine my delight when i saw these muffins from daily delicious. I think these muffins make good compromises between practicality and boring.

Muffins with coffee glaze.
I love how glazes dry up. They are fuss free and they are no-smudge. You dont have to worry about getting them all over your hands, or your face. or your hair.
You can also pretty much muck around with them anyway you want, like stack them up. 
LOL.

I also love how easy glazes come together. With this, some instant coffee gets dissolved in some hot water, to which icing sugar is added into the mixture to get them into that drizzling consistency. No heavy whipping required here, in fact, i managed to get everything incorporated just by a whisk of my fork (not even a balloon whisk).

Glazes aside, these muffins are also wonderfully moist and soft. And i think it has got to do with the the brown sugar, which is known to attract more moisture than the regular white.

I am also fancying the petite sizes these nuggets come in. They appear innocous and are warm in inviting the strictest of the dieters.

But of course that doesnt guarantee that you will be able to stop at one!
Beat butter salt and sugar together until light in color, add the egg, beat to combine.
Pour the honey into the butter and beat to combine.
Add the flour to the butter in 3 parts, alternating with the Crème Fraîche.
Divide the batter into prepared pans.
Bake for 15-17 minutes or golden and spring when touch lightly.
Let the muffin cool on a wire rack.
Mix the hot water and instant coffee granule together, add the icing sugar and stir to combine.
Drizzle over the muffin and serve with a smile^^.
Banana Espresso Chocolate Chip Muffins
The espresso in that irregular shaped banana cake was so impressionable that i just had to attempt another recipe with the same banana, espresso combination.
I knew i found gold with Tracey’s Banana Espresso Chocolate Chip Muffins

Cause not only were they easy to whip up, they also have a third delightful ingredient – Chocolate Chips.

While this recipe adopts the convenient muffin method of just mixing wet ingredients to dry ingredients, u do have to set aside time to peel and puree the bananas.

Frankly speaking, i am not a huge fan of measuring pureed bananas in cups. I find that it is not as accurate as the reliable metric measurement. I know i am being a bit of fussypants here, but really, the last thing i wanted was for me to add excess banana puree which would cause the muffins to have this weird wet gummy texture.
Not a biggie, a quick search on the internet revealed the weight of a cup of mashed bananas at 227 grams.

The extra step at weighing was definitely worth the effort cause i got a lovely banana cake done just right with none of that gelatinous, wet, pudding-like interior.

And of course, let’s not be forgetting about that espresso, which added not only an extra depth in the flavour department, but also that mandatory boost of caffeine in your breakfast.

And of course, let’s not forget to set aside a handful of chocolate chips to strew on top of your batter just before they go into the oven!
Banana Espresso Chocolate Chip Muffins
Taken From Tracey’s Culinary Adventure
1 1/2 cups mashed, very ripe bananas (about 4 medium bananas)
1/2 cup sugar
1/4 cup firmly packed light brown sugar
1/2 cup (1 stick) unsalted butter, melted and cooled slightly
1/4 cup milk (I used 1%)
1 large egg, at room temperature
1 1/2 cups all-purpose flour
1 teaspoon instant espresso powder
1 1/2 teaspoons baking soda
1 teaspoon salt
2/3 cup semisweet chocolate chips
Preheat oven to 350 F. Line a 12-cup muffin pan with paper liners.
In a medium bowl, stir together the bananas, sugars, butter, milk and egg. Whisk together the flour, instant espresso powder, baking soda and salt in a large bowl. Make a well in the middle of the dry ingredients and pour in the wet ingredients. Stir until just combined. Fold in the chocolate chips.
Distribute the batter evenly among the muffin cups, filling each about three-quarters full. Bake for 20-25 minutes, or until a toothpick inserted in the center of a muffin comes out clean. Move the muffin pan to a wire rack, and let cool for about 10 minutes, then remove the muffins from the pan to the rack to cool completely.
Muffins can be stored in an airtight container for up to 2 days.
Yields 12 muffins
Banana Cake with Cream Cheese Frosting and Honey-Toasted Almonds
Try as i might, i just cant seem to get a decent shot of this bugger here.

It might be because of the lighting, or the props, or the way it is frosted.
The cake started out as a banana cake,

Over which cream cheese frosting is piled onto

Geez, i think that’s it!
I think the poor shots are probably due to the cream cheese frosting. Yummy as the frosting is (how can u go wrong with cream cheese, butter and icing sugar?), the consistency is not exactly suitable for frosting. It is a tad too liquid, and you don’t even wanna think about pipping with this frosting. I might need to add more icing sugar into this to get to the consistency that’s workable.
And try as i might, frosting this cake made it look somewhat like a huge cloud of shapeless blob

I am sorry, i tried my best. Honest.
But, looks can be deceiving, cause it is still a good cake,
I was kind of weirded out when i saw espresso powder in the cake recipe. But i dipped my finger into the cake batter before i sent it to the oven. It was like a flavour breakthrough. Who would have thought espresso would go so well with bananas?

I have also added some candied honey almonds for an extra crunch, and for that bit of saltiness i so enjoy in all sweet desserts. So don’t judge a book by its cover this time around!
Banana Cake with Cream Cheese Frosting and Honey-Toasted Almonds (makes 1 double layer cake, or 1 single layer cake and 6 large muffins)
For the cake: (taken from Baking with Buttermilk)
2 1/2 cups (350 g) all-purpose flour (I used white whole wheat)
1 1/2 tsp ground cinnamon
1 1/2 tsp baking powder
3/4 tsp baking soda
1/2 tsp salt
1 cup (8 ounces/230 g) unsalted butter, at room temperature
1 1/2 cups (300 g) sugar
1 tsp vanilla extract
1 Tbsp instant espresso or coffee powder (I omitted this)
2 large eggs, at room temperature
6 Tbsp (90 ml) buttermilk, yogurt or sour cream (regular or low-fat), at room temperature (I used Fage 0%)
2 cups (50 ml) banana purée (3 to 4 very ripe bananas) (I used 4)
1. Preheat oven to 350°F (175°C)
2. Spray with oil or butter 2 9-inch cake pans. Line the bottoms with parchment paper. (If making muffins, prepare one cake pan and 1 muffin tin)
3. In a medium bowl, combine flour, cinnamon, baking powder, soda and salt. Whisk to combine.
4. In a stand mixer bowl (or large mixing bowl if using a hand mixer or spoon) beat butter and sugar until light and fluffy. It should take about 3 to 5 minutes. Incorporate the vanilla and espresso powder. Beat in eggs one at a time until each is completely mixed in. Add half of the flour then the buttermilk and banana purée. Add the remaining flour and stir until combined, but don’t over mix.
5. Divide the batter between the two prepared pans (or pan and muffin tin) and bake until golden and toothpick comes out clean, about 40 minutes. (12-15 minutes for muffins, or until tops spring back to the touch) Cool in pans on wire racks.
For the frosting: (Taken from Baking with Buttermilk)
1 stick butter
4 oz. cream cheese
1 1/2 cups powdered sugar
1 tsp vanilla extract
1-2 Tbsp. almond milk
In a large bowl, beat together butter and cream cheese until very light and fluffy. Slowly add powdered sugar until well mixed. Add vanilla extract. Tip in a Tablespoon or two of milk, if needed.
For the almonds:
1/3 cup sliced raw almonds
1 Tbsp honey
1 tsp ground cinnamon
1/8 tsp salt
Place almonds in a small pan over medium heat. Allow to begin toasting, 1-2 minutes. Add honey, cinnamon and salt, stir until golden. Add water 1 tsp at a time if clumping together. Toast until fragrant but not burnt, about 5 minutes. Pour onto lined baking sheet or Silpat when done until ready to use.
Isabella’s Lemon Meringue Cupcakes
I never would have thought 8-12 year old kids could be left in the kitchen unsupervised. I mean, with open flames, kitchen knives, and heavy weight kitchen appliances, the kitchen is not exactly a safe playground. But watching Australia’s junior masterchef got me totally flabbergasted.

The cynic in me wondered whether they were even able to cook up something that was safe for consumption, that nothing was too raw, or overdone. But i was blown away when i saw their creations which looked not only delicious, but also were assembled in the most appealing fashion.

The baker in me naturally got drawn to the winning dish which was featured in the first mystery box challenge -Lemon meringue cupcakes.
Now now, not only was the challenge winner, 12 year old Isabella was able to make temperature sensitive egg-based curd, she was also able to score with the ever so temperamental egg white meringue.

The lemon curd was cooked till it was just thickened. It was really smooth, luscious and silky. A hole is created in the middle of each cupcake to house the lemon curd.

however, i was a tad worried as the curd was a bit on the sour side.

But my worries were unfounded as the tangy-ness from the sour curd went flawlessly well with the traditionally too sweet meringue.
‘
So when the judges were swooning over this, they were not exaggerating. This cupcake got its deserved attention and praises. It is that good!
Ingredients
(Taken from Masterchef)
Cupcakes
1 cup pure cream
1 cup caster sugar
2 eggs, lightly beaten
1 1/2 cups self raising flour
Finely grated rind of 1 lemon
Lemon curd
1/2 cup lemon juice
100g butter
1/2 cup caster sugar
1 egg
3 egg yolks
Meringue
3 egg whites
1/2 cup caster sugar
1. Preheat oven to 180’C. Place 12 patty cake liners in a 12 hole 1/2-cup capacity muffin pan.
2. Place cream, sugar and eggs in a large mixing bowl and whisk until smooth. Gradually add flour and zest and continue whisking until mixture is thick and smooth.
3. Divide mixture between prepared liners and bake for 15-20 minutes or until cakes spring back to touch. Cool in muffin pan.
4. For lemon curd, heat lemon juice and butter in a small saucepan and simmer until butter has melted. Add sugar, egg and yolks and cook, whisking continuously until mixture becomes thick and glossy. Pour into a shallow oven tray to cool.
5. For meringue, beat egg whites in an electric mixer until firm peaks form, gradually add sugar, a tablespoon at a time, beating until sugar has dissolved between each addition. Spoon meringue mixture into a piping bag.
6. To serve, preheat grill to medium-high. Cut a small hole in the top of each cupcake and fill with 1-2 teaspoons of lemon curd. Pipe a swirl of meringue mixture on the top of each cupcake and place under heated grill for 60-90 seconds or until golden. Arrange on a serving plate with spoonfuls of lemon curd if desired.
Strawberry Charlotte

I’ve always thought Charlotte cakes as being charming and very impressive looking. In fact, they were so majestic looking that i was always intimidated to attempt making one.
Most of the Charlottes i’ve seen have a ring of sponge fingers around them. I have never made sponge fingers before, and i was pretty damn sure that i will screw it up somehow. The batter involved the delicate folding of temperamental egg whites into egg yolks and flour. This batter is then piped into slug-like shapes before being sent to bake. I wanted my slugs to be uniformly fat and stunted in height, so i drew guiding lines across my parchment to make sure that happens (that’s quite anal, i know).
What i didnt know was how these sponge fingers would puff. My gang of slugs grew from fat to obese. Well, that’s all right i guess, since they all managed to puff consistently, which meant that i still will have my crown of sponge fingers in a standard size and height.
Next came the mousse, the original recipe from Annie’s eats called for raspberry and blackberry mousse. I didn’t have any of these fruits on hands, plus they are real expensive here in Indonesia. So i subbed them with the more readily available (and cheaper) strawberries.
The recipe was also designed to make 4 to 5 mini charlottes, again i didn’t have mini charlotte molds, so i had to content myself with making a huge one instead.
I then decorated the top of the mousse with a medley of fresh cherries, blueberries and strawberries. 
aaah, I love working with fresh gorgeous fruits, especially when they are of vibrant bold colours. They just made everything so much prettier.

Truth be told, i haven’t had a chance to taste this yet. I wanted to, but i haven’t really had the heart to slice into it yet. But rest assured, i did taste the sponge fingers, and the mousse individually before they were assembled and they tasted pretty damn good!! 🙂

Individual Berry Charlottes
(Taken from Annie’s eats )
Yield: 4-5 individual charlottes
Ingredients:
For the ladyfingers:
3 large eggs, separated
½ cup confectioners’ sugar, sifted, plus more for sprinkling
1/3 cup granulated sugar
½ cup all-purpose flour
For the blackberry mousse:
½ cup strained blackberry puree
2 tsp. granulated sugar
½ tsp. gelatin
1½ tsp. cold water
½ cup heavy cream
For the raspberry mousse:
½ cup strained raspberry puree
2 tsp. granulated sugar
½ tsp. gelatin
1½ tsp. cold water
½ cup heavy cream
Fresh berries, for serving
Directions:
To make the lady fingers, place the egg whites in the bowl of an electric mixer fitted with the whisk attachment. Beat on medium-high speed until foamy. Gradually add the sifted confectioners’ sugar, and continue whipping the egg whites until a stiff, glossy meringue forms. Transfer the meringue mixture to a medium mixing bowl. In the empty mixer bowl, now fitted with the flat beater, combine the egg yolks and granulated sugar. Beat on medium speed until thick and pale yellow. With a spatula, fold the egg yolk mixture into the meringue until smooth and blended, taking care not to deflate the egg whites. Gently fold in the flour until no streaks remain.
Preheat the oven to 375˚ F. Line two baking sheets with parchment paper or silicone baking mats. Transfer the batter to a pastry bag fitted with a plain round tip. Pipe the ladyfingers onto the prepared baking pans, about 3 inches long and 1 inch wide. Additionally, pipe small rounds for the bases of the charlottes (about 2½-3 inches in diameter). Sprinkle additional confectioners’ sugar over the piped ladyfingers. Bake until light golden, about 10 minutes, rotating the pans halfway through baking. Let cool on the pans 10-15 minutes, then remove the ladyfingers and cake bases to a wire rack to cool completely. (Yield: approximately 36 ladyfingers plus 4 cake bases)
To make the blackberry mousse, combine the blackberry puree and sugar in a small saucepan over medium heat. Bring to a boil. While the mixture is heating, combine the gelatin and water in a small bowl to soften. Once the fruit puree reaches a boil, remove from the heat. Stir in the softened gelatin mixture. Let cool to room temperature. In the bowl of an electric mixer fitted with the whisk attachment, beat the heavy cream on medium-high speed until stiff peaks form (be careful not to overbeat!) With a spatula, gently fold in the fruit puree until well mixed and no streaks remain.
To assemble the charlottes, place a cake disk inside the bottom of each 3-inch ring mold on a flat plate or baking sheet.
Line the edges of the mold with upright ladyfingers, flat sides facing toward the center.
Fill a pastry bag fitted with a large plain round tip with the raspberry mousse. Pipe a layer of the mousse into the center of the charlottes, leaving at least ½-inch of exposed ladyfingers to act as a rim for the berry topping. Transfer the charlottes to the refrigerator to chill the mousse until ready to serve.
Before serving, gently remove the ring molds from the charlottes. Tie a decorative bow around the outside of each cake. Top with fresh berries and serve chilled.
Happy Birthday Sis!

This cake comprises of a triple layer sponge cake covered with whipped white chocolate ganache.
The pastel green scribbles is icing made of egg whites and icing sugar.
The sides of this cake is shredded strawberry flavoured pink chocolate

Sweet pastel colour palette, for the sweetest sister.
Happy Birthday sis!
Brown Sugar and Chocolate Chip Bundt Cake with Maple Espresso Glaze
I was quite upset over my last entry, the bundt cake with the torn surface and the forgotten chocolate chips. I told myself not to beat myself over it, but i just wasn’t able to put it to rest.

I felt the need to rectify those flaws, I just had to attempt another bundt.
So here goes my next bundt, tear free and with chocolate chips IN the batter. Hola!
But i wasn’t that sure this bundt would come out perfect either, and i had a back up plan,

A glaze to cover up any imperfections (should there be another) on the surface.
And oh boy, what a glaze it was,

Who would have thought that maple syrup and espresso could come together in such a perfection. Seriously, i don’t even think i could find words fitting enough to describe this glaze.
This is the kind of glaze that you would close your eyes and moan to. Your sense of smell and taste would thank you in sheer gratification for this. It was all i could do not to drink this by the cupful.

So the glaze goes over the cake. Sorry about the messiness, i was trying to pour the glaze over the cake with my left hand while balancing the camera with my right.
My circus act resulted in something that looked like this

Once the glaze is on, the next step in the recipe is to let stand at room temperature until glaze is firm, about 1 hour.
I don’t know about you, but i am not waiting

I cut myself A big fat slice,

And this time with chocolate chips IN the cake.
The recipe also called for the chips to be sprinkled with flour before they are thrown into the batter for better suspension. I always thought this step was for fruits which have higher water content, but i guess you could do that to chocolate chips too!

Brown Sugar and Chocolate Chip Pound Cake with Maple-Espresso Glaze
(Taken from Food librarian who adapted from epicurious)
Cake:
- Nonstick vegetable oil spray
- 1 12-ounce package semisweet chocolate chips
- 3 cups all purpose flour, divided
- 2 teaspoons baking soda
- 1 teaspoon baking powder
- 3/4 teaspoon salt
- 1 cup (2 sticks) unsalted butter, room temperature
- 1 1/2 cups (packed) golden brown sugar
- 2 1/2 teaspoons vanilla extract
- 1 teaspoon maple extract
- 4 large eggs
- 1 cup buttermilk
Glaze:
- 1 cup powdered sugar
- 2 tablespoons pure maple syrup
- 2 tablespoons (or more) whipping cream
- 1 1/2 teaspoons instant espresso powder
For cake:
Preheat oven to 325°F. Butter 12-cup Bundt pan. Spray pan generously with nonstick spray. Dust pan lightly with flour. Mix chocolate chips and 2 tablespoons flour in medium bowl. Sift remaining flour with baking soda, baking powder, and salt into another medium bowl. Using electric mixer, beat butter and brown sugar in large bowl until fluffy, about 3 minutes. Beat in vanilla extract and maple extract. Add eggs, 1 at a time, beating well after each addition. Mix in flour mixture in 3 additions alternately with buttermilk in 2 additions, beginning and ending with flour mixture. Fold in chocolate chip mixture. Transfer batter to prepared pan, spreading evenly.
Bake cake until tester inserted near center comes out clean and cake begins to pull away from sides of pan, about 1 hour. Cool cake in pan on rack 30 minutes. Invert cake onto rack and cool completely.
GOOD TO KNOW:
Mixing the chocolate chips with a little flour before adding them to the batter helps the chips stay evenly suspended in the batter and evenly distributed throughout the baked cake (otherwise, they may sink to the bottom).
For glaze:
Combine powdered sugar, maple syrup, 2 tablespoons cream, and espresso powder in medium bowl. Whisk until smooth, adding more cream by 1/2 teaspoonfuls if glaze is too thick to drizzle. Spoon glaze decoratively over top of cake; let stand at room temperature until glaze is firm, about 1 hour. DO AHEAD: Can be made 1 day ahead. Cover with cake dome and let stand at room temperature.
A little torn.
So i made a little bundt cake today,

It’s marbled and it’s got pretty swirls of chocolate and yellow.
Except for the little mishap i had unmoulding the cake.

My cake was a little torn.
A tear (from my eyes) for a tear (on the cake).

So i made a little bundt cake today,
and it was deliciously moist and tender,
and u can see from the picture, it has got chocolate chips on the side.

Yup, u read it right, chocolate chips on the side, all measured and looking pretty in a ramekin.
It was supposed to go into the batter, but scatterbrain here, forgot.

I just gotta remind myself that it’s still a good, moist and delicious cake, and it kept the people at work happy. And i will not get upset over it.
Black Beauty

If you look really closely at the picture, you would notice that there are two layers of batters involved in making this beauty. The bottom layer is a layer of a brownie so moist and fudgy that it is almost custard like. The top is a buttercake recipe so rich and luxurious, it is more fitting to call it a brownie.

But that’s not the highlight of the buttercake. The highlight of this cake is the use of a certain flour called the black glutinous rice flour.
Black glutinous rice flour comes from black glutinous rice (doh!). Like its fair counterpart (white glutinous rice), the black glutinous rice is an especially sticky rice that is most commonly used for Asian desserts.
It’s only recently (well, maybe not that recent) that this sticky rice is made into flour. In this flour form, which is so agreeable to baking, does it start to leave its powdery imprints in the world of cakes and other bakes.

The flour is generally grey with specks of black, and it leaves a gritty texture into the resultant cake. I know you must be thinking, gritty texture ?? Eeeww!! but trust me, this one doesn’t taste anywhere like the health food we so often force fibrous wheatgerms into. This one actually tastes delicious. U just gotta trust me on this. LOL

Besides texture, the black glutinous rice flour is also very aromatic. Unlike the white glutinous rice flour which is bland, tasteless and scentless, the black glutinous rice imparts a waft of delightfully sweet smell with each bite you take. Not wanting this to run in the danger of sounding like a perfume advert, i must assure you that the smell is not at all overpowering. It’s subdued, yet full bodied at the same time and very very very delicious. I guess i can attest the many uses of the black glutinous rice in Asian desserts to attest to that!
Black Beauty*
For the Brownie Batter
125 gr Dark Chocolate
62.5 gr Butter
75 gr egg
100 gr caster sugar
65 gr AP
12.5 gr milk powder
1/4 tsp baking powder
1. In a heatproof bowl, put together chocolate and butter. Set bowl over simmering water till the chocolate melts. Set aside to cool.
2. In another bowl, beat the egg and caster sugar at high speed till it is thick and pale yellow. Pour the melted chocolate into the bowl and whisk to combine.
3. In yet another bowl, sift together the flour, milk powder and baking powder. Fold the flour mixture into the chocolate mixture. Pour into a 8×8 inch pre-lined and greased pan.
For the cake batter
150 gr butter
125 gr icing sugar
25 gr condensed milk
150 gr eggs
113 gr black glutinous rice flour
13 gr cocoa powder
1. Beat the butter, icing sugar and condensed milk till light and fluffy.
2. Gradually add the eggs in.
3. In another bowl, sift the black glutinous rice flour and cocoa powder together and add it into the butter mixture.
4. Pour the mixture into the 8×8 inch pan and gently spread it across the above brownie batter.
5. Bake at 350 for 40 minutes or till cooked.
*Note: Recipe adapted from an Indonesian cookbook, please pardon the poor translation. LOL
Marble Cake

I cant tell you enough how many times i have been disappointed attempting to make the perfect butter cakes. Even recipes with promising titles such as “the perfect butter cake” or “the best pound cake”, somehow, nothing met up with my expectations.

Most of them usually err to the dry side, and i find myself reaching for that dollop of whipped cream or even jam to be served alongside the cake.
Of course, there are recipes that call for milk, juices, or even water to moisten things up, but usually, the batter gets heavy, and needless to say, so will the eventual cake.

I guess my journey to find that perfect butter cake came to an end with this recipe. This recipe yields a good, soft, moist cake with very tight crumbs.
Without any liquid in the cake batter to counter the dryness so common in most butter cakes, this cake relies on only the butter for that moistness. From here, u can pretty much guess how wonderfully rich and lustrously buttery this cake would be.
The butter in the recipe is beaten and aerated, producing a cake that rose and was very light, but yet, this cake was still dense enough to carry all that buttery aroma in its fullest glory.

Although i am very much loving the marbled swirls in this cake, i must say that i am not really liking the chocolate batter as much as i do the plain one. The chocolate batter which had cocoa powder in it was naturally more bitter compared to the plain one. Also, the cocoa powder really took away all that wonderful buttery taste that i very much adore.
Kek Marble Susu (Milk Marble Cake)
(adapted from Ovenhaven)
250g butter
230g castor sugar
2 tsp ovalette
4 eggs
60g condensed milk
270g cake flour
1 tsp baking powder
2 tbsp cocoa powder
2 tbsp milk
1 tsp chocolate emulco
- Preheat oven to 170°C.
- Beat the butter, sugar and ovalette until light and fluffy.
- Add in the eggs one by one, beating well after each addition.
- Add in the condensed milk, and mix well.
- Sift the flour together with the baking powder, and add slowly to the mixture, until it is well incorporated.
- Divide the batter into two, leaving one plain, and adding the chocolate emulco, cocoa powder and milk to the other.
- Drop alternate spoonfuls of the two batters into a 9-inch square pan, lined with baking paper. Bake at 170°C for 30-35mins.
Chocolate Orange Cake
There were two bars of chocolate sitting in my fridge one day. One just a bar of chocolate in its dark glory, and the other, a bar of dark chocolate with orange peel and cashew nuts in it.
I grabbed the second one, because, believe it or not, i have never really tasted chocolates with fruits in it (aside from the usual raisin studded chocolate bars). I was prepped for disappointments as i thought of myself to be a chocolate purist, that chocolate should preferably be eaten on its own, without any interference from the various fruits and nuts so common in the world of chocolates.
I took a bite, and my firm stance on un-tampered, pure chocolate was heavily shaken. I liked what i ate and developed a new-found love for orange scented chocolates.

Needless to say, i began scouring the net for orange scented chocolate everything. Many were recipes for orange chocolate cake, and my decision rested on this particular recipe which called for a whole seville orange to be boiled and blitzed before it was added to the cake.

Yup, what better way to infuse that citrusy scent than to dump a whole orange, peel and all into the cake?
Like the chocolate, the shadows of doubt that came with that whole boiling and blitzing orange was dark yet alluring, but i decided it was worth the risk and decided to take a dive.

The resultant cake was fudgy, dense and moist, and the orange flavour was discernible. It is a pretty good cake, but i guess dense cakes are just not my thing, i would rather go all the way and make dense fudgy brownies instead. A dense cake is just halfway there and it doesnt quite cut it for me. I find myself scrapping and eating the ganache more than the cake.

And i think i just myself a pretty good chocolate ganache recipe. I upped the chocolate slightly from the recipe as the comments in the recipe indicated that it was more on the runny side. The minor adjustments i made is just perfect for my tropical, humid weather. The chocolate ganache was of the perfect consistency even after being left overnight. It is fudgy, without being too thick to be spread across the cake.
I also carelessly strewn a store bought mango peels across the cake, just for aesthetic purposes. But i do like how it tastes with the ganache. The tangy and slightly salted peel gave the ganache an extra texture and it was such a pleasant tease to the palate.
Chocolate Orange Cake
(Taken from bbcgoodfood.com)
- 1 Seville orange
- a little melted butter , for greasing
- 100g plain chocolate , broken into pieces
- 3 eggs
- 280g caster sugar
- 240ml sunflower oil
- 25g cocoa powder
- 250g plain flour
- 1½ tsp baking powder
- orange candied peel , to decorate
For the Chocolate Ganache *
- 200g plain chocolate , broken into pieces
- 225ml double cream
- Pierce the orange with a skewer (right through). Cook in boiling water for 30 minutes until soft. Whizz the whole orange in a food processor until smooth; let cool.
- Preheat the oven to 180C/gas 4/fan 160C.Grease and line the base of a 23cm/9in round cake tin. Melt the chocolate in a heatproof bowl set over a pan of simmering water or in the microwave for 2 minutes on High, stirring after 1 minute. Let cool.
- In a large bowl, lightly beat the eggs, sugar and oil. Gradually beat in the puréed orange, discarding any pips, then stir in the cooled melted chocolate. Sift in the cocoa, flour and baking powder. Mix well and pour into the tin. Bake in the centre of the oven for 55 minutes, or until the cake springs back when lightly pressed in the middle. (Check after 45 minutes and cover with foil if it is browning too much.) Allow to cool for 10 minutes in the tin, then turn out on to a wire rack to cool completely.
- Make the chocolate ganache: put the chocolate into a heatproof bowl. Bring the cream to the boil and pour over the chocolate. Leave for 2 minutes, then stir until smooth. Set aside until firm enough to spread over the cake – up to 1½ hours.
- Transfer the cake to a serving plate. Using a palette knife, swirl the ganache over the top. Decorate with strips of candied orange peel.
* For the chocolate ganache, i added equal ratio of chocolate vs cream (1 :1).
New York Style Coffee Cake
I never thought there will come a day where i feel uninspired to bake. But for the past week, for some reason, i have been feeling down. The thought of weighing flour, whipping eggs and creaming butter just lost its appeal to me. I laid low for quite a bit, and chose to stay cocooned under my blanket in the mornings rather than make a mad dash into my kitchen as i usually do.

I began missing the hum of my oven, and the whirr of my stand mixer. I miss the steady “snap” my camera makes as i clicked on the shutter button, and most importantly, i had a tub of sour cream threatening to expire on me (DUH). So i sauntered over to the kitchen, and turned my oven up against my sunken mood. I had the perfect recipe in my hands, perfect because it was relatively fuss free (i wasn’t exactly in the spirit of some fancy, science-challenging baking), and also perfect cause it uses my tub of sour cream.

Fortunately, this coffee cake came together like a dream. And it tastes pretty dream like too, a soft, moist yellow cake topped with brown sugar cinnamon crumbs. I absolutely loved the crunch of the crumb against the soft cake. It’s like having a cookie over the cake, and the brown sugar just makes it so flavourful and aromatic.
And unlike most crumbs which require you to cut your butter into the sugar and flour, this recipe calls for melted butter, another win!

But what i love most about this recipe, is the ratio of that wonderful brown sugar crumb with respect to the cake. Basically, you crumble your crumb dough over your cake batter, making sure to cover every little surface, press it down, and you will still be left with enough crumble dough to go over that entire surface for the second, or third time!

And trust me, you do want every little piece of that crumbly bits. 🙂
New York Style Coffee Cake
Recipe taken from buns in my oven who adapted from Baked Explorations
For the crumb topping:
- 1 cup firmly packed brown sugar
- 1/2 cup granulated sugar
- 1/2 teaspoon salt
- 1 1/2 tablespoons cinnamon
- 1 cup (2 sticks) melted butter
- 2 1/2 cups all-purpose flour
For the cake:
- 2 1/2 cups all-purpose flour
- 3/4 teaspoon baking powder
- 1 teaspoon baking soda
- 1/2 teaspoon salt
- 12 tablespoons (1 1/2 sticks) butter
- 1 1/2 cups granulated sugar
- 2 large eggs
- 1 1/4 cups sour cream
- 1 teaspoon vanilla extract
Preheat the oven to 350 degrees. Butter the sides and bottom of a glass 9×13 pan. You can use a metal pan, but the edges may get a bit crispy.
To make the crumb topping, mix both sugars, salt, and cinnamon in a medium bowl. Add the melted butter and whisk until combined. Fold in the flour until it is absorbed. Spread out a large sheet of parchment paper on the counter and spread this mixture out on the parchment paper to dry while you make the cake mixture.
To make the cake, sift the flour, baking powder, baking soda, and slat together in a medium bowl and set aside.
Cream the butter until it is smooth and ribbonlike in the bowl of a stand mixer fitted with the paddle. Scrape down the bowl and add the sugar. Beat until fluffy. Add the eggs, one at a time, and beat until incorporated. Scrape the bowl and mix again for 30 seconds. Add the sour cream and vanilla and beat just until incorporated. Add the dry ingredients in three parts, scraping down the bowl before each addition, beaiting only until it is just incorporated.
To assemble the cake, pour the batter in the prepared pan.Use your hands to scoop up a handful of the topping and make a fist. The topping should hold together. Break off in chunks and drop them over the cake. Repeat to use all the topping. Remember, the topping layer will look very thick.
Bake the cake for 45 to 55 minutes, or until a toothpick inserted in the middle comes out clean. Rotate the pan two times during the baking process. Cool the entire pan on a wire rack for 30 minutes before serving.
The cake will last for 3 days, tightly covered, at room temperature.
Vanilla Cupcakes with Salted Caramel Frosting

‘Please don’t scrape away this frosting’ i thought to myself as i spread the caramel buttercream onto each of these cupcakes. It seems almost habitual for my family members to scrape away the bad, unhealthy frosting as they eat cupcakes, layered cakes or even filled cookies. I don’t blame them, i do that myself, but i am at least diplomatic enough to leave a decent amount of frosting to know its flavour, taste and texture.

You can pretty much imagine my delight when i see a naked half eaten cupcake. Naked, becase all of its frosting had been eaten, as opposed to pushed to the side of the plate. The half bitten cupcake lay undressed, and abandoned.
This must have been some pretty good frosting for my family member (my sister actually) to change her eating habit, and sacrifice that extra calories! And that is a major breakthrough for me.I know i am probably not convincing you enough with the pictures here. The colours are a bit on the pale side, hardly caramel-like. I guess i must have been too chicken to take the sugar to a further amber brown as i was making the caramel. But trust me, even its ghastly shade, the caramel flavour was definitely present, although not as much as it should have been. Hopefully on my next attempt, i would be gutsy enough to take that heat and sugar relationship to a deeper, darker level.

So for these cupcakes, i have decided on a lil sprinking of crushed caramel candies, and a drizzle of caramel sauce. Just because i am a firm believer that nothing goes better on caramel than MORE caramel. LOL.

Vanilla Cupcakes with Salted Caramel Frosting
Taken from the parsley thief ( Thanks so much for sharing! )
Cupcakes:
2 cups cake flour
2 teaspoons baking powder
1 teaspoon salt
1 1/2 sticks unsalted butter, softened
1 1/2 cups sugar
seeds from 1 vanilla bean
2 large egg whites
2 large eggs
3/4 cup whole milk
Preheat the oven to 350 degrees. Line 2 muffin pans with paper cups.
Whisk the flour, baking powder & salt in a bowl. Set aside. Beat the butter in a mixer, fitted with the paddle attachment, on medium speed, until light & fluffy. Add the sugar & vanilla seeds, beat until combined. Add the egg whites & then the whole eggs, one at a time, beating after each addition. Scrape down the bowl, as needed. Add the milk & beat to combine. Turn the mixer down to low & slowing add the flour mixture. Beat until just incorporated.
Pour the batter into the paper liners, until 1/2 full. Bake for about 18 minutes, rotating the pans halfway through the cooking time, until a toothpick inserted in the center comes out clean.
Let the cupcakes cool on a wire rack completely before frosting.
Frosting:
1/4 cup sugar
2 tablespoons water
1/4 cup heavy cream
1 teaspoon vanilla extract
1 1/2 sticks unsalted butter, softened
1 teaspoon kosher salt
1 cup powdered sugar
Combine the sugar & water in a small saucepan. Bring to a boil & cook, without stirring, until it turns a dark amber color, about 6-7 minutes. Remove from the heat & slowly stir in the heavy cream & vanilla. The mixture will bubble up quite a bit, so do this slowly, stirring as you pour! Set aside until cool to the touch.
Beat the butter & salt in a mixer, fitted with the paddle attachment, on medium speed, until light & fluffy. Reduce the speed to low & add the powdered sugar. Beat until completely incorporated. Turn off the mixer, scrape down the bowl & pour in the caramel. Turn the mixer back on & beat until light & fluffy, about 2 minutes. Transfer the frosting to an airtight container & chill for at least 45 minutes before using.
Note: The frosting can be made ahead of time & stored in an airtight container for up to 7 days. Let the frosting come to room temperature before using.
Lastly, do head over to the parsley thief for a more accurate shade of the caramel frosting and for the most pretty pictures!
Merry Christmas!
Just logging in to wish every one a happy happy christmas admist all the christmas mess and share two cakes i have baked.

Swiss roll cake coated with white chocolate whipped cream, and surrounded by a wreath of green tinted marshmallow cornflakes. 🙂

A 30th Birthday Sponge cake with white chocolate whipped cream and decorated with retarded oreo critters.
A lil Christmas Baking
A mini post on other Christmas related bakings i’ve done 🙂
1. Christmas Biscottis
While biscottis are traditionally dunked in tea, or coffee, these are good enough to be eaten on its own. Crushed candy canes are mixed into the biscottis batter for an added touch of sweetness to the otherwise plain tasting biscottis. I’ve done this cookie two ways, one is to dip them in melted white chocolate and sprinkle them with more crushed candy canes:

And another is to drizzle some white frosting on them and sprinkle even more candy canes!

A lil note though, the candy canes will lose their crunch and get a bit sticky after a while. But that didnt bother me as they were still delicious.
Recipe from Annie
Ingredients:
2½ cups all-purpose flour
1½ tsp. baking powder
¼ tsp. salt
8 tbsp. unsalted butter, at room temperature
½ cup sugar
3 large eggs
2/3 cup finely chopped peppermint candies, plus extra for garnish
14 oz. white chocolate
Directions:
Preheat the oven to 350° F. Line a baking sheet with parchment paper or a silicon baking mat.
In a medium mixing bowl, combine the flour, baking powder and salt; stir briefly with a fork to combine. In the bowl of a stand mixer fitted with the paddle attachment, beat together the butter and sugar on medium-high speed until well combined, about 2 minutes. Beat in the eggs one a time, mixing well after each addition. Add in the dry ingredients and mix on low speed just until incorporated. Fold in the 2/3 cup crushed peppermints with a rubber spatula until evenly incorporated.
Evenly divide the dough into 4 portions. Form each into a 9″ by 1½” log on the prepared baking sheet, spaced evenly. Bake until the cookies are light golden brown on top, about 18-20 minutes. Remove the pan from the oven and let cool for 10 minutes on the cookie sheet. Reduce the oven temperature to 325° F.
After the logs have cooled for 10 minutes, use a sharp serrated knife to cut the logs into ½-inch slices on the diagonal. Arrange the cut pieces on the baking sheet, laying on one of their cut sides so one cut side is facing up. Bake for 15 minutes more, until the cookies are light golden brown and crisp. (They may seem a bit soft, but will firm as they cool.) Transfer to a cooling rack to cool completely.
Once the biscotti have cooled, melt the white chocolate in the top of a double boiler. Dip one half of each cookie in the chocolate, shake gently to remove the excess, and transfer to a baking sheet or work surface lined with wax paper. Sprinkle with extra crushed candy canes while the chocolate is still wet. Let stand at room temperature until the chocolate has set completely. Store in an airtight container.
2. Cranberry Bliss Bar

The cranberry bliss bar is a Starbucks breakfast favourite it seems, but the truth is, i have never tasted the ones sold there before. The Starbucks here (Indonesia) don’t have it on the menu! But if the ones sold taste anywhere as good as these, i could definitely relate to why they are such a hit.
The base of these bars are subtly flavoured with ginger and studded with cranberries and white chocolate. They are then topped with a lemony cream cheese frosting before being piped with a sugared icing.

Between the white chocolate vs cranberries, or, the cream cheese frosting vs the sugary icing, these bars are a good balance of sweetness and tartness. These will definitely zest up your mornings and double up as good wake up calls!
Recipe from Megan
Cranberry Bliss Bars
see on Brownies for Dinner, originally from My Little Mochi
(printable recipe)
Bars:
1 cup (2 sticks) butter, softened
1 1/4 cups brown sugar
3 eggs
1 1/2 teaspoons vanilla
1 teaspoon powdered ginger
1/4 teaspoon salt
1 1/2 cups all-purpose flour
3/4 cup dried cranberries, chopped
6 ounces (about 3/4 cup) white chocolate chips (or chopped white chocolate)
Frosting:
4 ounces cream cheese, softened
3 cups powdered sugar
4 teaspoons lemon juice
1/2 teaspoon vanilla
1/3 cup dried cranberries, chopped
Drizzling Icing:
1/2 cup powdered sugar
2 tablespoons vegetable shortening
1-2 tablespoons milk
Preheat oven to 350 degrees. Grease a 9×13 pan and set aside. In a medium bowl, cream the butter and brown sugar until smooth. Add eggs, vanilla, ginger, and salt and mix well. Gradually add flour and mix until smooth. Stir in cranberries and white chocolate. Pour the batter into the greased pan, using a spatula to evenly spread the batter in the pan. Bake 30-40 minutes, until edges are light brown and a toothpick inserted in the center comes out clean. Allow to cool completely before frosting.
Frosting:
Beat the cream cheese, powdered sugar, vanilla and lemon juice until completely smooth. Spread on the completely cool cake. Sprinkle the top with cranberries.
Drizzling Icing:
In a small bowl, whisk together 1 Tbsp of milk, powdered sugar, and vegetable shortening. Gradually add more milk until the icing has a thick but drizzly consistency. I used closer to 2 tablespoons. Put the icing into a ziploc bag and snip off a tiny bit of the corner. Drizzle the icing on top in zig-zags.
Cut into squares or triangles and enjoy!
3. Chocolate Hearts with Crushed Christmas Candies
These are yogurt cakelets made in a heart shaped pan, dunked in melted dark chocolate and sprinkled with christmas candies. The yogurt cakelets are incredibly moist and dense, but most importantly they pop out prettily from the pan 🙂

These are better refrigerated as the candies and the chocolate will get melty and sticky after a while. But i am definitely liking the dark chocolate contrast against the candies.

Recipe from Kirbie
Ingredients
1 1/2 cups all-purpose flour
1 tsp baking powder
1/2 tsp salt
1 cup vanilla yogurt
3/4 cup sugar
3 large eggs
1/3 cup vegetable oil
Directions
1. Preheat the oven to 350 degrees F. Grease and flour the cakelet pan.
2. Sift together the flour, baking powder, and salt into 1 bowl and set it aside.
3.
In another bowl, whisk together the yogurt, sugar, and eggs. Slowly whisk the dry
ingredients into the wet ingredients. With a rubber spatula, fold the
vegetable oil into the batter until well incorporated.
4. With a
spoon fill the cake pan with the cake batter about 3/4 full. Do not over fill it. Bake
in the oven for about 20 minutes, or until a cake tester comes out clean and
cake is lightly brown.
5. Remove from cake pan
once it is completely cool
With that, I would like to thank Annie, Megan and Kirbie for sharing the wonderful recipes! Happy Christmas everyone!
12 Weeks of Christmas Cookies, Week #12 – Potato Chips Christmas Tree
It’s official. This is the last week of 12 WOCC, and i can’t tell you enough how much i loved and thoroughly enjoyed each of the 12 weeks.. I’ve gotten to know so many talented and creative bloggers out there, and seen so many of their inspiring cookies. I do sincerely hope that this event will continue next year, and i do hope that i am still actively baking and blogging then. 🙂 Once again, my thanks go to Abby for organizing the lovely event!

Anyways, for my final week, i made another Christmas tree. This time, with potato chips, and it looks something like this.

I was eating a bag of chips when i noticed how each chip is shaped like a leaf. I have also observed an on going trend of potato chips dipped in chocolate. And combining two and two, this tree idea got stuck to my head.
The idea is really simple. First thing first, i baked a blondie batter in a cone shaped vessel.

Why blondie batter ?
Cause i wanted something sturdy, which is able to stand up on its own and hold the weight of the potato chip “leaves”. I didn’t want any of that rising butter cakes and sponge cakes get. I also didnt want a brownie batter*, as a brownie batter, with its high chocolate content might be too fudgy and wet for this structure.
*Believe me or not, blondies are actually brownies, without chocolate. LOL.
Do take note though, the batter will probably take more time to bake cause of the shape of the vessel which has lesser surface area and thus less heat contact. Also, be sure to have something sturdy to prop the vessel while baking ( I used a square loaf tin)
Next, we slather buttercream onto the tree core.

Be generous with the buttercream. It will act as a “glue” for the leaves.
Then we stick on the “leaves”.
Wait, WHAT leaves?
White chocolate dipped leaves of course. White chocolate because i wanted a white Christmas tree. I couldn’t imagine a brown Christmas tree using milk or dark chocolate.

It’s really easy these leaves, just drop the potato chips into the melted white chocolate, fish it out and let it dry. I microwaved my white chocolate with a little bit of shortening, to thin it down a bit. I didn’t want the white chocolate coating to get too thick and weigh down the leaves.


Once we the tree is in full bloom, we go on to decorations, for what is a Christmas tree without the decorations?I decided that since the leaves are already so elaborate, decorations should be kept at a minimum. I didnt want the decorations to diminish that full bloom, leafy effect. It was just a matter of sticking a few mini M&M’s strategically. My leaves were only semi dry by then, my M&M’s readily stuck to each leaf. However, if ur leaves were already dried up, u might need to dip the underside of the M&Ms in more white chocolate to get it to stick.

And there you have it, My Potato Chips Christmas Tree. Place these tree on the dining table during Christmas dinner and watch spring turn to fall as guests help themselves to the leaves. Do make extra leaves and replenish the bald patches as the evening go by, and come dessert time, slice up the tree core of a blondie and distribute them around! Merry Christmas!
Blondie Recipe
8 TBS unsalted butter, melted ( 1 stick)
1/2 C packed light brown sugar
1/3 C granulated sugar
1 large egg
1tsp pure vanilla extract
1 C AP flour
1 tsp salt
1. Preheat oven to 350 F. Brush an cone shaped baking pan with butter. Line pan with a piece of parchment paper, leaving a 2 inch overhang on two sides. Grease paper
2. In a large bowl, whisk butter and sugars until smooth. Whisk in egg and vanilla. Add flour and salt, mix until just moistened ( do not overmix ). Transfer batter to prepared pan, smooth the top with a spatula.
3. Bake 40- 45 minutes, or until top is golden brown and a toothpick inserted into the center comes out clean. Set pan on wire rack and let cool completely. Using parchment overhang, lift the brownies from the pan and transfer to a cutting board.
Swiss Meringue Buttercream From Martha Stewart
* Note i scaled down the recipe to using 2 egg whites.
- 2 1/2 cups sugar
- 10 large egg whites
- 4 cups (8 sticks or 2 pounds) unsalted butter, cut into pieces
- 2 teaspoons pure vanilla extract
Directions
- Place sugar and egg whites in the heat-proof bowl of an electric mixer. Set bowl over a pan of gently simmering water, and whisk until sugar has dissolved and egg whites are hot to the touch, about 3 minutes. Test by rubbing the mixture between your fingers; it should feel completely smooth.
- Transfer bowl to mixer stand. Using the whisk attachment, beat on high speed until mixture has cooled completely and formed stiff and glossy peaks, about 10 minutes.
- Add the butter, one piece at a time, and beat until incorporated after each addition. Don’t worry if the buttercream appears curdled after all the butter has been added; it will become smooth again with continued beating. Add vanilla, and beat just until combined.
- Switch to the paddle attachment, and beat on the lowest speed to eliminate any air pockets, about 5 minutes. If using buttercream within several hours, cover bowl with plastic wrap, and set aside at room temperature in a cool environment. Or transfer to an airtight container, and store in the refrigerator, up to 3 days. Before using, bring buttercream to room temperature, and beat on the lowest speed with the paddle attachment until smooth, about 5 minutes.
Almond, Orange, and Cranberry MiniCupcakes

Almond, Orange, Cranberry Cupcakes. Geez, the title itself is already a mouthful isn’t it? There is the fruits, and the nuts all rolled into a medley. But fret not, despite the jumbled mess of a name, this will work just fine.

These cupcakes might take a lil bit more fostering than the average cupcakes. It’s not just a matter of throwing in a bunch of chocolate chips, or a handful of nuts.
The oranges have to be zested, and the cranberries chopped, and then soaked.

And let me tell you about these soaked cranberries… I soaked these cranberries in Grand Marnier, and i can’t tell you enough how wonderfully plump and flavourful each cranberry became. It was like biting into mini bursts of delight, fruity, full-bodied, and fragrant. I think Grand Marnier is fast becoming a baking favourite.

A lil downfall in these soaked cranberries though, literally. The cranberries get heavy, and they sink downward. Although some did manage to stay afloat, most of them made their way south. I know i should have chopped the cranberries smaller, and pat them dry, or sprinkle a lil flour before dumping them into the batter. But i guess i got a lil lazy. Lesson learnt.

Let me go on to marvel at the cake now. In case you were wondering, the dark shade of this cake is brought about by the glorious brown sugar. And just by having brown sugar, these cupcakes by default are delicious. I love brown sugar, and i have come to notice a trend with it. Brown sugar baked goods somehow get more flavoursome and all the more luscious with time. These cupcakes taste better on the second day, so i guess that kinda challenges that cliche “fresh from the oven” slogan so overused today eh?
Anyways, for the recipe, i have adapted Pastry Girl’s Apricot, Orange, and Almond Mini Cakes and subbed the Apricots for Dried Cranberries. And in case you havent already, do head over to her blog for the most amazing display of desserts. Her pictures of stunningly gorgeous! Thanks Anita for sharing the recipe!
Apricot, Orange, and Almond Loaf Cakes
adapted from Carole Bloom’s Bite-Size Desserts
makes 12 4″x 2 1/4″ loaves
2/3 cup (4 ounces) dried apricots, finely chopped (i used dried cranberries)
2 tablespoons Grand Marnier
2 cups (9 ounces) flour
1/2 teaspoon baking powder
1/4 teaspoon baking soda
1/4 teaspoon salt
6 ounces (1 1/2 sticks) unsalted butter, room temperature
3/4 cup (5 ounces) sugar plus extra for sprinkling
3/4 cup (4 1/2 ounces) light brown sugar
2 extra-large eggs, room temperature (I used large and it turned out fine)
1 extra-large egg yolk, room temperature (same as above)
1 teaspoon vanilla extract
1/4 teaspoon orange extract
zest of 1 orange
1/2 cup buttermilk
1/3 cup sliced almonds
Preheat oven to 325 degrees F. Spray twelve mini loaf pans with cooking spray and place on a baking sheet.
Combine apricots and Grand Marnier in a small bowl, cover with plastic wrap, and let marinate for 15 minutes.
Sift flour, baking powder, baking soda, and salt together in a bowl and set aside.
Beat butter in a stand mixer until light and fluffy, about 2 minutes. Add the sugars and beat until well combined.
Combine eggs, egg yolk, extracts, and orange peel in a small bowl. Add to mixture and beat until well combined.
Add the flour mixture and buttermilk in three alternating additions, starting and ending with the flour mixture. Mix just until combined.
Add in the apricots and mix until combined.
Divide mixture among prepared pans, filling about 3/4 full. Sprinkle almonds and sugar over the tops.
Bake for 30-35 minutes, until a toothpick inserted in the center comes out clean.
Let cool on wire racks before serving.
Peanut Caramel Topped Brownies

Bakers who have been baking along Tuesdays with Dorie should be able to identify this cake straight away. This cake/ brownie just looks so strikingly different with bold whole caramel peanuts strewn over the top as topping. Quite frankly, i don’t think i have come across any other cake that looked like this.

Well, maybe my re-creation of this cake is not 100% accurate. You see, the caramel was supposed to flow down the sides of the cake as it was drizzled over the top in its semi molten state.
But i knew i was bringing this to work, and really, i would do much better if i didn’t have to deal with all the gooey, sticky caramel-ey mess no matter how delicious it promised to be. So i cooked the caramel a lil further, and let it cool a bit to set before i spooned the peanuts onto the cake.

Now, that looks pretty neat and orderly. I was actually quite glad i was able to coax the peanut/caramel combo into staying on top of the cake instead of having them slide down the sides.

Now, lets get a closer look at that complying topping. This topping is part crunchy from the peanuts, and part chewy from the caramel and ALL awesome.
Peanuts (apart from peanut butter) are probably the least used nuts in the baking world. I’ve seen recipes calling for walnuts, almonds, hazelnuts, pistachios, etc, but only a couple that call for peanuts. But despite being underrated, the peanuts really showed the world a thing or two here.

Now lets get on to the brownie part shall we?
This brownie was cake like, soft and moist. It was lighter than most brownies, which complemented the topping rather well. A dense fudgy brownie would probably have made this dessert too cloyingly rich. The brownie was also very easily put together involving just a few simple whisking. There is no need to pull out your heavy machineries here. Pheww!

The brownie rose pretty well too, almost reaching to the brim of my springform. That’s quite an achievement for a cake batter that didnt require any beating. I also liked the spongy texture of the brownie that probably resulted from all that rising.

On a lil side note though, while the caramel didn’t leave its trails in a sticky mess this time, i would probably want that the next time if i were to bake it again. While this semi hardened caramel was good. I think the original chewy, sticky, gooey would be better. Just saying. 🙂
While i have a copy of Baking From My Home to Yours on my bedstand, i couldnt resist but hit the print button for the recipe from The Curvy Carrot who happened to have baked this recently. I wasn’t exactly looking forward to lugging the book to my kitchen have even more undesirable stains on the poor book! So here goes!
Caramel-Peanut-Topped Brownie Cake (Recipe taken from The Curvy Carrot) thanks so much for sharingg!
Servings: 10
Ingredients
For the cake:
1 cup all-purpose flour
1 teaspoon baking soda
1/4 teaspoon salt
1 stick (8 tablespoons) unsalted butter, cut into 8 pieces
5 ounces bittersweet chocolate, coarsely chopped **(I just used Ghiradelli bittersweet chocolate chips….oh Ghiradelli…..sigh….)
3 large eggs
1/2 cup (packed) light brown sugar
1/4 cup sugar
3 tablespoons light corn syrup
1/2 teaspoon pure vanilla extract
For the topping:
2 cups sugar
1/2 cup water
1 and 1/2 tablespoons light corn syrup
2/3 cup heavy cream
2 tablespoons unsalted butter, at room temperature
1 cup salted peanuts
Instructions
1. For the cake: Center a rack in the oven and preheat the oven to 350 degrees.
2. Butter an 8-inch round springform pan, dust the inside with flour, tap out the excess and line the bottom of the pan with a piece of parchment paper.
3. Put the pan on a baking sheet lined with parchment paper.
4. Whisk the flour, baking soda and salt together.
5. Set a heatproof bowl over a saucepan of gently simmering water.
6. Add the butter and chocolate to the bowl and heat, stirring occasionally, until the ingredients are just melted.
7. Remove the bowl from the heat.
8. In a large bowl, whisk the eggs and sugars together until well blended.
9. Whisk in the corn syrup, followed by the vanilla.
10. Whisk in the melted butter and chocolate.
11. Still working with a whisk, gently stir in the dry ingredients, mixing only until they are incorporated.
12. Pour the batter into the prepared pan and spread until even.
13. Bake the cake for 40-45 minutes, or until a thin knife inserted into the center comes out almost clean.
14. Transfer the pan to a rack and cool the cake for 15 minutes, then run a blunt knife between the cake and the pan and remove the sides of the pan. Cool the cake to room temperature.
15. When the cake is completely cool, invert it, remove the base of the pan and peel off the paper. Wash and dry the springform pan, and return the cake to it right-side up. Refasten the sides.
16. For the topping: Put the sugar, water and corn syrup in a medium heavy-bottomed saucepan, stir just to combine the ingredients, and put the pan over medium-high heat on the stove.
17. Heat, without stirring, until the caramel turns deep amber (mine was the color of light beer….test it on a white plate if you are unsure), about 5 to 10 minutes (depending on your stove and pan). As the sugar is caramelizing, wipe down any splatters on the sides of the pan with a pastry brush dipped in cold water.
18. Lower the heat a bit, and standing back from the saucepan, add the cream and butter. (BE CAREFUL…IT IS HOT AND WILL BUBBLE AGGRESSIVELY.)
19. When the caramel calms down a bit, stir to dissolve any lumps.
20. Add the peanuts and stir. Transfer the hot mixture to a 1-quart Pyrex measuring cup or a heat-proof bowl.
21. Spoon the peanuts over the top of the cake, and then pour enough caramel to cover the peanuts and top of cake completely. You may have leftover caramel.
22. Allow the topping to set at room temperature about 20 minutes or so.
23. When ready to serve, run a blunt knife around the edge of the springform pan and remove the sides.
Source: Baking: From My Home To Yours by Dorie Greenspan.
Blueberry Chiffon Cakes
I am kind of having mixed feelings about chiffon cakes. Though most of the time, i enjoy the light, cottony soft texture, of the chiffon, sometimes though, i feel like i needed something more substantial. Something with more oomph, or something richer (think dense fudgy brownies).
So i tried spicing things up with my blueberry chiffons two ways. One to have it studded with blueberries, and another decorated with fresh blueberries, whipped cream and some icing.
The studded:

Fresh blueberries were folded into the batter before it was poured into the pan.

I for one absolutely adore how the blueberries peeked out of the cake, adding some colours to the otherwise plain brown cake.

A common problem with adding fresh fruits to a chiffon batter, is to have all the fruits sinking down south. Unfortunately, mine sank too. But not entirely, some lucky one managed to stay afloat, but most of them crowd within the bottom half of the chiffon.

Besides sinking, the blueberries also seemed to form mini caves around themselves. I am not entirely sure why this happens. It doesnt seem to apply only to fruits for i have seen cheese forming the same holes within breads. Anyone shed some light ?
Taste wise, the berries provide an unexpected burst of tartness, which go pretty well against the sweetness from the cake. It also added a bit of moistness. I also liked how the colours from the blueberries bled, creating splotches of purplish blue.
Next,
The Decorated:

As the chiffon is incredibly soft, i was not left with much choices when it comes to frosting this cake.
I settled on decorating half the cake with freshly whipped cream and fresh blueberries, and the other half with white sugar icing drizzled over fresh blueberries. Both were light enough for the chiffon to handle. Fortunately.

I also left the batter plain this time. I feel like i shouldnt crowd the cake with too many things and overshadow the chiffon.
So after all that, which is my fave way of eating the chiffon?
I would say i liked my chiffon with the whipped cream. It added an extra moistness to the cake, without overpowering it. 🙂
For the recipe, i have used Kokken69‘s (Thanks so much for sharing!). She has the most beautiful pictures in her blog.
Recipe : Adapted from Kokken69
Sugar 55g
Corn Starch 5g
Water 12g
Grapeseed Oil 36g (or any other neutral oil e.g. canola oil)
Blueberry puree 50g
Lemon juice 6g
All purpose flour55g
Sugar 10g
Blueberry 30g (blueberry should be cut into very small pieces and dried with a kitchen towel. Best option would be dried Blueberry)
1. Heat oven using convection mode to 160C.
2. In a mixing bowl place egg yolk, blueberry puree, water, oil, lemon juice and sugar. Beat the mixture under well mixed and sugar is completely dissolved. (I do this by using a hand whip)
3. Sift flour into egg yolk mixture and mix well.
4. In a separate clean dry mixing bowl, whip egg white until foamy. Add sugar/corn starch mixture in 3 additions during whipping. Whip egg white until meringue is firm peaks.
5. Add 1/3 portion of the meringue into the egg yolk base. Use a spatula to blend egg white with egg yolk.
6.Add another 1/3 portion of the remaining meringue and blueberries into (5). Use spatula to fold egg white evenly with (5).
7. Add the remaining meringue into (6). Fold the egg white evenly with (6).
8. Pour (7) into a 17cm chiffon pan (do not oil the pan otherwise the batter will not rise).
9. Bake the cake at 160C for 30mins.
Unfolding the Chiffon
The truth is, i haven’t gotten over my cracked and sunken chiffon issues.
I have been baking and experimenting with chiffon cakes till they are ready to come out of my ears. I sent every one of the cake into the oven with high hopes each time, manipulating the temperature, and the heat source ( top vs bottom, fan or without ).
Each one has been a disappointment as they all share that undesirable cracked surface which kinda folded upon itself. And it was really heartbreaking (no pun intended) to break all that eggs into the batter of one failure after another.

I became quite obsessed with it. I think about it all the time, wondering where i have gone wrong. It was during one of these thinking sessions that it finally dawned upon me where i might have gone wrong.*cue for lightbulb moment*
From my experiments, it became quite obvious that the temperature and the heat source was not the issue. Ditto for egg whites beating and folding. I ruled each and every factor till i was left with one possibility – the BATTER. The one thing that i was sure never to go wrong.
Well, it wasn’t really the BATTER actually, it was more on the eggs, or the size of eggs. Being an avid fan of Rose Levy Beranbaum, i register my eggs in grams rather than in units. 1 egg = 50 grams. And i have followed recipes with that law without a hitch. So when the recipe calls for three eggs, i usually pop a fourth cause somehow the batch of eggs i get is unusually small. And that aha moment came when i realized that maybe, there was just too much eggs in the batter!
I scoured the net for another chiffon recipe and landed with this Red Bean Chiffon cake from Happyflour. Let me tell you something about Happyflour. She is the chiffon expert, her archive on chiffon cakes is truly amazing!
And that was when i hit my turning point. For what sat in the oven was a pretty chiffon with minimal cracks!

No more bunching, folding, cracking, ugly surfaces. No more uneven dense layer beneath the uneven surface!

Thank You so much for Happyhomebaking, HappyFlour, Kirbie, NEL, ieatishootipost and bakingfiends and everyone else for answering all my querries!
Recipe (Adapted from HappyFlour) Thanks so much for sharing!
Ingredients
3 egg yolk
20g caster sugar
2tbsp cooking oil
1/8tsp salt
75g cake flour
65g red bean paste
70g thick coconut milk
3 egg white
1/4tsp cream of tartar
60g caster sugar
Step:
1. Preheat oven to 175C.
2. Cook red bean paste and coconut milk together over low fire.
3. Set aside to cool.
4. Sift flour and salt together.
5. Use a hand whisk mix egg yolk, sugar, oil, red bean mixture and flour together.
6. Whisk until well combined. (If batter is too thick, add 1/2-1tbsp of water.)
7. Use a cake mixer and whisk the egg whites and cream of tartar till frothy.
8. Gradually add in the sugar and whisk till stiff peaks form.
9. Fold in 1/4 of the meringue into the egg yolk mixture until combined.
10.Then fold in the rest of the meringue lightly in 3 portions until well combined.
11.Pour batter into a 20cm tube pan.
12.Put into a preheated oven and bake for 40mins.
13.Remove from oven, invert cake onto table until completely cool.
14.Remove from pan and serve.
Chiffon Complication
Can anyone tell me,
Why does my chiffon tops always crack?

Or why does the said top fold and bunch up upon itself and creat a dense layer on the top of the cake?
I can pretty much overlook the crack. But the inconsistency in the texture of the cake (Heavy top), buggs me till no end.

It’s not the recipe for sure, because this happens to most of the chiffons recipes i attempt.

Of course the cake can be flipped and reversed, and the denser layer now gets hidden below.

So i can hide the failures of this cake, to get somewhat decent shots.
But that doesnt erase the fact this is a letdown. Or that i am a poor baker. *whimper*
Can someone pls help me shed some light into this mystery? pretty please?
Lil’ Miss Weird
What an odd looking dessert.
It’s green, with a dark red belly, and a head of white.
It’s not a muffin, nor a cupcake.

Whoops, where are my manners, let me get you guys acquainted.
Meet Matcha Sponge Cake.
She sandwiches Red Bean Mousse
And she sports a head of buttercream with a sprinkle of shredded white chocolate.
She tastes pretty good 🙂
Recipe from Add a little love (Thanks for sharing!)
Ingredients:
Green tea cake base
4 eggs
1 cup cake flour
2 tbsp green tea powder
2/3 cup icing sugar
1/2 tbsp baking powder
1/3 tsp salt
1/3 cup vegetable oil
1/2 cup milk
1/2 tbsp vanilla extract
1/2 tsp cream of tartar
Red bean mousse
1 cup red bean paste
1/4 cup milk
1/4 cup sour cream
1 cup whipping cream
1 tbsp lemon juice
2 tbsp gelatin
Cake topping
1 mango
1 kiwi
few cherries, and 1 strawberry
5 tbsp boiling water
1/2 tbsp gelatin
1 tbsp sugar
Directions:
The first thing to do is to preheat the oven 325F.
Green Tea Cake Base
A. Mix cake flour, green tea powder, 1/3 cup icing sugar ( another 1/3 saved for the egg white), baking powder, salt.
B. Shift through
C. Add vegetable oil, milk, vanilla extract, and egg yolks.
D. Mix well
E. Put egg white in a different bowl.
F. Beat for one minute, add the rest of 1/3 cup icing sugar, and cream of tartar.
G. Beat for few more minute
H. It is ready when the egg white does not move when put the bowl upside down.
Q. Remove the crust on the top of the cake. I over baked the cake, it is tough on the top. Normally you don’t have to remove it.
R. Use four tooth picks to center each side of the cake.
S. Cut along the tooth picks making sure that the cake is evenly cut into two slices. Same method can be used to cut three layers as well.
T. Put the bottom layer back into the baking pan. Surround it with new parchment paper.
When working with the gelatin, soak it in the water for 3 minutes, heat it up in a microwave for 1 minute. Let it sit for 3 minutes, the gelatin water will become completely clear as shown on the bottom right.
U. Beat the whipping cream until stiff.
V. Mix red bean paste, milk, sour cream, and clear gelatin water. Mix well, and then fold in the whipped cream.
W. Pour 1/3 of the red bean mix onto the first layer of the cake.
X. Drop the second layer cake, gently press it down. Then pour the rest of the red bean mix. Leave it in the fridge at least for 5 hours.
Brown Sugar Pound Cake
I almost didnt want to post this up. Let’s face it, this isnt exactly the most interesting looking cake. It is brown, plain and dull. In fact it is looking kinda ugly.

And no matter which angle i took it from, the pics just refused to come out right. I bent over my back, trying to capture it from an angle that would make it look somewhat prettier, but it didnt work. I gave up, but still uploaded it to the computer anyway, out of habit.

I took a bite of the cake. It was good. Moist, dense, and very flavourful.
I am a sucker for brown sugar, and was absolutely loving the aroma it brought to the cake.
I placed the cake in a cake stand, and left it around for the other family members to eat it. They did, each silently helping him/herself to the slice.
No one commented though, and that’s pretty common, cause i bake almost everyday, and it is quite needless for them to be commenting everyday. And i let it at that, no bothering to ask for opinions as well.
The next morning i cut myself another slice from the now much smaller cake.
The day old cake really impressed me this time. The brown sugar left DEEP marks within the cake and gave the cake such a strong personality. , and boy, that was when i decided that this post HAS to go up.

I am for that “not all that glitter is gold” thing today. For this definitely didnt glitter, but it still shone!
Recipe from nosh with me
(who adapted from L.A Times) Thanks for sharing!!
*note: I omitted the glaze as i thought the cake was sweet enough as it is
Cake Ingredients
3 cups flour
1/2 teaspoon baking powder
1/4 teaspoon salt
1 cup milk
1 teaspoon vanilla
1 1/2 cups (3 sticks) butter, softened, plus additional for greasing the pan
1 (1-pound) box dark brown sugar
1/2 cup white sugar
5 eggs
Cake Preparation
- Heat the oven to 325 degrees. Grease and flour a 10-inch tube pan.
- In a mixing bowl, combine the flour, baking powder and salt and stir with a fork; set aside. Into a small bowl, pour the milk and add the vanilla; set aside.
- With a mixer, beat the butter at high speed until light and fluffy. Add the brown sugar in three batches, then add all of the white sugar, beating after each addition. Add the eggs one by one, beating well after each addition.
- Reduce the speed to low and add half of the flour mixture and then half the milk, beating until the flour or milk has disappeared into the batter. Add the rest of the flour and the rest of the milk in the same way. Quickly scrape the batter into the tube pan and bake until the cake is nicely browned at the edges, springs back when lightly touched at the center and a wooden skewer inserted into the center comes out clean, about 1 hour and 10 minutes.
- Remove the pan from the oven and leave it on a wire rack for 20 to 30 minutes. Loosen the cake from the pan with a table knife and turn it out onto a wire rack or plate, then leave it to cool completely. When cool, glaze with caramel glaze.
Glaze Ingredients
2 tablespoons butter
4 tablespoons half and half (I used whole milk)
1/2 cup packed brown sugar
1 cup powdered sugar
1/2 teaspoon vanilla extract
Glaze Preparation
- In a saucepan over medium heat, melt the butter.
- Add milk and brown sugar, stir to combine.
- Boil vigorously for 1 minute.
- Remove from heat and beat in 1/2 cup powdered sugar.
- Cool slightly then beat in the vanilla and remaining powdered sugar, adding more milk if necessary.
- Quickly spoon over cake before glaze sets.
For a worthy cause…
Cupcakes and buttercream. Really, the possibilities are endless isnt it?


Anyways, These are for a bakesale held at my nephew’s school. Proceeds from the sale go to children from under-privilleged families with terminal diseases.
The organization “will make sure these children can live their remaning days with dignity, care and unconditional love”.
I hope my bit helped. I have nothing but best wishes for them, and of course, my prayers.
Yet another Birthday

My brother – in- law’s birthday is one day after my brother. And after that purist chocolate of a cake for the brother, i wanted another element to be featured in this next cake.
Don’t get me wrong, chocolate is still a favorite, and it’s presence is mandatory in this cake. However, for this cake, it, the chocolate content can take a backseat, and i was allowed room to introduce another ingredient.
I recounted the various times i hung out with my brother in law, and noticed an ongoing trend. Starbucks, Coffee Bean, Starbucks, Starbucks. Yup, we are dealing with a coffee buff here.

And so, the opera cake it is then!
Layers of sponge cake sandwiching alternating layers of coffee buttercream and chocolate ganache.
Winner!

No-Nonsense Chocolate Cake

With a bold statement such as “chocolate and fruits should NEVER go together”, i couldn’t for the life of me risk putting fruits into his birthday cake.
No pureed fruits into the cake batter,
No macerated fruits between the cake layers,
and not even glazed fruits to serve as aesthetic purposes.

I am talking about my purist chocolate of a brother, the Japanese based boy, who brought us the many super super cute Disney cookie cutters.
Birthday boy popped in for a visit which coincided with his Birthday. Happy Birthday Brother!

Oreo Rubble

I have been feeling a bit caught up, between muffins and cupcakes.
I wanted them to look pretty, but i didn’t want the fussy frostings.
Because, let’s admit it, each time i pack the cupcakes into a case, i have to beware of butterfinger smudges.
And each time i walk with the said loaded case, i have to walk a lil bit slower.
And i do say a lil prayer, for the weather to be just right, that it wouldn’t rain too hard, or shine too bright,
Just so that my frostings would stay upright.

But with this cupcakes, my precautions can take a mini break.
These cuppies were swiftly sweeped into an awaiting lunchbox.
And as i walk with the lunchbox, i could even afford a lil swing of my arm.
I smiled upon the heavy deluge that accompanied us the whole of this morning.

And i have to say, these cuppies are quite lookers too. Rustic, and homely, a different set of charm from its hollywood-ised, glammed up cousin with the pretty cream frostings.
So if you are like me, or Dana, who are feeling in a lil bit of a cupcake scrooge mood, this is one recipe to turn to.
Mississippi Mud Cupcakes
Taken from Dana who adapted from Cupcakes!
Makes 18-24 regular cupcakes
I used Newman’s Own for the cookies. The recipe says the yield is 18, but I got 24 – never a bad thing!
2 1/4 cups crushed chocolate sandwich cookies , in 1/2 inch to 1/4 inch pieces
1 cup (6oz.) semisweet chocolate chips
Chocolate Sour Cream Cupcake Batter (recipe follows)
3 oz. semisweet chocolate, chopped
Position a rack in the middle of the oven. Preheat the oven to 350 degrees. Line 18 muffin tin cups with paper cupcake liners.
Spoon 1 tbsp. of the cookie pieces into the bottom of each paper liner, then spoon about 8 chocolate chips over the cookie pieces in each liner. Spoon a scant 1/4 cup of batter over the chocolate chips. Sprinkle the remaining chocolate chips and cookie pieces over the tops, pressing them gently into the batter.
Bake just until the tops feel firm and a toothpick inserted in the center comes out clean, about 22 minutes. Cool the cupcakes for 20 minutes in the pans on a wire rack.
Carefully lift the cupcakes from the pan and place them on a wire rack to cool completely. Put the chopped chocolate in a heatproof bowl and place it over, but not touching, a saucepan of barely simmering water. Stir until the chocolate is melted and smooth. Remove from the water and set aside to cool slightly.
Use a small spoon to drizzle thin lines of melted chocolate over the top of each cooled cupcake. The cupcakes can be covered and stored at room temperature for up to 3 days.
Chocolate Sour Cream Cupcake Batter
This is a great basic cupcake to have in your repetoire. All kinds of frosting taste great on top.
3 oz. unsweetened chocolate, chopped
1 cup flour
1/2 tsp. baking powder
1/2 tsp. baking soda
1/4 tsp. salt
1/2 cup (1 stick) unsalted butter, at room temperature
1 1/4 cups sugar
2 large eggs
1 tsp. vanilla extract
1/2 cup sour cream
1/2 cup water
Put the chocolate ina heatproof bowl and place it over, but not touching, a saucepan of barely simmering water. Stir until the chocolate is melted and smooth. Remove from the water and set aside to cool slightly.
Sift the flour, baking powder, baking soda, and salt into a medium bowl and set aside.
In a large bowl, using an electric mixer on medium speed, beat the butter and sugar until smoothly blended and creamy, about 2 minutes. Stop the mixer and scrape the sides of the bowl as needed during mixing. On low speed, mix in the melted chocolate. On medium speed, add the eggs one at a time, mixing well until each is blended into the batter. Add the vanilla and beat until the mixture looks creamy and the color has lightened slightly, about 1 minute. Mix in the sour cream until no white streaks remain. On low speed, add half of the flour mixture, mixing just to incorporate it. Mix in the water. Mix in the remaining flour mixture unil it is incorporated and the batter looks smooth. Proceed with above recipe.
Lamb Cupcakes

I was about to type in the title of this post when i realized that i didn’t exactly know the meanings of “Lamb” and “Sheep”.
I know, I know, a kindergartener could probably put me to shame on this, but then again, in my (rather weak) attempt at defence, English is technically not my first language.
I knew that Mary had a lil’ LAMB, but i also knew that Baa Baa was a black SHEEP. And from what i can remember, both of them feature the woolly four legged animals though of different colours.
I then thought of LAMB CHOPS, and wonder why i have never had SHEEP CHOPS. And how a few days ago, how my leather expert of a friend said my wallet is “lamb-skinned” instead of “sheep skinned”.
Anyways, lets not digress too far, so is this a Lamb marshmallow cupcake, or a sheep marshmallow cupcake?
I typed in “Lamb Vs Sheep” into google and got my answer on the first item that showed up.
Lambs are baby sheeps. Lamb chops are baby sheeps served on a plate (is that tragic or wad?), and when adult sheeps are prepared, they are called mutton chops.
AAaaah. we learn something new each day, or at least i did!
I followed Martha Stewart’s Cupcakes book for this, but fortunately, she has it on her site too. Here is the online version
Baa-Baah for now!
Beetle Bug for the Lil’ Bug

It’s my nephew’s first Birthday! Happy Bday Brian!
Dispensing a lil Nutella Happiness

U know how some things don’t need introduction? That there is a general global knowledge and quite possibly a universal love toward it? I might be exaggerating, but that’s how i feel about Nutella.
I grew up with spooning Nutella straight from the jar and into my mouth, careful to always change my spoon and not double dip because i didnt want my pristine jar of Nutella contaminated.
As for these cupcakes, good generous dollops of Nutella on each was in order.
Because I didn’t say that i stopped licking Nutella off my spoon,
Because adults also need that occasional burst of sheer heaven.
And sheer heaven is what i was trying to deliver with these cupcakes.
Recipe from Khas –> She was my school mate a long long long time ago!!
If u are reading this, HI KHAS! Thanks so much for sharing the recipe!
10 tbsp (140 grams) butter, softened
Caramel Frenzy
I don’t know what came over me when i chose to embark on making these cupcakes. Baking projects like this should only be for the master bakers like Sprinkle Bakes, who probably feels that caramel making is as easy as eating them. I guess curiosity got the better of me, after my somewhat mini success with caramel on a previous incident.

But even with that as a boost, this recipe is still not for the faint hearted, as it requires you to make caramel THREE times. I don’t know how lucky you are generally in life, but for me, there is no way that i can get lucky three times in consecutive.
So making these cupcakes mean one thing, I gotta stop mucking around and pay attention to what’s going on. That’s pretty much the most important rule in the game of caramel making i guess – watching the whole process with vigilant eyes.
Triple salted caramel cupcakes ( does that sounds damn good or wad?), for the triple caramel components that make up the cake. the filling, the topping and the sugar spun decorations.

And thanks to Sprinkle Bakes’ comprehensive and detailed instructions, i think i did pretty okay. THANKS Sprinkle Bakes!
But having said that, i know i still have a long way to go. I wouldn’t exactly call that blob of candied caramel an art, and plus i guess the filling was just a tad over done judging from its colour and its slight bitter taste. For better pictures, head down to Sprinkle Bakes. Her cupcakes and pictures are nothing short of perfect!

1 teaspoon baking powder
1/4 teaspoon sea salt
1 stick of unsalted butter, at room temperature
1 cup plus 2 tablespoons packed light brown sugar
2 large eggs, at room temperature
1 teaspoon vanilla
1/2 cup plus 2 tablespoons buttermilk
3 tablespoons salted butter cubed
1/4 cup plus 1 tablespoons heavy cream, at room temperature
1/4 cup granulated sugar
2 tablespoons water
1/4 cup heavy cream
1 teaspoon vanilla extract
1 stick salted butter
1 stick unsalted butter
1/2 teaspoon sea salt
1 1/2 cups powdered sugar
Candied Salted Caramel Rounds
1 1/4 cups granulated sugar
1/4 teaspoon sea salt
3/4 cup water
2-4 tablespoons of large-crystal sugar
Lay out a large piece of parchment on your work surface and spray with cooking oil (such as canola). Fill a large tub (or your sink) partially full of ice water.
Put sugar, salt and cold water in a heavy pan; stir over low heat until sugar dissolves. Increase heat and bring syrup to a boil. Lower heat slightly and swirl the pan once or twice as the syrup caramelizes so it will color evenly; do not stir. When the caramel is deep amber, plunge the base of the pan into ice water for about 2 seconds to stop further cooking.
Working quickly, dip a spoon in the caramel and let it fall onto the parchment paper in a drizzle. Move the spoon in a circular motion as the syrup falls from the spoon. Repeat 15 times. When caramel has hardened (it will still be sticky) sprinkle on the large-crystal sugar. Remove from paper and adorn cupcakes.
Blondes have more fun Blondies

I came across this blondie recipe and was immediately enchanted by its whimsical charm.
They just look so fun and happy, kinda like eating a McDonald’s happy meal on a bright Sunday morning when you were 5.
These blondies however, were on the thin side. They were almost bar cookie like, but they still have that dense fudgy characteristic of most brownies.
My only complaint is that i live in a houseful of adults, with no kids to pack these into their lunchboxes.
But, if u happen to have a kid in handy, here goes:
8 TBS unsalted butter, melted ( 1 stick)
1/2 C packed light brown sugar
1/3 C granulated sugar
1 large egg
1tsp pure vanilla extract
1 C AP flour
1 tsp salt
1 C dark chocolate chips
1C colour coated candies
1. Preheat oven to 350 F. Brush an 8×8 inch square baking pan with butter. Line pan with a piece of parchment paper, leaving a 2 inch overhang on two sides. Grease paper
2. In a large bowl, whisk butter and sugars until smooth. Whisk in egg and vanilla. Add flour and salt, mix until just moistened ( do not overmix ). Fold in 1/2 C each of the chocolate chips and colour coated candies. Transfer batter to prepared pan, smooth the top with a spatula. Sprinkle the remaining chocolate chips and candies.
3. Bake 40- 45 minutes, or until top is golden brown and a toothpick inserted into the center comes out clean. Set pan on wire rack and let cool completely. Using parchment overhang, lift the brownies from the pan and transfer to a cutting board, Cut into 16 squares. Store bars in an airtight container for up to 2 days.
Strawberry Deluge

I know i have been baking too much with strawberries lately, but that’s what you do when u bought a gorgeous bucket of strawberries right?
You see, strawberries aren’t exactly the kind of fruit that you could leave chilling for weeks. You are lucky if you can get away with one week, before all the mildew starts to attack and firm supple-ness turns to .. squishy.
So here is a strawberry shortcake, which is made of a sliced cream scone sandwiching macerated strawberries and softly whipped cream.
The scones were somewhat crispy on the edges and soft and bread-like within the middle, making it a great vehicle to soak up all that sweetened juice from the macerated strawberry.
And the whipped cream?
It just went so well with the scone, cause sometimes, eating a scone alone might be a bit on the dry side.
A winning combination, really.
Recipe adapted from Joy of baking
Scones:
2 cups (280 grams) all-purpose flour
1/4 cup (50 grams) granulated white sugar
2 teaspoons (10 grams) baking powder
1/8 teaspoon salt
1/3 cup (76 grams) cold unsalted butter
1 large egg, lightly beaten
1 teaspoon pure vanilla extract
1/2 cup (120 ml) light whipping cream or half and half (12 – 18% butterfat)
Egg Wash:
1 large egg, lightly beaten
1 tablespoon cream
Filling:
2 pounds (900 grams) fresh strawberries, hulled and sliced
1/4 cup – 1/3 cup (50 – 65 grams) granulated white sugar (or to taste)
Topping:
1 cup (240 ml) heavy whipping cream
1/2 teaspoon pure vanilla extract
1 tablespoon (14 grams) granulated white sugar
Scones: Preheat oven to 400 degrees F (200 degrees C) and place rack in middle of oven. Line a cookie sheet with parchment paper.
In a large bowl, whisk together the flour, sugar, baking powder, and salt. Cut the butter into small pieces and blend into the flour mixture with a pastry blender or two knives. The mixture should look like coarse crumbs. Whisk together the egg, cream and vanilla extract and add to the flour mixture, mixing just until the dough comes together. Do not over mix the dough.
Transfer to a lightly floured surface and knead dough gently four or five times and then pat or roll the dough into a circle that is about 7 inches (18 cm) round and about 1 inch (2.5 cm) thick. With a 3 inch (7 cm) round cookie cutter, cut out rounds and place the scones on the baking sheet. Make an egg wash of one well-beaten egg mixed with 1 tablespoon cream and brush the tops of the scones with this mixture.
Bake for about 15 – 20 minutes or until nicely browned and a toothpick inserted in the center of a scone comes out clean. Transfer to a wire rack.
Filling: Wash and slice the strawberries. Place about one third of the strawberries in a large bowl and crush them with a potato masher or fork. Add the remaining sliced strawberries, along with the sugar. (The amount of sugar used will depend on how sweet the berries are.) Set aside to macerate at room temperature for about 30 to 60 minutes.
Whipped cream: In a large mixing bowl place the whipping cream, vanilla extract, and sugar and stir to combine. Cover and chill the bowl and beaters in the refrigerator for at least 30 minutes. When chilled, beat the mixture until stiff peaks form. The whipped cream will hold for several hours in the refrigerator.
To serve: Cut the scones in half and place the bottom half of the scone (soft side up) on a dessert plate. Top with some of the strawberries and whipped cream. Place the top half of the scone on the strawberries. Top with whipped cream and a few more strawberries. If there is any juice from the strawberries, drizzle a little over the top of the scone. Serve immediately.
Serves about 8 people.
100% Natural Strawberry Chiffon Cake

I used natural pureed strawberries for this chiffon cake, and i feel really good about that.
It’s baked in my own little kitchen, away from the world of synthesized and unnatural food ingredients.
Just for this once.
Maybe this cake felt the love coming from all that goodness decided to stand tall with pride.
It’s quite an improvement from its stouter, denser predecessor.
I was beaming with pride when it didn’t sink, well, not that much anyway, when it was removed from the oven.
I had to remind myself, it is just cake, not exactly rocket science and promptly instructed my elevated spirit to come back down.
Tomorrow, i will rejoin the world in its commercialized, preserved, chemical-ful food circulation, cause i am realistic, and i am painfully aware of the impossibility, and the financial burden of using organic, natural products all the time.
So until i start my own farm or strike the lottery, i will still gladly eat SPAM off its can.
Recipe adapted from bakingbites:
Strawberry Chiffon Cake
2 1/4 cups sifted cake flour
1 1/2 cups sugar, divided
1 tbsp baking powder
1/4 teaspoon salt
3/4 cup pureed fresh strawberries (about 1 heaping cup berries)
7 tbsp vegetable oil
1 1/2 teaspoons vanilla extract
7 large egg yolks
7 large egg whites, at room temperature
Preheat the oven to 325F. Take out a 10-inch tube pan, but do not grease it.
In a very large bowl, whisk together the flour, 1 1/4 cups sugar (reserving 1/4 cup), baking powder and salt.
In a medium bowl, whisk together the strawberry puree, vegetable oil, vanilla and egg yolks until well combined, then pour into the dry ingredients and whisk until just smooth and no streaks of dry ingredients remain.
In another large bowl, using an electric mixer, beat the egg whites to stiff peaks, gradually adding in the remaining 1/4 cup of sugar as you go.
Once the egg whites have reached stiff peaks (better to be a bit softer than to overbeat them), gently whisk 1/4 of the egg whites into the strawberry batter to lighten it. Gently, working in two or three additions, fold the remaining beaten whites into the strawberry batter, folding until no streaks of egg white foam remain visible and the batter is a uniform color. Be sure to scrape the sides and bottom of the bowl well.
Pour into the ungreased tube pan and bake for 50-60 minutes, until the top of the cake springs back when gently touched and a toothpick inserted into the center comes out clean.
Invert cake over a bottle (or onto a wire rack if your pan has “feet” to hold it up) and let cool completely. Once cooled, run a knife around the edges and turn cake out onto a serving platter. Store in an airtight container.
Serve plain or with whipped cream and fresh strawberries.
Makes 1 cake; Serves 12-14
Pandan Sponge Cake

This is supposed to be a chiffon cake, but i wouldn’t go so far so as call it that.
See, this cake is a little bit height challenged, it doesnt reach out for the skies the way chiffons do.
A bummer really… i wanted to just pass it on to whoever would eat it and forget about the whole cake.
But, it is such a pretty colour.
And despite it being slightly on the denser side, it is quite counsellingly soft and moist.
So i picked up my spirit (which kinda sank along with the cake), and my camera and let the cake gave me its last best shot, literally.
As for me, i guess it’s time to really dissect the arts of making chiffon.
Mini Cakelets

If i could describe a characteristic for these cakelets, it would be unpretentious.
Their simple and honest goodness is a fresh change from all the jazzed up cupcakes of today.
I feel like i have somewhat travelled back to a time where things were waaay more simpler, where recipes don’t run to a couple of pages long, or when women from the movie stepford wives would don on their floral aprons to bake these cakes..
Okay, that was totally random, but it’s just a thought.
If you have got a couple of minutes to spare, give this cake a try.. i promise, this cake would bake out in record time!
Try it! Recipe from Here
Papi’s Birthday

Papi. That’s how we call our dad.
I don’t exactly know which language it derived from, but from young, it has always papi.
And on this special day, it’s papi’s birthday. It’s special, and i wasn’t about to show up with a birthday cake to showcase my inferior piping skills.
This cake is pretty ingenious. It doesn’t condemn you for having retarded piping skills and yet somehow, it still manages to look somewhat gorgeous.
Happy birthday papi, i know i don’t make the prettiest cakes, but i still demand an “A” for the effort.
Fruit Pastry Cake

With all the raves that’s been going on about this cake, i couldn’t turn a blind eye to it.
Type the words fruit pastry cake and u will see many, many, many versions of it.
And it doesnt hurt one bit that this cake, in however way u choose to decorate it, always turns out so effortlessly pretty.
So, this morning, i decided to hop on the bandwagon…
It was a good decision.
This cake delivers everything that the other food bloggers promised – Soft, moist, tender crumbed and …. sweet..
too sweet in fact.
No biggie with that. Just hold back on the sugar and we are good to go.
Although it’s almost a norm to use blueberries, strawberries and peach, i deviated a wee bit by using pineapples.

Aside from that,i followed adhered strictly to the recipe.
A baking addict who loves to give away all her baked products to willing (or unwilling) recipients to make room for more baking. i would love to hear from you! Email me at twilightzky@hotmail.com
Flickr Photos


Foodgawker

Paperblog

Yummy

